MotionLayout教你轻松玩转动画

MotionLayout教你轻松玩转动画

Rouse
发布于 2023-02-14 11:16:48
发布于 2023-02-14 11:16:48
Rouse
读完需要
15
分钟
速读仅需 5 分钟
如果你还不知道MotionLayout,亦或者你知道但一直都没实际用过,那么在这里将带你全面体验MotionLayout的神奇、简单与高效。
相信你之后做动画就会对它恋恋不舍。
通过这篇文章,你将会明白关于MotionLayout的如下几个要点:
- MotionLayout是什么?
- 将MotionLayout添加到项目中并使用
- MotionScene
- ConstraintSet
- Transition
- CustomAttribute
MotionLayout是什么
首先我们来介绍一下MotionLayout,它是google推出的一种实现动画的布局view,基于ConstraintLayout为基础,可以让开发者直接通过xml布局的方式来轻松实现动画。
这里可能就有人会问,它与传统的动画又有什么不同呢,或者它的优势在哪里?
首先我们传统的动画会有以下几种:
- 矢量动画
- 属性动画
- LayoutTransition动画
- 一些封装控件提供的动画能力,例如CoordinatorLayout
这些可能是我们用的比较多的,各自都有自己的使用场景,但MotionLayout却基本兼容了它们的使用场景,也就是说,MotionLayout是它们的结合体。
它能够自定义属性,来实现属性动画的特征;可以使用TransitionManager来实现界面的过渡动画,同时也可以结合CoordinatorLayout,来实现特效动画。
除此之外,MotionLayout在Android Studio中做了完美优化,提供了它专有的工具,能让开发者通过界面化的方式来更好的实现动画效果。
当然它也有一些局限性,例如
MotionLayout只能针对自己的直接子view进行操作,与TransitionManager不同的是,TransitionManager可以作用于其他的嵌套布局,灵活性更高。
将MotionLayout添加到项目中并使用
如果你项目中已经使用了ConstraintLayout,只要版本不是很低就无需新增依赖,可以直接使用。
如果没有的话,需要增加一下依赖:
androidx.constraintlayout:constraintlayout:2.1.4
由于MotionLayout是基于ConstraintLayout的,所以我们只要有ConstraintLayout依赖即可。
现在我们就可以直接在项目中使用了
<?xml version="1.0" encoding="utf-8"?>
<androidx.constraintlayout.motion.widget.MotionLayout xmlns:android="http://schemas.android.com/apk/res/android"
    xmlns:app="http://schemas.android.com/apk/res-auto"
    android:layout_width="match_parent"
    android:layout_height="match_parent"
    app:layoutDescription="@xml/activity_motion_layout_scene"
    app:showPaths="true">

    <TextView
        android:id="@+id/tv"
        android:layout_width="wrap_content"
        android:layout_height="wrap_content"
        android:gravity="center"
        android:background="@color/colorAccent"
        android:text="@string/app_name"
        android:textColor="@android:color/white"
        app:layout_constraintStart_toStartOf="parent"
        app:layout_constraintTop_toTopOf="parent" />

</androidx.constraintlayout.motion.widget.MotionLayout>
在使用的过程中,我们如果需要做动画,需要引用动画的xml,通过layoutDescription来引用。对应的就是activity_motion_layout_scene文件
下面我们来看下文件具体内容
MotionScene
在MotionLayout中,如果你需要做动画,需要使用MotionScene,也就是说,你的动画定义都需要在MotionScene中。
它主要包括如下几个动画操作标签
- ConstraintSets
- Transition
- CustomAttribute
- KeyFramesSet
我们来给上面的TextView做一个简单的移动动画:从左上角移动到右下角。
针对这种简单的平移动画,我们可以直接使用ConstraintSet来定义动画的start与end。
ConstraintSet
这里有一点需要注意,ConstraintSet中的约束会直接影响到我们外面的layout布局的约束。
<?xml version="1.0" encoding="utf-8"?>
<MotionScene xmlns:android="http://schemas.android.com/apk/res/android"
    xmlns:app="http://schemas.android.com/apk/res-auto">

    <ConstraintSet android:id="@+id/start">
        <Constraint
            android:id="@+id/tv"
            android:layout_width="wrap_content"
            android:layout_height="50dp"
            app:layout_constraintStart_toStartOf="parent"
            app:layout_constraintTop_toTopOf="parent" />
    </ConstraintSet>

    <ConstraintSet android:id="@+id/end">
        <Constraint
            android:id="@id/tv"
            android:layout_width="wrap_content"
            android:layout_height="50dp"
            app:layout_constraintBottom_toBottomOf="parent"
            app:layout_constraintEnd_toEndOf="parent" />
    </ConstraintSet>

</MotionScene>
我们定义了两个ConstraintSet, 分别是start与end,其中start代表的是动画开始的位置,也就是TextView开始的展示方式。
包括它的宽高,布局约束,这些都会直接覆盖layout中的宽高与约束。
另一个end,代表的是,动画结束的位置,也就是TextView结束之后的展示方式。
这里我们将它的约束由之前的左上角,改成了右下角。
这样我们动画的开始与结束就已经定位完成。接下来要做的就是应用我们定义的start与end,让动画生效。
需要注意的是,这里定义的id是需要关联我们layout中的id,这样才能让MotionLayout进行匹配那个View需要进行动画。
Transition
为了让动画生效,我们需要使用到Transition来定义它的动画执行方式。我们在MotionScene中再添加Transition
<Transition
        app:constraintSetEnd="@id/end"
        app:constraintSetStart="@+id/start"
        app:duration="3000">
</Transition>
这里的id,就是前面ConstraintSet中定义的id。
这样我们的动画就可以执行起来。一个平移动画就实现了,不需要任何java或者kotlin代码,直接使用xml即可。
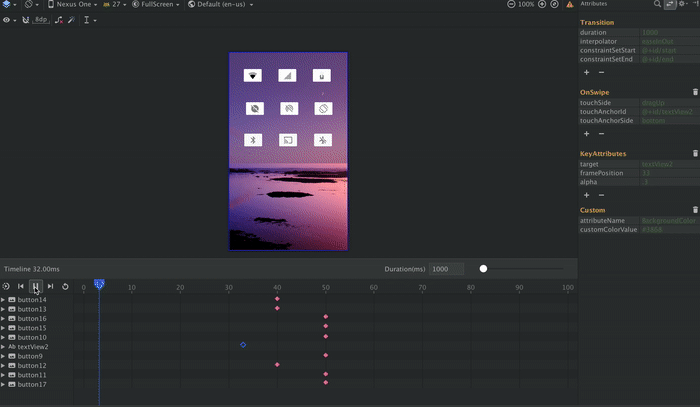
同时Android Studio提供了图形化操作,这样你连xml都可以不用写。
看右边的曲线图,使用的是一个线性的interpolator。我们也可以改变它的运动方式,例如使用系统提供的easeInOut
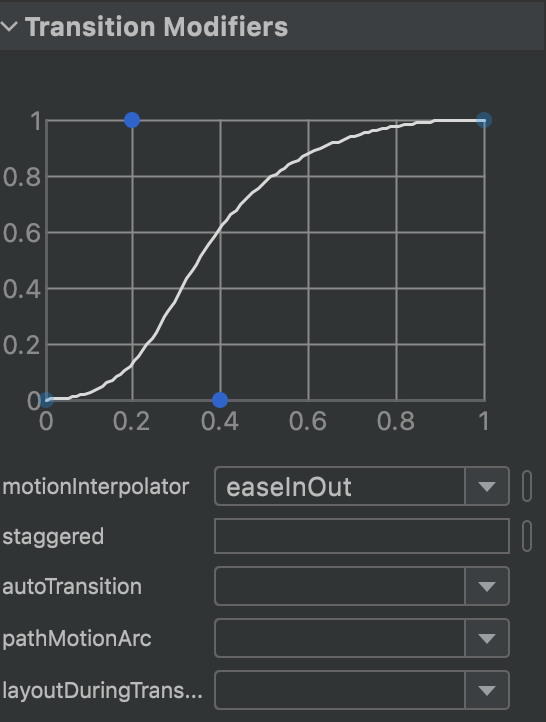
除了motioninterpolator,还提供了其他属性设置,例如我们还可以定义动画路线,使用pathMotionArc,设置为startVertical
现在它的运动曲线就变成了基于竖直方向上的一个弧线。
除此之外,我们还可以为动画添加手势操作,例如OnSwipe
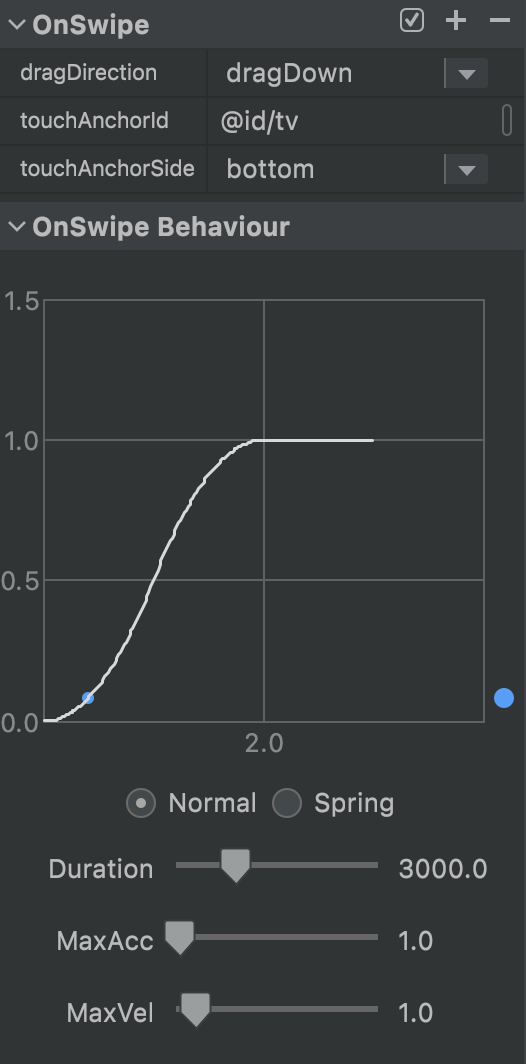
我们定义了一个滑动手势,手势方向是dragDown,对应的滑动id是我们的tv,也就是TextView,作用于TextView的滑动面是bottom。

这些代码层面都是在xml中
    <Transition
        app:constraintSetEnd="@id/end"
        app:constraintSetStart="@+id/start"
        app:duration="3000"
        app:motionInterpolator="easeInOut"
        app:pathMotionArc="startVertical">
        <OnSwipe
            app:dragDirection="dragDown"
            app:touchAnchorId="@id/tv"
            app:touchAnchorSide="bottom" />
    </Transition>
我们还可以使用OnClick,让动画的启动通过点击事件来触发。
    <Transition
        app:constraintSetEnd="@id/end"
        app:constraintSetStart="@+id/start"
        app:duration="3000"
        app:motionInterpolator="easeInOut"
        app:pathMotionArc="startVertical">

        <OnClick
            app:clickAction="toggle"
            app:targetId="@id/tv" />

    </Transition>
现在我们点击TextView就能实现动画的来回切换。
CustomAttribute
在ConstraintSet除了位置边界属性设置之外,还包含了其它的内置属性,例如:
- alpha
- visibility
- elevation
- rotation
- translation
- scale
这些属性都可以直接拿来做动画使用。
如果需要作用于自定义的属性,就需要使用到CustomAttribute,跟我们的传统动画ObjectAnimator一样,只要你为需要做的自定义属性提供对应的get/set方法即可。
下面来一个简单的例子,例如改变view的背景色。
我们直接使用backgroundColor属性,由于backgroundColor属性已经支持set/get方法,所以我们可以直接拿来用。
<?xml version="1.0" encoding="utf-8"?>
<MotionScene xmlns:android="http://schemas.android.com/apk/res/android"
    xmlns:app="http://schemas.android.com/apk/res-auto">

    <ConstraintSet android:id="@+id/start">
        <Constraint
            android:id="@+id/tv"
            android:layout_width="wrap_content"
            android:layout_height="50dp"
            app:layout_constraintStart_toStartOf="parent"
            app:layout_constraintTop_toTopOf="parent">
            <CustomAttribute
                app:attributeName="backgroundColor"
                app:customColorValue="@color/colorAccent" />
        </Constraint>
    </ConstraintSet>

    <ConstraintSet android:id="@+id/end">
        <Constraint
            android:id="@id/tv"
            android:layout_width="wrap_content"
            android:layout_height="50dp"
            app:layout_constraintBottom_toBottomOf="parent"
            app:layout_constraintEnd_toEndOf="parent">
            <CustomAttribute
                app:attributeName="backgroundColor"
                app:customColorValue="@color/colorPrimary" />
        </Constraint>
    </ConstraintSet>

    <Transition
        app:constraintSetEnd="@id/end"
        app:constraintSetStart="@+id/start"
        app:duration="3000"
        app:motionInterpolator="easeInOut"
        app:pathMotionArc="startVertical">
        <OnSwipe
            app:dragDirection="dragDown"
            app:touchAnchorId="@id/tv"
            app:touchAnchorSide="bottom" />
    </Transition>

</MotionScene>
属性名称是backgroundColor,属性值使用的是customColorValue,这里根据自身的属性值来决定使用哪种,目前支持的有如下几种。
- customColorValue
- customIntegerValue
- customFloatValue
- customStringValue
- customDimension
- customBoolean
- customReference
- customPixelDimension
有了自定义属性的功能,可以说基本可以实现我们日常需要的90%的动画需求。
至于剩下的10%,涉及的都是复杂的动画实现。我们现在的动画实现都是给个start与end,中间的动画过程我们都没有进行干涉。一旦涉及到更灵活更复杂的动画需求,就需要手动设置动画的每一个进度的值。
针对定制化的动画,MotionLayout也提供了解决方案,具体实现方式可以期待之后的文章。
最后来个调查:你是否觉得MotionLayout让动画实现更加趋于简单了呢?
本文参与 腾讯云自媒体同步曝光计划,分享自微信公众号。
原始发表:2022-12-15,如有侵权请联系 cloudcommunity@tencent.com 删除
评论
登录后参与评论
推荐阅读
目录
腾讯云开发者

Copyright © 2013 - 2026 Tencent Cloud. All Rights Reserved. 腾讯云 版权所有
深圳市腾讯计算机系统有限公司 ICP备案/许可证号:粤B2-20090059 ![]() 粤公网安备44030502008569号
粤公网安备44030502008569号
腾讯云计算(北京)有限责任公司 京ICP证150476号 | 京ICP备11018762号