ES8集群部署


这次ES8集群部署花的时间真不少,还熬了两夜,原本是比较简单的,同事搞就可以了,结果还是超出了预期,不熟悉的东西部署也是相当耗时间的。开始是准备基于Docker部署的,但是没有成功,网上参考了很多,调各个配置参数,就是没成功,后来看到这个文章:https://www.zsjweblog.com/2022/03/09/elasticsearch8-1-0%e9%9b%86%e7%be%a4%e6%90%ad%e5%bb%ba/,改为直接使用安装包进行部署,在测试机上尝试是可以把几个节点服务连接成一个集群的。
像这类需要部署成集群的,还是使用原生部署比较好,之前部署doris的经历也是类似,开始使用docker部署,各种踩坑,后来还是改用原生进行部署,才成功了。
以下是熬了两天的成果:
部署4个节点的ES8集群:
节点 | IP | http.port | transport.port |
|---|---|---|---|
node-1 | ip1 | 9200 | 9300 |
node-2 | ip2 | 9200 | 9300 |
node-3 | ip3 | 9200 | 9300 |
node-4 | ip4 | 9200 | 9300 |
IP换成实际的IP地址,通常是使用内网IP。如果同一个服务器上部署多个节点,则部署时可以使用不同的端口号进行区分。
1. 下载ES8
cd 安装目录
wget https://artifacts.elastic.co/downloads/elasticsearch/elasticsearch-8.1.0-linux-x86_64.tar.gz

# 解压
tar -zxf elasticsearch-8.1.0-linux-x86_64.tar.gz
如果连不了外网,则在本地下载好上传到安装目录。
这个步骤每个服务都要执行一次。
2. 生成证书
cd elasticsearch-8.10.4

# 连续回车,在当前目录生成文件:elastic-stack-ca.p12
bin/elasticsearch-certutil ca

# 生成证书
# 连续回车,在当前目录生成证书文件:elastic-certificates.p12
bin/elasticsearch-certutil cert --ca elastic-stack-ca.p12

# 移动到配置目录
mv elastic-certificates.p12 config/
这个步骤只需要在节点1执行即可,在其他节点服务器只需要将该证书文件elastic-certificates.p12赋值到对应的config目录即可。
3. 修改配置
vim config/elasticsearch.yml
# ======================== Elasticsearch Configuration =========================
#
# NOTE: Elasticsearch comes with reasonable defaults for most settings.
#       Before you set out to tweak and tune the configuration, make sure you
#       understand what are you trying to accomplish and the consequences.
#
# The primary way of configuring a node is via this file. This template lists
# the most important settings you may want to configure for a production cluster.
#
# Please consult the documentation for further information on configuration options:
# https://www.elastic.co/guide/en/elasticsearch/reference/index.html
#
# ---------------------------------- Cluster -----------------------------------
#
# Use a descriptive name for your cluster:
# 可以根据需要进行修改
cluster.name: deeao
#
# ------------------------------------ Node ------------------------------------
#
# Use a descriptive name for the node:
#
node.name: node-1
#
# Add custom attributes to the node:
#
#node.attr.rack: r1
#
# ----------------------------------- Paths ------------------------------------
#
# Path to directory where to store the data (separate multiple locations by comma):
#
#path.data: /path/to/data
#
# Path to log files:
#
#path.logs: /path/to/logs
#
# ----------------------------------- Memory -----------------------------------
#
# Lock the memory on startup:
#
#bootstrap.memory_lock: true
#
# Make sure that the heap size is set to about half the memory available
# on the system and that the owner of the process is allowed to use this
# limit.
#
# Elasticsearch performs poorly when the system is swapping the memory.
#
# ---------------------------------- Network -----------------------------------
#
# By default Elasticsearch is only accessible on localhost. Set a different
# address here to expose this node on the network:
#
#network.host: 192.168.0.1
network.host: 0.0.0.0
#
# By default Elasticsearch listens for HTTP traffic on the first free port it
# finds starting at 9200. Set a specific HTTP port here:
#
http.port: 9200
transport.port: 9300
#
# For more information, consult the network module documentation.
#
# --------------------------------- Discovery ----------------------------------
#
# Pass an initial list of hosts to perform discovery when this node is started:
# The default list of hosts is ["127.0.0.1", "[::1]"]
# 根据实际进行配置
discovery.seed_hosts: ["ip1:9300", "ip2:9300", "ip3:9300", "ip4:9300"]
#
# Bootstrap the cluster using an initial set of master-eligible nodes:
# 节点名称要注意对应
cluster.initial_master_nodes: ["node-1", "node-2", "node-3", "node-4"]
#
# For more information, consult the discovery and cluster formation module documentation.
#
# ---------------------------------- Various -----------------------------------
#
# Allow wildcard deletion of indices:
#
#action.destructive_requires_name: false
#
#
# -----------------------------------------------------------------------------
#

# 是否支持跨域
http.cors.enabled: true

# 默认为*表示支持所有域名跨域访问,也可以指定域名跨域,或者使用正则表达式匹配。
http.cors.allow-origin: "*"

# 跨域允许设置的头信息
http.cors.allow-headers: Authorization

# 是否返回设置的跨域Access-Control-Allow-Credentials头
http.cors.allow-credentials: true

# 开启x-pack
xpack.security.enabled: true
# 开启ssl认证
xpack.security.transport.ssl.enabled: true
xpack.security.transport.ssl.verification_mode: certificate
xpack.security.transport.ssl.client_authentication: required

# 配置生成的ca证书,这里的路径可以根据
xpack.security.transport.ssl.keystore.path: elastic-certificates.p12
xpack.security.transport.ssl.truststore.path: elastic-certificates.p12
xpack.security.authc.api_key.enabled: true
在其他节点服务器上,通常把该配置文件复制过去,再要修改节点名称即可。注意节点名称,一定要在cluster.initial_master_nodes中。
4. 启动ES服务
在每一个服务器上启动服务
# 测试期间可以直接启动
./bin/elasticsearch

# 启动后台服务
nohup ./bin/elasticsearch &

# 查看集群日志
tail -f logs/deeao.log
5. 设置集群密码
这个步骤只需要在节点1上执行即可。
bin/elasticsearch-setup-passwords auto
这个命令会自动生成随机密码,输出大概如下,注意保存:
Changed password for user apm_system
PASSWORD apm_system = VadTJ7fWqL5hCJAjE3Co

Changed password for user kibana_system
PASSWORD kibana_system = 0B5d8WESa3TDsRdJ64eZ

Changed password for user kibana
PASSWORD kibana = 0B5d8WESa3TDsRdJ64eZ

Changed password for user logstash_system
PASSWORD logstash_system = EaRC1iKNioa8x0uRO3mN

Changed password for user beats_system
PASSWORD beats_system = mMnDSqF2oTuQPhqukUga

Changed password for user remote_monitoring_user
PASSWORD remote_monitoring_user = P4DLXc1VBDyFBWaQNqZw

Changed password for user elastic
PASSWORD elastic = fHNY2y8x78CqGNBSKqRp
如果需要单独设置某用户的密码可以使用:
bin/elasticsearch-setup-passwords interactive
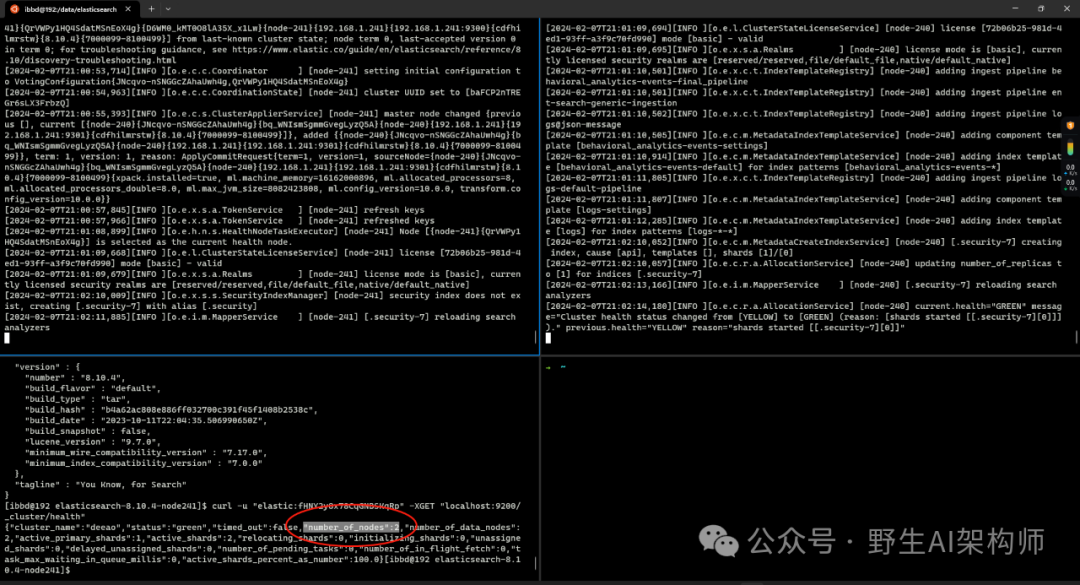
6. 检查集群是否健康
在任意节点上执行的效果应该都类似的:
curl -u "elastic:fHNY2y8x78CqGNBSKqRp" -XGET "ip:9200/
_cluster/health"
输出大致如下:
{"cluster_name":"deeao","status":"green","timed_out":false,"number_of_nodes":4,"number_of_data_nodes":4,"active_primary_shards":1,"active_shards":4,"relocating_shards":0,"initializing_shards":0,"unassigned_shards":0,"delayed_unassigned_shards":0,"number_of_pending_tasks":0,"number_of_in_flight_fetch":0,"task_max_waiting_in_queue_millis":0,"active_shards_percent_as_number":100.0}
表示deeao这个集群现在有4个节点,集群状态为green。
本文参与 腾讯云自媒体同步曝光计划,分享自微信公众号。
原始发表:2024-02-07,如有侵权请联系 cloudcommunity@tencent.com 删除
评论
登录后参与评论
推荐阅读
目录
腾讯云开发者

Copyright © 2013 - 2026 Tencent Cloud. All Rights Reserved. 腾讯云 版权所有
深圳市腾讯计算机系统有限公司 ICP备案/许可证号:粤B2-20090059 ![]() 粤公网安备44030502008569号
粤公网安备44030502008569号
腾讯云计算(北京)有限责任公司 京ICP证150476号 | 京ICP备11018762号