【Linux】————(日志、线程池及死锁问题)

【Linux】————(日志、线程池及死锁问题)

用户11036582
发布于 2024-12-03 08:28:15
发布于 2024-12-03 08:28:15
日志
关于日志,首先我们来说一下日志的作用,
作用:
- 问题追踪:通过日志不仅仅包括我们程序的一些bug,也可以在安装配置时,通过日志可以发现问题。
- 状态监控:通过实时分析日志,可以监控系统的运行状态,做到早发现问题、早处理问题。
- 安全审计:审计主要体现在安全上,通过对日志进行分析,可以发现是否存在非授权的操作。
日志并不是越多越详细就越好。在分析运行日志,查找问题时,我们经常遇到该出现的日志没有,无用的日志一大堆,或者有效的日志被大量无意义的日志信息淹没,查找起来非常困难。那么什么时候输出日志呢?以下列出了一些常见的需要输出日志的情况:
常见的需要输出日志的情况:
- 1. 系统启动参数、环境变量系统启动的参数、配置、环境变量、System.Properties等信息对于软件的正常运行至关重要,这些信息的输出有助于安装配置人员通过日志快速定位问题,所以程序有必要在启动过程中把使用到的关键参数、变量在日志中输出出来。在输出时需要注意,不是一股脑的全部输出,而是将软件运行涉及到的配置信息输出出来。比如,如果软件对jvm的内存参数比较敏感,对最低配置有要求,那么就需要在日志中将-Xms -Xmx -XX:PermSize这几个参数的值输出出来。
- 2. 异常捕获处在捕获异常处输出日志,大家在基本都能做到,唯一需要注意的是怎么输出一个简单明了的日志信息。这在后面的问题问题中有进一步说明。
- 3. 函数获得期望之外的结果时一个函数,尤其是供外部系统或远程调用的函数,通常都会有一个期望的结果,但如果内部系统或输出参数发生错误时,函数将无法返回期望的正确结果,此时就需要记录日志,日志的基本通常是warn。需要特别说明的是,这里的期望之外的结果不是说没有返回就不需要记录日志了,也不是说返回false就需要记录日志。比如函数:isXXXXX(),无论返回true、false记录日志都不是必须的,但是如果系统内部无法判断应该返回true还是false时,就需要记录日志,并且日志的级别应该至少是warn。
- 4. 关键操作关键操作的日志一般是INFO级别,如果数量、频度很高,可以考虑使用DEBUG级别。以下是一些关键操作的举例,实际的关键操作肯定不止这么多。
- 5.删除:删除一个文件、删除一组重要数据库记录……
- 5.添加:和外系统交互时,收到了一个文件、收到了一个任务……
- 7.处理:开始、结束一条任务……
对于日志我们就说这些,下面我们看一下日志的代码:
#pragma once

#include <iostream>
#include <cstdio>
#include <string>
#include <cstring>
#include <unistd.h>
#include <fstream>
#include <sstream>
#include <filesystem> //c++17
#include <memory>
#include <time.h>
#include "Mutex.hpp"

namespace LogModule
{
    using namespace LockModule;

    std::string Currtime()
    {
        time_t time_stamp = ::time(nullptr);
        struct tm curr;
        localtime_r(&time_stamp, &curr);

        std::string buffer;
        buffer.resize(100); // 预留足够空间,可根据实际情况调整大小
        std::snprintf(&buffer[0], buffer.size(), "%4d-%02d-%02d %02d:%02d:%02d",
                      curr.tm_year + 1900,
                      curr.tm_mon + 1,
                      curr.tm_mday,
                      curr.tm_hour,
                      curr.tm_min,
                      curr.tm_sec);
        buffer.resize(std::strlen(&buffer[0])); // 调整大小为实际字符串长度
        return buffer;
    }

    // 构成:1.构建日志字符串2.刷新落盘(screen,file)
    // 日志文件的默认路径和文件名

    // 2.日志等级
    enum class LogLevel
    {
        DEBUG = 1,
        INFO, // 正常
        WARNING,
        ERROR,
        FATAL // 致命的
    };
    std::string Level2String(LogLevel level)
    {
        switch (level)
        {
        case LogLevel::DEBUG:
            return "DEBUG";
            break;
        case LogLevel::ERROR:
            return "ERROR";
            break;
        case LogLevel::FATAL:
            return "FATAL";
            break;
        case LogLevel::INFO:
            return "INFO";
            break;
        case LogLevel::WARNING:
            return "WARNING";
            break;
        default:
            return "";
        }
    }
    const std::string defaultlogpath = "./log/";
    const std::string defaultlogname = "log.txt";
    // 3.刷新策略
    class LogStrategy
    {
    public:
        virtual ~LogStrategy() = default;
        virtual void SyncLog(const std::string &message) = 0;

    private:
    };

    // 3.1控制台策略
    class ConsoleLogStrategy : public LogStrategy // 继承一下
    {
    public:
        ConsoleLogStrategy()
        {
        }
        ~ConsoleLogStrategy()
        {
        }
        void SyncLog(const std::string &message)
        {
            LockGuard lockguard(_lock); // 保证刷新策略的安全
            std::cout << message << std::endl;
        }

    private:
        Mutex _lock; // 锁
    };

    // 3.2 文件级策略
    class FileLogStrategy : public LogStrategy
    {
    public:
        FileLogStrategy(const std::string logpath = defaultlogpath, const std::string logname = defaultlogname)
            : _logpath(logpath),
              _logname(logname)
        {
            LockGuard lockguard(_lock);
            if (std::filesystem::exists(_logpath))
                return;
            try
            {
                std::filesystem::create_directories(_logpath);
            }
            catch (const std::filesystem::filesystem_error &e)
            {
                std::cerr << e.what() << "\n";
            }
        }
        ~FileLogStrategy()
        {
        }
        void SyncLog(const std::string &message)
        {
            std::string log = _logpath + _logname;
            std::ofstream out(log, std::ios::app); // 日志写入,一定是追加的
            if (!out.is_open())
            {
                return;
            }
            out << message << "\n";
            out.close();
        }

    private:
        std::string _logpath;
        std::string _logname;
        Mutex _lock;
    };

    // 日志类,构建日志字符串,根据策略进行刷新。
    class Logger
    {
    public:
        Logger()
        {
            // 默认采用ConsoleLogStrategy
            _strategy = std::make_shared<ConsoleLogStrategy>();
        }
        void EnableConsoleLog()
        {
            _strategy = std::make_shared<ConsoleLogStrategy>();
        }
        void EnableFileLog()
        {
            _strategy = std::make_shared<FileLogStrategy>();
        }
        ~Logger()
        {
        }

        // 一条完整的信息:[2024-8-09 12:32:22] [DEBUG]
        class LogMessage
        {
        public:
            LogMessage(LogLevel level, const std::string &filename, int line, Logger &logger)
                : _currtime(Currtime()),
                  _level(level),
                  _pid(getpid()),
                  _filename(filename),
                  _line(line),
                  _logger(logger)
            {
                std::stringstream ssbuffer;
                ssbuffer << "[" << _currtime << "] "
                         << "[" << Level2String(_level) << "] " << "[" << _pid << "] "
                         << "[" << _filename << "] "
                         << "[" << _line << "] ";
                _loginfo = ssbuffer.str();
            }
            template <typename T>
            LogMessage &operator<<(const T &info)
            {
                std::stringstream ss;
                ss << info;
                _loginfo += ss.str();
                return *this;
            }
            ~LogMessage()
            {
                if (_logger._strategy)
                {
                    _logger._strategy->SyncLog(_loginfo);
                }
            }

        private:
            std::string _currtime; // 当前日志时间吗,需要可读性,所以不要时间戳
            LogLevel _level;       // 日志等级
            pid_t _pid;            // 进程pid
            std::string _filename; // 源文件名称
            uint32_t _line;        // 日治所在的行号,32位的无符号整数
            Logger &_logger;       // 负责根据不同的策略进行刷新
            std::string _loginfo;  // 一条完整的日志记录
        };

        // 就是要拷贝
        LogMessage operator()(LogLevel level, const std::string &filename, int line)
        {
            return LogMessage(level, filename, line, *this);
        }

    private:
        std::shared_ptr<LogStrategy> _strategy; // 日志刷新的策略方案
    };

    Logger logger;

#define LOG(Level) logger(Level, __FILE__, __LINE__)
#define ENABLE_CONSOLE_LOG() logger.EnableConsoleLog()
#define ENABLE_FILE_LOG() logger.EnableFileLog()
}
基于环形队列的生产消费模型
环形队列采用数组模拟,用模运算来模拟环状特性
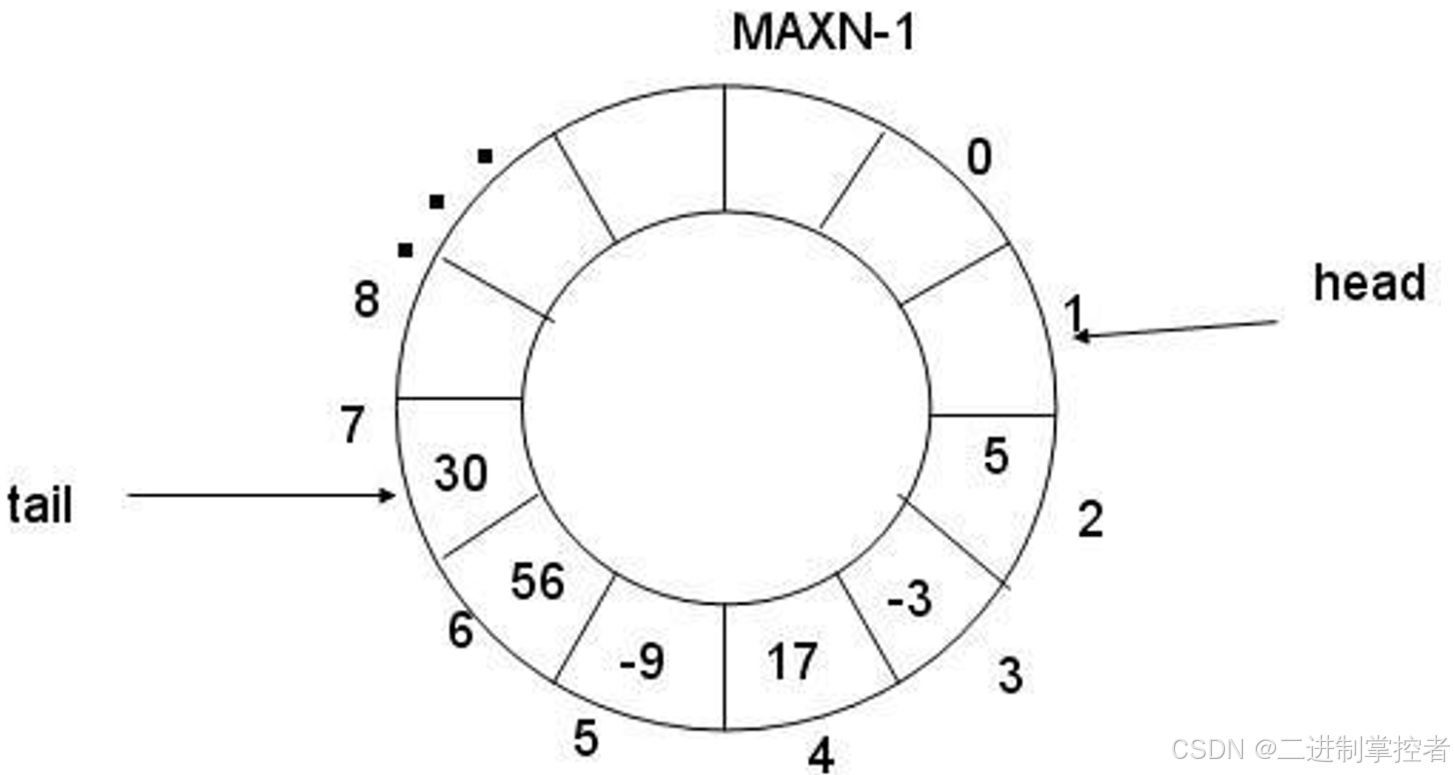
环形结构起始状态和结束状态都是一样的,不好判断为空或者为满,所以可以通过加计数器或者标记位来判断满或者空。另外也可以预留一个空的位置,作为满的状态

但是我们现在有信号量这个计数器,就很简单的进行多线程间的同步过程
下面我们看一下代码:
RingQueue.hpp:
#pragma once

#include <iostream>
#include <vector>
#include <string>
#include <pthread.h>
#include <semaphore.h>

template <typename T>
class RingQueue
{
private:
    void P(sem_t &s)//申请信号量
    {
        sem_wait(&s);
    }
    void V(sem_t &s)//释放信号量
    {
        sem_post(&s);
    }
public:
    RingQueue(int max_cap)
        : _ringqueue(max_cap), _max_cap(max_cap), _c_step(0), _p_step(0)
    {
        sem_init(&_data_sem, 0, 0);
        sem_init(&_space_sem, 0, max_cap);

        pthread_mutex_init(&_c_mutex, nullptr);
        pthread_mutex_init(&_p_mutex, nullptr);
    }
    void Push(const T &in) //生产者
    {
        // 信号量:是一个计数器,是资源的预订机制。预订:在外部,可以不判断资源是否满足,就可以知道内部资源的情况!
        P(_space_sem); // 信号量这里,对资源进行使用,申请,为什么不判断一下条件是否满足???信号量本身就是判断条件!
        pthread_mutex_lock(&_p_mutex); //?
        _ringqueue[_p_step] = in;
        _p_step++;
        _p_step %= _max_cap;
        pthread_mutex_unlock(&_p_mutex);
        V(_data_sem);
    }
    void Pop(T *out) // 消费
    {
        P(_data_sem);
        pthread_mutex_lock(&_c_mutex); //?
        *out = _ringqueue[_c_step];
        _c_step++;
        _c_step %= _max_cap;
        pthread_mutex_unlock(&_c_mutex);
        V(_space_sem);
    }
    ~RingQueue()
    {
        sem_destroy(&_data_sem);
        sem_destroy(&_space_sem);

        pthread_mutex_destroy(&_c_mutex);
        pthread_mutex_destroy(&_p_mutex);
    }
private:
    std::vector<T> _ringqueue;
    int _max_cap;

    int _c_step;
    int _p_step;

    sem_t _data_sem; // 消费者关心
    sem_t _space_sem; // 生产者关心

    pthread_mutex_t _c_mutex;
    pthread_mutex_t _p_mutex;
};
Main.cc
#include "RingQueue.hpp"
#include "Task.hpp"
#include <iostream>
#include <pthread.h>
#include <unistd.h>
#include <ctime>

void *Consumer(void*args)
{
    RingQueue<Task> *rq = static_cast<RingQueue<Task> *>(args);
    while(true)
    {
        Task t;
        // 1. 消费
        rq->Pop(&t);

        // 2. 处理数据
        t();
        std::cout << "Consumer-> " << t.result() << std::endl;
    }
}
void *Productor(void*args)
{
    RingQueue<Task> *rq = static_cast<RingQueue<Task> *>(args);

    while(true)
    {
        sleep(1);

        // 1. 构造数据
        int x = rand() % 10 + 1; //[1, 10]
        usleep(x*1000);
        int y = rand() % 10 + 1;
        Task t(x, y);

        // 2. 生产
        rq->Push(t);

        std::cout << "Productor -> " << t.debug() << std::endl;
    }
}

int main()
{
    srand(time(nullptr) ^ getpid());
    RingQueue<Task> *rq = new RingQueue<Task>(5);
    // 单单
    pthread_t c1, c2, p1, p2, p3;
    pthread_create(&c1, nullptr, Consumer, rq);
    pthread_create(&c2, nullptr, Consumer, rq);
    pthread_create(&p1, nullptr, Productor, rq);
    pthread_create(&p2, nullptr, Productor, rq);
    pthread_create(&p3, nullptr, Productor, rq);


    pthread_join(c1, nullptr);
    pthread_join(c2, nullptr);
    pthread_join(p1, nullptr);
    pthread_join(p2, nullptr);
    pthread_join(p3, nullptr);
    return 0;
}
Task.hpp
#pragma once

#include<iostream>
#include<functional>

// typedef std::function<void()> task_t;
// using task_t = std::function<void()>;

// void Download()
// {
//     std::cout << "我是一个下载的任务" << std::endl;
// }


// 要做加法
class Task
{
public:
    Task()
    {
    }
    Task(int x, int y) : _x(x), _y(y)
    {
    }
    void Excute()
    {
        _result = _x + _y;
    }
    void operator ()()
    {
        Excute();
    }
    std::string debug()
    {
        std::string msg = std::to_string(_x) + "+" + std::to_string(_y) + "=?";
        return msg;
    }
    std::string result()
    {
        std::string msg = std::to_string(_x) + "+" + std::to_string(_y) + "=" + std::to_string(_result);
        return msg;
    }

private:
    int _x;
    int _y;
    int _result;
};
线程池(懒汉单例模式)
线程池: 一种线程使用模式。线程过多会带来调度开销,进而影响缓存局部性和整体性能。而线程池维护着多个线程,等待着监督管理者分配可并发执行的任务。这避免了在处理短时间任务时创建与销毁线程的代价。线程池不仅能够保证内核的充分利用,还能防止过分调度。
这里我们主要还是看一下线程池这个代码的实现,其他不在这里展示: ThreadPool.hpp:
#pragma once

#include <iostream>
#include <unistd.h>
#include <string>
#include <vector>
#include <queue>
#include <functional>
#include "Thread.hpp"
#include "Log.hpp"
#include "LockGuard.hpp"

using namespace ThreadMoudle;
using namespace log_ns;

static const int gdefaultnum = 5;

void test()
{
    while (true)
    {
        std::cout << "hello world" << std::endl;
        sleep(1);
    }
}

template <typename T>
class ThreadPool
{
private:
    void LockQueue()
    {
        pthread_mutex_lock(&_mutex);
    }
    void UnlockQueue()
    {
        pthread_mutex_unlock(&_mutex);
    }
    void Wakeup()
    {
        pthread_cond_signal(&_cond);
    }
    void WakeupAll()
    {
        pthread_cond_broadcast(&_cond);
    }
    void Sleep()
    {
        pthread_cond_wait(&_cond, &_mutex);
    }
    bool IsEmpty()
    {
        return _task_queue.empty();
    }
    void HandlerTask(const std::string &name) // this
    {
        while (true)
        {
            // 取任务
            LockQueue();
            while (IsEmpty() && _isrunning)
            {
                _sleep_thread_num++;
                LOG(INFO, "%s thread sleep begin!\n", name.c_str());
                Sleep();
                LOG(INFO, "%s thread wakeup!\n", name.c_str());
                _sleep_thread_num--;
            }
            // 判定一种情况
            if (IsEmpty() && !_isrunning)
            {
                UnlockQueue();
                LOG(INFO, "%s thread quit\n", name.c_str());
                break;
            }

            // 有任务
            T t = _task_queue.front();
            _task_queue.pop();
            UnlockQueue();

            // 处理任务
            t(); // 处理任务,此处不用/不能在临界区中处理
            // std::cout << name << ": " << t.result() << std::endl;
            LOG(DEBUG, "hander task done, task is : %s\n", t.result().c_str());
        }
    }
    void Init()
    {
        func_t func = std::bind(&ThreadPool::HandlerTask, this, std::placeholders::_1);
        for (int i = 0; i < _thread_num; i++)
        {
            std::string threadname = "thread-" + std::to_string(i + 1);
            _threads.emplace_back(threadname, func);
            LOG(DEBUG, "construct thread %s done, init success\n", threadname.c_str());
        }
    }
    void Start()
    {
        _isrunning = true;
        for (auto &thread : _threads)
        {
            LOG(DEBUG, "start thread %s done.\n", thread.Name().c_str());
            thread.Start();
        }
    }
    ThreadPool(int thread_num = gdefaultnum)
        : _thread_num(thread_num), _isrunning(false), _sleep_thread_num(0)
    {
        pthread_mutex_init(&_mutex, nullptr);
        pthread_cond_init(&_cond, nullptr);
    }
    ThreadPool(const ThreadPool<T> &) = delete;
    void operator=(const ThreadPool<T> &) = delete;

public:
    void Stop()
    {
        LockQueue();
        _isrunning = false;
        WakeupAll();
        UnlockQueue();
        LOG(INFO, "Thread Pool Stop Success!\n");
    }

    // 如果是多线程获取单例呢?
    static ThreadPool<T> *GetInstance()
    {
        if (_tp == nullptr)
        {
            LockGuard lockguard(&_sig_mutex);
            if (_tp == nullptr)
            {
                LOG(INFO, "create threadpool\n");
                // thread-1 thread-2 thread-3....
                _tp = new ThreadPool();
                _tp->Init();
                _tp->Start();
            }
            else
            {
                LOG(INFO, "get threadpool\n");
            }
        }
        return _tp;
    }

    void Equeue(const T &in)
    {
        LockQueue();
        if (_isrunning)
        {
            _task_queue.push(in);
            if (_sleep_thread_num > 0)
                Wakeup();
        }
        UnlockQueue();
    }
    ~ThreadPool()
    {
        pthread_mutex_destroy(&_mutex);
        pthread_cond_destroy(&_cond);
    }

private:
    int _thread_num;
    std::vector<Thread> _threads;
    std::queue<T> _task_queue;
    bool _isrunning;

    int _sleep_thread_num;

    pthread_mutex_t _mutex;
    pthread_cond_t _cond;

    // 单例模式
    // volatile static ThreadPool<T> *_tp;
    static ThreadPool<T> *_tp;
    static pthread_mutex_t _sig_mutex;
};

template <typename T>
ThreadPool<T> *ThreadPool<T>::_tp = nullptr;
template <typename T>
pthread_mutex_t ThreadPool<T>::_sig_mutex = PTHREAD_MUTEX_INITIALIZER;
线程安全的单例模式
单例模式是一种 "经典的, 常用的, 常考的" 设计模式
大佬和菜鸡们两极分化的越来越严重. 为了让菜鸡们不太拖大佬的后腿, 于是大佬们针对一些经典的常见的场景, 给定了一些对应的解决方案, 这个就是设计模式
单例模式的特点
某些类, 只应该具有一个对象(实例), 就称之为单例. 例如一个男人只能有一个媳妇. 在很多服务器开发场景中, 经常需要让服务器加载很多的数据 (上百G) 到内存中. 此时往往要用一个单例的类来管理这些数据.
饿汉实现方式和懒汉实现方式
- 吃完饭, 立刻洗碗, 这种就是饿汉方式. 因为下一顿吃的时候可以立刻拿着碗就能吃饭.
- 吃完饭, 先把碗放下, 然后下一顿饭用到这个碗了再洗碗, 就是懒汉方式.
懒汉方式最核心的思想是 "延时加载". 从而能够优化服务器的启动速度.
可重入VS线程安全
概念:
- 线程安全:多个线程并发同一段代码时,不会出现不同的结果。常见对全局变量或者静态变量进行操作, 并且没有锁保护的情况下,会出现该问题。
- 重入:同一个函数被不同的执行流调用,当前一个流程还没有执行完,就有其他的执行流再次进入,我们称之为重入。一个函数在重入的情况下,运行结果不会出现任何不同或者任何问题,则该函数被称为可重入函数,否则,是不可重入函数。
常见的线程不安全的情况
- 不保护共享变量的函数
- 函数状态随着被调用,状态发生变化的函数
- 返回指向静态变量指针的函数
- 调用线程不安全函数的函数
常见的线程安全的情况
- 每个线程对全局变量或者静态变量只有读取的权限,而没有写入的权限,一般来说这些线程是安全的
- 类或者接口对于线程来说都是原子操作
- 多个线程之间的切换不会导致该接口的执行结果存在二义性
常见不可重入的情况
- 调用了malloc/free函数,因为malloc函数是用全局链表来管理堆的
- 调用了标准I/O库函数,标准I/O库的很多实现都以不可重入的方式使用全局数据结构
- 可重入函数体内使用了静态的数据结构
常见可重入的情况
- 不使用全局变量或静态变量
- 不使用用malloc或者new开辟出的空间
- 不调用不可重入函数
- 不返回静态或全局数据,所有数据都有函数的调用者提供
- 使用本地数据,或者通过制作全局数据的本地拷贝来保护全局数据
可重入与线程安全联系
- 函数是可重入的,那就是线程安全的
- 函数是不可重入的,那就不能由多个线程使用,有可能引发线程安全问题
- 如果一个函数中有全局变量,那么这个函数既不是线程安全也不是可重入的。
可重入与线程安全区别
- 可重入函数是线程安全函数的一种
- 线程安全不一定是可重入的,而可重入函数则一定是线程安全的。
- 如果将对临界资源的访问加上锁,则这个函数是线程安全的,但如果这个重入函数若锁还未释放则会产生死锁,因此是不可重入的。
常见锁概念
死锁
死锁是指在一组进程中的各个进程均占有不会释放的资源,但因互相申请被其他进程所站用不会释放的资源而处于的一种永久等待状态。
死锁四个必要条件
- 互斥条件:一个资源每次只能被一个执行流使用
- 请求与保持条件:一个执行流因请求资源而阻塞时,对已获得的资源保持不放
- 不剥夺条件:一个执行流已获得的资源,在末使用完之前,不能强行剥夺
- 循环等待条件:若干执行流之间形成一种头尾相接的循环等待资源的关系
避免死锁
- 破坏死锁的四个必要条件
- 加锁顺序一致
- 避免锁未释放的场景
- 资源一次性分配
STL,智能指针和线程安全
STL中的容器是否是线程安全的? 不是. 原因是, STL 的设计初衷是将性能挖掘到极致, 而一旦涉及到加锁保证线程安全, 会对性能造成巨大的影响. 而且对于不同的容器, 加锁方式的不同, 性能可能也不同(例如hash表的锁表和锁桶). 因此 STL 默认不是线程安全. 如果需要在多线程环境下使用, 往往需要调用者自行保证线程安全
智能指针是否是线程安全的?
对于 unique_ptr, 由于只是在当前代码块范围内生效, 因此不涉及线程安全问题. 对于 shared_ptr, 多个对象需要共用一个引用计数变量, 所以会存在线程安全问题. 但是标准库实现的时候考虑到了这 个问题, 基于原子操作(CAS)的方式保证 shared_ptr 能够高效, 原子的操作引用计数.
其他常见的各种锁
悲观锁:在每次取数据时,总是担心数据会被其他线程修改,所以会在取数据前先加锁(读锁,写锁,行锁等),当其他线程想要访问数据时,被阻塞挂起。 乐观锁:每次取数据时候,总是乐观的认为数据不会被其他线程修改,因此不上锁。但是在更新数据前, 会判断其他数据在更新前有没有对数据进行修改。主要采用两种方式:版本号机制和CAS操作。 CAS操作:当需要更新数据时,判断当前内存值和之前取得的值是否相等。如果相等则用新值更新。若不等则失败,失败则重试,一般是一个自旋的过程,即不断重试。
最后:
十分感谢你可以耐着性子把它读完和我可以坚持写到这里,送几句话,对你,也对我:
1.一个冷知识: 屏蔽力是一个人最顶级的能力,任何消耗你的人和事,多看一眼都是你的不对。
2.你不用变得很外向,内向挺好的,但需要你发言的时候,一定要勇敢。 正所谓:君子可内敛不可懦弱,面不公可起而论之。
3.成年人的世界,只筛选,不教育。
4.自律不是6点起床,7点准时学习,而是不管别人怎么说怎么看,你也会坚持去做,绝不打乱自己的节奏,是一种自我的恒心。
5.你开始炫耀自己,往往都是灾难的开始,就像老子在《道德经》里写到:光而不耀,静水流深。
最后如果觉得我写的还不错,请不要忘记点赞✌,收藏✌,加关注✌哦(。・ω・。)
愿我们一起加油,奔向更美好的未来,愿我们从懵懵懂懂的一枚菜鸟逐渐成为大佬。加油,为自己点赞!
本文参与 腾讯云自媒体同步曝光计划,分享自作者个人站点/博客。
原始发表:2024-12-02,如有侵权请联系 cloudcommunity@tencent.com 删除
评论
登录后参与评论
推荐阅读
目录
腾讯云开发者

Copyright © 2013 - 2026 Tencent Cloud. All Rights Reserved. 腾讯云 版权所有
深圳市腾讯计算机系统有限公司 ICP备案/许可证号:粤B2-20090059 ![]() 粤公网安备44030502008569号
粤公网安备44030502008569号
腾讯云计算(北京)有限责任公司 京ICP证150476号 | 京ICP备11018762号