Android 平台GB28181设备接入实战指南
原创
Android 平台GB28181设备接入实战指南
原创
音视频牛哥
发布于 2025-02-20 09:48:01
发布于 2025-02-20 09:48:01
一、引言
随着视频监控技术的不断发展,国标 GB28181 协议在安防监控领域得到了广泛应用。该协议为不同厂家的视频监控设备之间的互联互通提供了统一的规范,使得设备的接入与管理变得更加简单和高效。在 Android 平台上实现 GB28181 设备接入,可以拓展设备的应用场景,提升用户体验。本文将从专业技术的角度,详细介绍 Android 平台如何实现 GB28181 设备接入到国标 28181 服务平台。
二、技术背景
GB28181 协议是基于 IP 网络的安防视频监控标准,主要包括信令和媒体传输两个方面。信令用于建立、维护和释放呼叫,媒体传输则负责视频、音频等数据的传输。Android 平台具有丰富的硬件资源和强大的软件开发能力,通过在 Android 设备上实现 GB28181 协议,可以使其具备与国标服务平台进行通信的能力,从而实现设备的接入和监控功能。
三、实现步骤
以大牛直播SDK的Android平台GB28181设备接入模块为例,通过平台注册接入到现有的GB/T28181—2016或GB/T28181—2022服务,可用于如执法记录仪、智能安全帽、智能监控、智慧零售、智慧教育、远程办公、明厨亮灶、智慧交通、智慧工地、雪亮工程、平安乡村、生产运输、车载终端等场景。
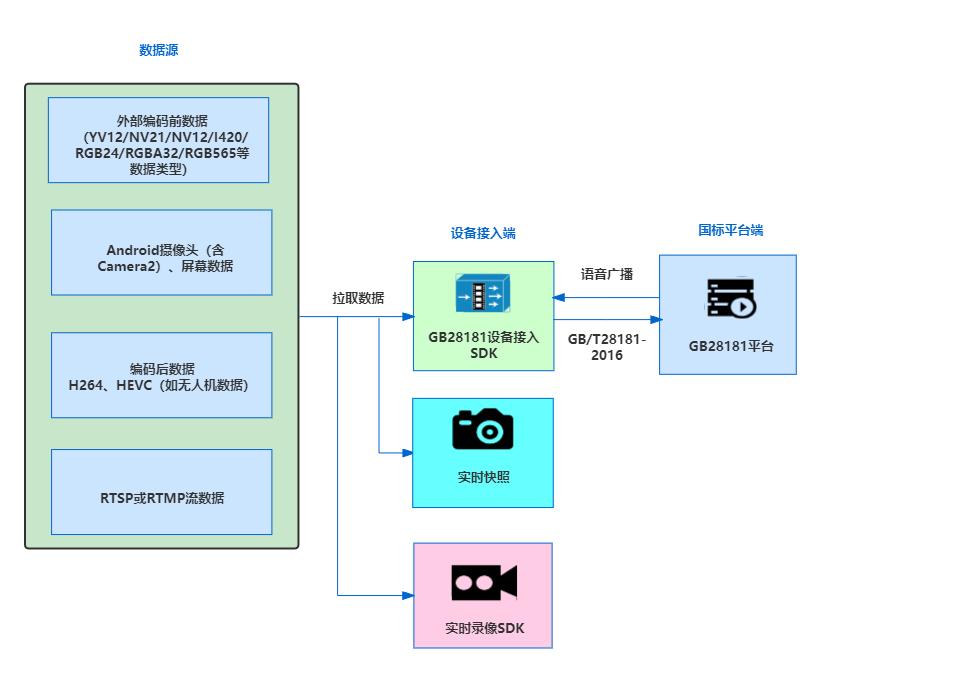
Android终端除支持常规的音视频数据接入外,还可以支持移动设备位置(MobilePosition)订阅和通知、图像抓拍、语音广播和语音对讲、历史视音频下载和回放,支持对接数据类型如下:
- 编码前数据(目前支持的有YV12/NV21/NV12/I420/RGB24/RGBA32/RGB565等数据类型),其中,Android平台前后摄像头数据,或者屏幕数据,或者Unity拿到的数据,均属编码前数据;
- 编码后数据(如无人机等264/HEVC数据,或者本地解析的MP4音视频数据);
- 拉取RTSP或RTMP流并接入至GB28181平台(比如其他IPC的RTSP流,可通过Android平台GB28181接入到国标平台)。
功能支持:
- [视频格式]H.264/H.265(Android H.265硬编码);
- [音频格式]G.711 A律、AAC;
- [音量调节]Android平台采集端支持实时音量调节;
- [H.264硬编码]支持H.264特定机型硬编码;
- [H.265硬编码]支持H.265特定机型硬编码;
- [软硬编码参数配置]支持gop间隔、帧率、bit-rate设置;
- [软编码参数配置]支持软编码profile、软编码速度、可变码率设置;
- 支持横屏、竖屏推流;
- Android平台支持后台service推送屏幕(推送屏幕需要5.0+版本);
- 支持纯视频、音视频PS打包传输;
- 支持RTP OVER UDP和RTP OVER TCP被动模式(TCP媒体流传输客户端);
- 支持信令通道网络传输协议TCP/UDP设置;
- 支持注册、注销,支持注册刷新及注册有效期设置;
- 支持设备目录查询应答;
- 支持心跳机制,支持心跳间隔、心跳检测次数设置;
- 支持移动设备位置(MobilePosition)订阅和通知;
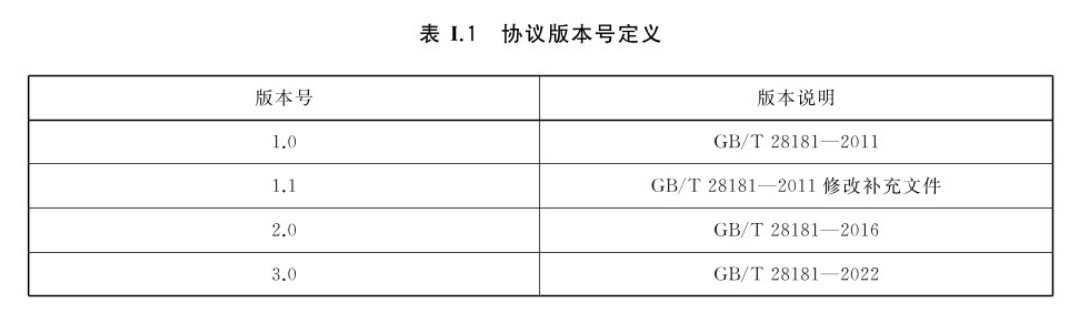
- 适用国家标准:GB/T 28181—2016、GB/T28181—2022;
- 支持语音广播;
- 支持语音对讲;
- 支持图像抓拍;
- 支持历史视音频文件检索;
- 支持历史视音频文件下载;
- 支持历史视音频文件回放;
- 支持云台控制和预置位查询;
- [实时水印]支持动态文字水印、png水印;
- [镜像]Android平台支持前置摄像头实时镜像功能;
- [实时静音]支持实时静音/取消静音;
- [实时快照]支持实时快照;
- [降噪]支持环境音、手机干扰等引起的噪音降噪处理、自动增益、VAD检测;
- [外部编码前视频数据对接]支持YUV数据对接;
- [外部编码前音频数据对接]支持PCM对接;
- [外部编码后视频数据对接]支持外部H.264数据对接;
- [外部编码后音频数据对接]外部AAC数据对接;
- [扩展录像功能]支持和录像SDK组合使用,录像相关功能。
系统要求
- SDK支持Android 5.1及以上版本;
- 支持的CPU架构:armv7, arm64, x86, x86_64。
准备工作
- 确保SmartPublisherJniV2.java放到com.daniulive.smartpublisher包名下(可在其他包名下调用);
- 如需集成语音广播、语音对讲功能,确保SmartPlayerJniV2.java放到com.daniulive.smartplayer包名下(可在其他包名下调用);
- smartavengine.jar和smartgbsipagent.jar加入到工程;
- 拷贝libSmartPublisher.so和libSmartPlayer.so(如需语音广播或语音对讲)到工程;
- AndroidManifast.xml添加相关权限:
<uses-permission android:name="android.permission.WRITE_EXTERNAL_STORAGE" ></uses-permission>
<uses-permission android:name="android.permission.INTERNET" ></uses-permission>
<uses-permission android:name="android.permission.MOUNT_UNMOUNT_FILESYSTEMS" />
<uses-permission android:name="android.permission.MODIFY_AUDIO_SETTINGS" />
<uses-permission android:name="android.permission.ACCESS_COARSE_LOCATION"></uses-permission>
<uses-permission android:name="android.permission.ACCESS_FINE_LOCATION"></uses-permission>- Load相关so:
static {
    System.loadLibrary("SmartPublisher");
    System.loadLibrary("SmartPlayer");
}- build.gradle配置32/64位库:
splits {
    abi {
        enable true
        reset()
        // Specifies a list of ABIs that Gradle should create APKs for
        include 'armeabi-v7a', 'arm64-v8a', 'x86', 'x86_64' //select ABIs to build APKs for
        // Specify that we do not want to also generate a universal APK that includes all ABIs
        universalApk true
    }
}- 如需集成到自己系统测试,请用大牛直播SDK的app name,授权版按照授权app name正常使用即可;
- 如何改app-name,strings.xml做以下修改:
<string name="app_name">SmartPublisherSDKDemo</string>接口详解
以Android平台Camera2对接为例,信令部分需要实现如下标红接口:
public class MainActivity extends Activity implements ViewTreeObserver.OnGlobalLayoutListener, Camera2Listener,
        GBSIPAgentListener, GBSIPAgentPlayListener, GBSIPAgentAudioBroadcastListener,
        GBSIPAgentDeviceControlListener, GBSIPAgentQueryCommandListener,
        GBSIPAgentTalkListener,
        GBSIPAgentQueryRecordInfoListener{
}
媒体数据处理接口,可参照SmartPublisherJniV2.java,如需语音广播或语音对讲,可参照SmartPlayerJniV2.java。
信令处理
GBSIPAgentListener主要系GB28181注册、心跳、DevicePosition等,如注册成功、注册超时、注册网络传输层错误、心跳异常、设备位置请求处理:
public interface GBSIPAgentListener
{
    /*注册成功
    * @param dateString: 服务器日期,用来校准设备端时间,用户自行决定是否校准设备时间
    */
    void ntsRegisterOK(String dateString);

    /*
    *注册超时
    */
    void ntsRegisterTimeout();

    /*
    *注册网络传输层异常
    */
    void ntsRegisterTransportError(String errorInfo);

    /*
    *心跳达到异常次数
    */
    void ntsOnHeartBeatException(int exceptionCount, String lastExceptionInfo);

    /*
     * 设备位置请求, 这个主要用在移动设备位置订阅上
     * @param interval 请求间隔, 单位是毫秒
     */
    void ntsOnDevicePositionRequest(String deviceId, int interval);
}
GBSIPAgentPlayListener主要系GB28181的Invite、Ack、Bye等处理:
public interface GBSIPAgentPlayListener {

    /*
     *收到s=Play的实时视音频点播
     */
    void ntsOnInvitePlay(String deviceId, SessionDescription sessionDescription);

    /*
     *发送play invite response 异常
     */
    void ntsOnPlayInviteResponseException(String deviceId, int statusCode, String errorInfo);

    /*
     * 收到CANCEL play INVITE请求
     */
    void ntsOnCancelPlay(String deviceId);

    /*
     * 收到Ack
     */
    void ntsOnAckPlay(String deviceId);

    /*
     * 收到Bye
     */
    void ntsOnByePlay(String deviceId);

    /*
     * 不是在收到BYE Message情况下, 终止Play
     */
    void ntsOnTerminatePlay(String deviceId);

    /*
     * Play会话对应的对话终止, 一般不会出发这个回调,目前只有在响应了200K, 但在64*T1时间后还没收到ACK,才可能会出发
    收到这个, 请做相关清理处理
    */
    void ntsOnPlayDialogTerminated(String deviceId);
}
GBSIPAgentAudioBroadcastListener主要系GB28181语音广播处理相关,如有语音广播相关需求,可参照demo实例实现:
public interface GBSIPAgentAudioBroadcastListener {

    /*
     *收到语音广播通知
     */
    void ntsOnNotifyBroadcastCommand(String fromUserName, String fromUserNameAtDomain, String sn, String sourceID, String targetID);

    /*
     *需要准备接受语音广播的SDP内容
     */
    void ntsOnAudioBroadcast(String commandFromUserName, String commandFromUserNameAtDomain, String sourceID, String targetID);

    /*
     *音频广播, 发送Invite请求异常
     */
    void ntsOnInviteAudioBroadcastException(String sourceID, String targetID, String errorInfo);

    /*
     *音频广播, 等待Invite响应超时
     */
    void ntsOnInviteAudioBroadcastTimeout(String sourceID, String targetID);

    /*
     *音频广播, 收到Invite消息最终响应
     */
    void ntsOnInviteAudioBroadcastResponse(String sourceID, String targetID, int statusCode, SessionDescription sessionDescription);

    /*
     * 音频广播, 收到BYE Message
     */
    void ntsOnByeAudioBroadcast(String sourceID, String targetID);


    /*
     * 不是在收到BYE Message情况下, 终止音频广播
     */
    void ntsOnTerminateAudioBroadcast(String sourceID, String targetID);
}
GBSIPAgentDeviceControlListener主要系GB28181设备控制相关,比如远程启动、云台控制:
public interface GBSIPAgentDeviceControlListener {

    /*
     * 收到远程启动控制命令
     */
    void ntsOnDeviceControlTeleBootCommand(String deviceId, String teleBootValue);

    /*
    * 云台控制
     */
    void ntsOnDeviceControlPTZCmd(String deviceId, String typeValue);
}
GBSIPAgentQueryCommandListener主要系GB28181查询命令,如预置位查询:
public interface GBSIPAgentQueryCommandListener {

    /*
     * 设备预置位查询
     */
    void ntsOnDevicePresetQueryCommand(String fromUserName, String fromUserNameAtDomain, String sn, String deviceId);
}
GBSIPAgentTalkListener主要系GB28181语音对讲相关处理:
public interface GBSIPAgentTalkListener {
    /*
     *收到s=Talk 语音对讲
     */
    void ntsOnInviteTalk(String deviceId, SessionDescription sessionDescription);

    /*
     *发送talk invite response 异常
     */
    void ntsOnTalkInviteResponseException(String deviceId, int statusCode, String errorInfo);

    /*
     * 收到CANCEL Talk INVITE请求
     */
    void ntsOnCancelTalk(String deviceId);

    /*
     * 收到Ack
     */
    void ntsOnAckTalk(String deviceId);

    /*
     * 收到Bye
     */
    void ntsOnByeTalk(String deviceId);

    /*
     * 不是在收到BYE Message情况下, 终止Talk
     */
    void ntsOnTerminateTalk(String deviceId);

    /*
     * Talk会话对应的对话终止, 一般不会出发这个回调,目前只有在响应了200K, 但在64*T1时间后还没收到ACK,才可能会出发
    收到这个, 请做相关清理处理
    */
    void ntsOnTalkDialogTerminated(String deviceId);
}
GBSIPAgentPlaybackListener系历史视音频回放相关:
public interface GBSIPAgentPlaybackListener {
    void ntsOnInvitePlayback(long var1, String var3, SessionDescription var4);

    void ntsOnPlaybackInviteResponseException(long var1, String var3, int var4, String var5);

    void ntsOnCancelPlayback(long var1, String var3);

    void ntsOnAckPlayback(long var1, String var3);

    void ntsOnPlaybackMANSRTSPPlayCommand(long var1, String var3);

    void ntsOnPlaybackMANSRTSPPauseCommand(long var1, String var3);

    void ntsOnPlaybackMANSRTSPScaleCommand(long var1, String var3, double var4);

    void ntsOnPlaybackMANSRTSPSeekCommand(long var1, String var3, double var4);

    void ntsOnPlaybackMANSRTSPTeardownCommand(long var1, String var3);

    void ntsOnByePlayback(long var1, String var3);

    void ntsOnTerminatePlayback(long var1, String var3);

    void ntsOnPlaybackDialogTerminated(long var1, String var3);
}
GBSIPAgentDownloadListen系历史视音频下载相关:
public interface GBSIPAgentDownloadListener {
    void ntsOnInviteDownload(long var1, String var3, SessionDescription var4);

    void ntsOnDownloadInviteResponseException(long var1, String var3, int var4, String var5);

    void ntsOnCancelDownload(long var1, String var3);

    void ntsOnAckDownload(long var1, String var3);

    void ntsOnDownloadMANSRTSPScaleCommand(long var1, String var3, double var4);

    void ntsOnByeDownload(long var1, String var3);

    void ntsOnTerminateDownload(long var1, String var3);

    void ntsOnDownloadDialogTerminated(long var1, String var3);
}
媒体数据处理
RTP数据发送
RTP Sender(SmartPublisherJniV2.java)相关接口设计:
/*
 * SmartPublisherJniV2.java
 * Author: https://daniusdk.com
 */
/*
 * 创建RTP Sender实例
 *
 * @param reserve:保留参数传0
 *
 * @return RTP Sender 句柄,0表示失败
 */
public native long CreateRTPSender(int reserve);

/**
 *设置 RTP Sender传输协议
 *
 * @param rtp_sender_handle, CreateRTPSender返回值
 * @param transport_protocol, 0:UDP, 1:TCP, 默认是UDP
 *
 * @return {0} if successful
 */
public native int SetRTPSenderTransportProtocol(long rtp_sender_handle, int transport_protocol);

/**
 *设置 RTP Sender IP地址类型
 *
 * @param rtp_sender_handle, CreateRTPSender返回值
 * @param ip_address_type, 0:IPV4, 1:IPV6, 默认是IPV4, 当前仅支持IPV4
 *
 * @return {0} if successful
 */
public native int SetRTPSenderIPAddressType(long rtp_sender_handle, int ip_address_type);

/**
 *设置 RTP Sender RTP Socket本地端口
 *
 * @param rtp_sender_handle, CreateRTPSender返回值
 * @param port, 必须是偶数,设置0的话SDK会自动分配, 默认值是0
 *
 * @return {0} if successful
 */
public native int SetRTPSenderLocalPort(long rtp_sender_handle, int port);

/**
 *设置 RTP Sender SSRC
 *
 * @param rtp_sender_handle, CreateRTPSender返回值
 * @param ssrc, 如果设置的话,这个字符串要能转换成uint32类型, 否则设置失败
 *
 * @return {0} if successful
 */
public native int SetRTPSenderSSRC(long rtp_sender_handle, String ssrc);

/**
 *设置 RTP Sender RTP socket 发送Buffer大小
 *
 * @param rtp_sender_handle, CreateRTPSender返回值
 * @param buffer_size, 必须大于0, 默认是512*1024, 当前仅对UDP socket有效, 根据视频码率考虑设置合适的值
 *
 * @return {0} if successful
 */
public native int SetRTPSenderSocketSendBuffer(long rtp_sender_handle, int buffer_size);

/**
 *设置 RTP Sender RTP时间戳时钟频率
 *
 * @param rtp_sender_handle, CreateRTPSender返回值
 * @param clock_rate, 必须大于0, 对于GB28181 PS规定是90kHz, 也就是90000
 *
 * @return {0} if successful
 */
public native int SetRTPSenderClockRate(long rtp_sender_handle, int clock_rate);

/**
 *设置 RTP Sender 目的IP地址, 注意当前用在GB2818推送上,只设置一个地址,将来扩展如果用在其他地方,可能要设置多个目的地址,到时候接口可能会调整
 *
 * @param rtp_sender_handle, CreateRTPSender返回值
 * @param address, IP地址
 * @param port, 端口
 *
 * @return {0} if successful
 */
public native int SetRTPSenderDestination(long rtp_sender_handle, String address, int port);

/**
 * 设置是否开启 RTP Receiver
 * @param rtp_sender_handle, CreateRTPSender返回值
 * @param is_enable, 0表示不收RTP包, 1表示收RTP包, SDK默认值为0.
 * @return
 */
public native int EnableRTPSenderReceive(long rtp_sender_handle, int is_enable);

/**
 *设置RTP Receiver SSRC
 *
 * @param rtp_sender_handle, CreateRTPSender返回值
 * @param ssrc, 如果设置的话,这个字符串要能转换成uint32类型, 否则设置失败
 *
 * @return {0} if successful
 */
public native int SetRTPSenderReceiveSSRC(long rtp_sender_handle, String ssrc);

/**
 *设置RTP Receiver Payload 相关信息
 *
 * @param rtp_sender_handle, CreateRTPSender返回值
 *
 * @param payload_type, 请参考 RFC 3551
 *
 * @param encoding_name, 编码名, 请参考 RFC 3551, 如果payload_type不是动态的, 可能传null就好
 *
 * @param media_type, 媒体类型, 请参考 RFC 3551, 1 是视频, 2是音频
 *
 * @param clock_rate, 请参考 RFC 3551
 *
 * @return {0} if successful
 */
public native int SetRTPSenderReceivePayloadType(long rtp_sender_handle, int payload_type, String encoding_name, int media_type, int clock_rate);

/**
 *设置RTP Receiver PS的pts和dts clock frequency
 *
 * @param rtp_sender_handle, CreateRTPSender返回值
 *
 * @param ps_clock_frequency, 默认是90000, 一些特殊场景需要设置
 *
 * @return {0} if successful
 */
public native int SetRTPSenderReceivePSClockFrequency(long rtp_sender_handle, int ps_clock_frequency);

/**
 *设置 RTP Receiver 音频采样率
 *
 * @param rtp_sender_handle, CreateRTPSender返回值
 * @param sampling_rate, 音频采样率
 *
 * @return {0} if successful
 */
public native int SetRTPSenderReceiveAudioSamplingRate(long rtp_sender_handle, int sampling_rate);

/**
 *设置 RTP Receiver 音频通道数
 *
 * @param rtp_sender_handle, CreateRTPSender返回值
 * @param channels, 音频通道数
 *
 * @return {0} if successful
 */
public native int SetRTPSenderReceiveAudioChannels(long rtp_sender_handle, int channels);

/**
 *初始化RTP Sender, 初始化之前先调用上面的接口配置相关参数
 *
 * @param rtp_sender_handle, CreateRTPSender返回值
 *
 * @return {0} if successful
 */
public native int InitRTPSender(long rtp_sender_handle);

/**
 *获取RTP Sender RTP Socket本地端口
 *
 * @param rtp_sender_handle, CreateRTPSender返回值
 *
 * @return 失败返回0, 成功的话返回响应的端口, 请在InitRTPSender返回成功之后调用
 */
public native int GetRTPSenderLocalPort(long rtp_sender_handle);

/**
 * UnInit RTP Sender
 *
 * @param rtp_sender_handle, CreateRTPSender返回值
 *
 * @return {0} if successful
 */
public native int UnInitRTPSender(long rtp_sender_handle);

/**
 * 释放RTP Sender, 释放之后rtp_sender_handle就无效了,请不要再使用
 *
 * @param rtp_sender_handle, CreateRTPSender返回值
 *
 * @return {0} if successful
 */
public native int DestoryRTPSender(long rtp_sender_handle);
RTP数据接收
对应RTP Receiver(SmartPlayerJniV2.java)相关接口设计,如无语音广播或语音对讲相关技术需求,这部分可忽略:
/*
 * SmartPlayerJniV2.java
 * Author: https://daniusdk.com
 */
/*
 * 创建RTP Receiver
 *
 * @param reserve:保留参数传0
 *
 * @return RTP Receiver 句柄,0表示失败
 */
public native long CreateRTPReceiver(int reserve);


/**
 *设置 RTP Receiver传输协议
 *
 * @param rtp_receiver_handle, CreateRTPReceiver
 * @param transport_protocol, 0:UDP, 1:TCP, 默认是UDP
 *
 * @return {0} if successful
 */
public native int SetRTPReceiverTransportProtocol(long rtp_receiver_handle, int transport_protocol);


/**
 *设置 RTP Receiver IP地址类型
 *
 * @param rtp_receiver_handle, CreateRTPReceiver
 * @param ip_address_type, 0:IPV4, 1:IPV6, 默认是IPV4
 *
 * @return {0} if successful
 */
public native int SetRTPReceiverIPAddressType(long rtp_receiver_handle, int ip_address_type);


/**
 *设置 RTP Receiver RTP Socket本地端口
 *
 * @param rtp_receiver_handle, CreateRTPReceiver
 * @param port, 必须是偶数,设置0的话SDK会自动分配, 默认值是0
 *
 * @return {0} if successful
 */
public native int SetRTPReceiverLocalPort(long rtp_receiver_handle, int port);


/**
 *设置 RTP Receiver SSRC
 *
 * @param rtp_receiver_handle, CreateRTPReceiver
 * @param ssrc, 如果设置的话,这个字符串要能转换成uint32类型, 否则设置失败
 *
 * @return {0} if successful
 */
public native int SetRTPReceiverSSRC(long rtp_receiver_handle, String ssrc);


/**
 *创建 RTP Receiver 会话
 *
 * @param rtp_receiver_handle, CreateRTPReceiver
 * @param reserve, 保留值,目前传0
 *
 * @return {0} if successful
 */
public native int CreateRTPReceiverSession(long rtp_receiver_handle, int reserve);


/**
 *获取 RTP Receiver RTP Socket本地端口
 *
 * @param rtp_receiver_handle, CreateRTPReceiver
 *
 * @return 失败返回0, 成功的话返回响应的端口, 请在CreateRTPReceiverSession返回成功之后调用
 */
public native int GetRTPReceiverLocalPort(long rtp_receiver_handle);


/**
 *设置 RTP Receiver Payload 相关信息
 *
 * @param rtp_receiver_handle, CreateRTPReceiver
 *
 * @param payload_type, 请参考 RFC 3551
 *
 * @param encoding_name, 编码名, 请参考 RFC 3551, 如果payload_type不是动态的, 可能传null就好
 *
 * @param media_type, 媒体类型, 请参考 RFC 3551, 1 是视频, 2是音频
 *
 * @param clock_rate, 请参考 RFC 3551
 *
 * @return {0} if successful
 */
public native int SetRTPReceiverPayloadType(long rtp_receiver_handle, int payload_type, String encoding_name, int media_type, int clock_rate);


/**
 *设置 RTP Receiver 音频采样率
 *
 * @param rtp_receiver_handle, CreateRTPReceiver
 * @param sampling_rate, 音频采样率
 *
 * @return {0} if successful
 */
public native int SetRTPReceiverAudioSamplingRate(long rtp_receiver_handle, int sampling_rate);

/**
 *设置 RTP Receiver 音频通道数
 *
 * @param rtp_receiver_handle, CreateRTPReceiver
 * @param channels, 音频通道数
 *
 * @return {0} if successful
 */
public native int SetRTPReceiverAudioChannels(long rtp_receiver_handle, int channels);


/**
 *设置 RTP Receiver 远端地址
 *
 * @param rtp_receiver_handle, CreateRTPReceiver
 * @param address, IP地址
 * @param port, 端口
 *
 * @return {0} if successful
 */
public native int SetRTPReceiverRemoteAddress(long rtp_receiver_handle, String address, int port);

/**
 *初始化 RTP Receiver
 *
 * @param rtp_receiver_handle, CreateRTPReceiver
 *
 * @return {0} if successful
 */
public native int InitRTPReceiver(long rtp_receiver_handle);

/**
 *UnInit RTP Receiver
 *
 * @param rtp_receiver_handle, CreateRTPReceiver
 *
 * @return {0} if successful
 */
public native int UnInitRTPReceiver(long rtp_receiver_handle);


/**
 *Destory RTP Receiver Session
 *
 * @param rtp_receiver_handle, CreateRTPReceiver
 *
 * @return {0} if successful
 */
public native int DestoryRTPReceiverSession(long rtp_receiver_handle);


/**
 *Destory RTP Receiver
 *
 * @param rtp_receiver_handle, CreateRTPReceiver
 *
 * @return {0} if successful
 */
public native int DestoryRTPReceiver(long rtp_receiver_handle);
PostAudioPacket(SmartPlayerJniV2.java),投递音频包给外部Live source,目前仅于语音对讲使用:
/*
 * SmartPlayerJniV2.java
 * Author: https://daniusdk.com
 */
/**
 * 投递音频包给外部Live source, 注意ByteBuffer对象必须是DirectBuffer
 *
 * @param handle: return value from SmartPlayerOpen()
 *
 * @return {0} if successful
 */
public native int PostAudioPacket(long handle, int codec_id,
                          java.nio.ByteBuffer packet, int offset, int size, long pts, boolean is_pts_discontinuity,
                          java.nio.ByteBuffer extra_data, int extra_data_offset, int extra_data_size, int sample_rate, int channels);
GB28181接口调用
对应GB28181相关接口调用相关设计如下:
/*
 * SmartPublisherJniV2.java
 * Author: https://daniusdk.com
 */
/**
 * 设置GB28181 RTP Sender
 *
 * @param rtp_sender_handle, CreateRTPSender返回值
 * @param rtp_payload_type, 对于GB28181 PS, 协议定义是96, 具体以SDP为准,  RFC 3551有定义
 * @param encoding_name, 编码名, 请参考 RFC 3551, 当前仅支持: "PS", 其他值返回失败
 * @return {0} if successful
 */
public native int SetGB28181RTPSender(long handle, long rtp_sender_handle, int rtp_payload_type, String encoding_name);

/**
 * 设置GB28181 RTP 收到的音频包回调
 * @param handle
 * @param audio_packet_callback
 * @return
 */
public native int SetGB28181ReceiveAudioPacketCallback(long handle, NTAudioPacketCallback audio_packet_callback);

/**
 * 启动 GB28181 媒体流
 *
 * @return {0} if successful
 */
public native int StartGB28181MediaStream(long handle);

/**
 * 停止 GB28181 媒体流
 *
 * @return {0} if successful
 */
public native int StopGB28181MediaStream(long handle);
总结
关键技术点
1. 信令处理
根据 GB28181 协议要求,实现信令的编解码、交换与处理等功能。利用 Socket 编程实现与设备的通信,遵循 GB28181 协议规定的信令格式和流程。例如,实现注册、心跳、设备位置请求等信令的处理。
2. 媒体传输
负责视频和音频数据的传输,确保数据传输的稳定性和实时性。可以通过拉取 RTSP 或 RTMP 流的方式,将视频数据接入到 GB28181 平台。
3. 错误处理与日志记录
在开发过程中,要充分考虑异常情况和错误处理。通过合理的日志记录,帮助定位问题并优化代码。例如,处理注册超时、网络传输层错误、心跳异常等情况。
五、性能优化与测试
在实现过程中,需要注意性能优化,如减少内存占用、降低 CPU 使用率等。同时,要进行充分的测试,包括功能测试、稳定性测试、兼容性测试等,确保设备能够稳定地接入到国标 28181 服务平台。
通过上述步骤和技术要点,可以在 Android 平台上实现 GB28181 设备接入到国标 28181 服务平台。这不仅可以拓展 Android 设备的应用场景,还可以提升视频监控系统的互联互通能力。希望本文对开发者有所帮助,推动 GB28181 协议在 Android 平台上的应用和发展。
原创声明:本文系作者授权腾讯云开发者社区发表,未经许可,不得转载。
如有侵权,请联系 cloudcommunity@tencent.com 删除。
原创声明:本文系作者授权腾讯云开发者社区发表,未经许可,不得转载。
如有侵权,请联系 cloudcommunity@tencent.com 删除。
评论
登录后参与评论
推荐阅读
目录
腾讯云开发者

Copyright © 2013 - 2026 Tencent Cloud. All Rights Reserved. 腾讯云 版权所有
深圳市腾讯计算机系统有限公司 ICP备案/许可证号:粤B2-20090059 ![]() 粤公网安备44030502008569号
粤公网安备44030502008569号
腾讯云计算(北京)有限责任公司 京ICP证150476号 | 京ICP备11018762号