长篇好文 | 全离线部署Zabbix7.0+MySQL8.0+PHP8.0

长篇好文 | 全离线部署Zabbix7.0+MySQL8.0+PHP8.0

Zabbix
发布于 2025-02-27 12:31:15
发布于 2025-02-27 12:31:15
作者简介
- Zabbix资深玩家,SRE高级运维架构师,精通服务组件监控、模板制作及告警治理;
- 擅长领域:Zabbix API定制化开发,对接企业蓝鲸,JMS保垒机等运维资产管理;
- Zabbix 6.0 + 7.0 官方中文手册译者。
部署背景
银行作为金融行业的重要组成部分,对信息系统的稳定性和安全性有着极高的要求。为了确保银行机房内的系统能够得到有效的监控,笔者选择部署Zabbix 7.0 LTS作为主力军。然而,由于银行机房的特殊安全策略,不允许直连互联网,这对安装和部署带来了一定的挑战。因此,笔者决定采用全离线部署和编译的方式来完成Zabbix 7.0 LTS的安装,具体步骤详见下文。
一、环境约定
1.1 系统版本
- 操作系统:Red Hat Enterprise Linux 8.8 (Ootpa),高度的稳定企业级操作系统,能够为Zabbix的运行提供可靠的基础。
- Zabbix版本:Zabbix 7.0最新版LTS,实时监控服务器、网络设备、应用程序等,为银行系统提供全面的监控服务。
- MySQL版本:MySQL 8.0,关系型数据库管理系统,为Zabbix提供数据存储支持。
- Web服务器:PHP 8.0,Zabbix的Web界面主程序语言,提供友好的用户交互体验
- 前端代理:NGINX,Web服务器和反向代理服务器,能够有效地处理并发请求,提高系统的响应速度。
1.2 硬件信息
- CPU:至少2个核心,以保证系统能够快速处理监控数据和执行相关任务。
- 内存:至少8GB,确保系统在运行Zabbix及相关服务时能够有足够的内存资源,避免出现内存不足的情况。
- 存储:至少20GB可用空间,用于存储Zabbix的安装文件、数据库文件、日志文件等,监控数据存储另算。
二、RHEL8安装
在开始部署之前,需要对RHEL8系统进行一系列的初始化配置,以确保系统处于一个干净、稳定的状态。
2.1 系统初始化
定义主机名
# hostnamectl set-hostname zabbix-server && bash配置安全级别
SELinux是一种增强系统安全性的机制,但在某些情况下可能会导致一些应用程序的运行出现问题,因此笔者将其设置为宽松模式。
# sestatus |egrep 'SELinux status|Current mode'
# sed -i 's/SELINUX=enforcing/SELINUX=disabled/g' /etc/selinux/config
# setenforce 0
# sestatus |egrep 'SELinux status|Current mode'
关闭防火墙
虽然银行机房内部有其他安全防护措施,但为了避免防火墙对Zabbix部署过程中的干扰,笔者暂时将其关闭。
# systemctl stop firewalld
# systemctl disable firewalld
# systemctl status firewalld
设置时间
# rm -f /etc/localtime
# ln -sf /usr/share/zoneinfo/Asia/Shanghai /etc/localtime
# hwclock -w
# timedatectl
# date
2.2 搭建本地源
由于银行机房无法直接连接互联网,笔者需要在RHEL8上搭建本地源,以便能够在离线环境下安装所需的软件包。因此需下载RHEL8.8的ISO光盘镜像,官网下载地址。
创建并挂载ISO目录
# ll /mnt/dvd
# mkdir -p /mnt/dvd
# mount -o loop /root/rhel-8.8-x86_64-dvd.iso /mnt/dvd
备份repos.d目录
# cd /etc/yum.repos.d/
# mkdir bak
# mv * bak
创建本地YUM源
# tee > /etc/yum.repos.d/local.repo << 'EOF'
[LocalRepo_BaseOS]

name=LocalRepository_BaseOS
baseurl=file:///mnt/dvd/BaseOS
enabled=1
gpgcheck=0

[LocalRepo_AppStream]
name=LocalRepository_AppStream
baseurl=file:///mnt/dvd/AppStream
enabled=1
gpgcheck=0
EOF
测试本地YUM源
上述配置文件保存后,执行:
# yum clean all
# yum makecache
可以再 yum install lrzsz 之类的软件包安装一下试试。
# yum -y install lrzsz2.3 准备离线资源
为了顺利完成Zabbix的全离线部署,笔者需要提前准备好所有所需的离线资源。
- Zabbix:从Zabbix官方网站下载Zabbix 7.0最新版LTS的安装包,以及其所需的依赖库和插件。
- MySQL:下载MySQL 8安装包,确保其版本与笔者的部署需求相匹配。
- NGINX:下载NGINX的安装包,确保其版本与笔者的部署需求相匹配。
- 下载PHP:下载PHP 8的安装包,Zabbix Web运行基本环境。
下载安装包,之后拷贝到离线机器上
# wget https://cdn.zabbix.com/zabbix/sources/stable/7.0/zabbix-7.0.3.tar.gz
# wget https://cdn.mysql.com/archives/mysql-8.0/mysql-8.0.32-linux-glibc2.12-x86_64.tar
# wget https://nginx.org/download/nginx-1.24.0.tar.gz
# wget https://www.php.net/distributions/php-8.3.3.tar.gz
三、MySQL8安装
在安装MySQL 8之前,笔者需要先卸载系统中可能存在的原有MySQL版本,以避免版本冲突和其他潜在问题。
3.1 卸载原有版本
第一步:查看mysql安装版本
rpm -qa|grep -i mysql第二步:卸载Mysql
rpm -ev --nodeps 【上一步查询到的mysql版本名称】最后删除关于mysql相关的文件夹:查找根目录下所有者是mysql和有mysql名称的文件
find / -user mysql
find / -name mysql
把查找出的目录文件删除:rm -rf 路径
3.2 安装当前版本
目录计划:
- 安装目录:/usr/local/mysql
- data 目录:/data/mysql/data/
- 日志位置:/data/mysql/mysql_error.err
# xz -d tar xvf mysql-8.0.32-linux-glibc2.12-x86_64.tar
# tar xvf mysql-8.0.32-linux-glibc2.12-x86_64.tar.xz
# mv mysql-8.0.32-linux-glibc2.12-x86_64 mysql
# mv mysql /usr/local/
创建mysql用户和用户组
# groupadd mysql
# useradd -r -g mysql -s /bin/false mysql
将安装目录所有者及所属组改为mysql ,并创建相关文件夹
# cd /usr/local/
# chown -R mysql:mysql /usr/local/mysql/
# mkdir -p /data/mysql/{data,backup,scripts,binlog}
# ll /data/mysql/
# chown -R mysql:mysql /data/mysql/
添加环境变量
# echo "export PATH=$PATH:/usr/local/mysql/bin"  >>  /etc/profile
# source /etc/profile
修改my.cnf配置文件
# tee >  /etc/my.cnf << "EOF"
[mysqld]
user=mysql
port=3306
#basedir=/data/mysql
datadir = /data/mysql/data/
default_authentication_plugin=mysql_native_password
log_error=/data/mysql/mysql_error.err
max_connections=10000
max_connect_errors=10
character-set-server=utf8mb4
default-storage-engine=INNODB
default_authentication_plugin=mysql_native_password
[mysql]
default-character-set=utf8mb4
EOF
初始化mysql数据库
# mysqld --initialize --user=mysql获取mysql初始密码
# cat /data/mysql/mysql_error.err
2024-09-14T08:26:30.427181Z 0 [Warning] [MY-010918] [Server] 'default_authentication_plugin' is deprecated and will be removed in a future release. Please use authentication_policy instead.
2024-09-14T08:26:30.427271Z 0 [System] [MY-013169] [Server] /usr/local/mysql/bin/mysqld (mysqld 8.0.32) initializing of server in progress as process 30827
2024-09-14T08:26:30.450042Z 1 [System] [MY-013576] [InnoDB] InnoDB initialization has started.
2024-09-14T08:26:31.128008Z 1 [System] [MY-013577] [InnoDB] InnoDB initialization has ended.
2024-09-14T08:26:32.685398Z 6 [Note] [MY-010454] [Server] A temporary password is generated for root@localhost: h62_Ruq-hxpo
将mysql加入到服务,并设置开机自启,启动mysql
# cp /usr/local/mysql/support-files/mysql.server /etc/init.d/mysqld
# chkconfig mysqld on
# systemctl start mysqld
3.3 如有防火墙
查看防火墙开放端口
# firewall-cmd --list-all在防火墙中将3306端口开放
# firewall-cmd --zone=public --add-port=3306/tcp --permanent
# firewall-cmd --reload
3.4 验证连通性
遇到报错
# mysql -uroot -p
mysql: error while loading shared libraries: libtinfo.so.5: cannot open shared object file: No such file or directory
解决方案
# sudo ln -s /usr/lib64/libtinfo.so.6.1 /usr/lib64/libtinfo.so.5再次连接SQL
# mysql -uroot -p
Enter password:
Welcome to the MySQL monitor.  Commands end with ; or \g.
Your MySQL connection id is 8
Server version: 8.0.32

Copyright (c) 2000, 2022, Oracle and/or its affiliates.

Oracle is a registered trademark of Oracle Corporation and/or its
affiliates. Other names may be trademarks of their respective
owners.

Type 'help;' or '\h' for help. Type '\c' to clear the current input statement.
# 修改初始密码
mysql> alter user root@localhost identified by '111111';
Query OK, 0 rows affected (0.00 sec)
# 刷新权限
mysql> flush privileges;
Query OK, 0 rows affected (0.01 sec)
重启服务且测试
# systemctl enable mysql
# systemctl restart mysql
在远程服务器或Navicat上测试连接(可选)
四、Zabbix安装
4.1 安装依赖
在安装Zabbix之前,笔者需要先安装一些基础依赖库,以确保Zabbix能够正常编译和运行。
# yum -y install net-snmp net-snmp-devel pcre*4.2 编译安装
# groupadd zabbix
# useradd -g zabbix zabbix
# tar -zxf zabbix-7.0.3.tar.gz
# cd zabbix-7.0.3/
# ./configure --prefix=/usr/local/zabbix --enable-server --enable-agent --with-mysql --with-net-snmp --with-libcurl --with-libxml2 --with-unixodbc --enable-ipv6 --enable-java --with-openssl  --with-iconv --with-iconv-include --with-iconv-lib --with-libpcre --with-libevent --with-zlib --with-zlib-include --with-zlib-lib --with-libpthread
检验成功
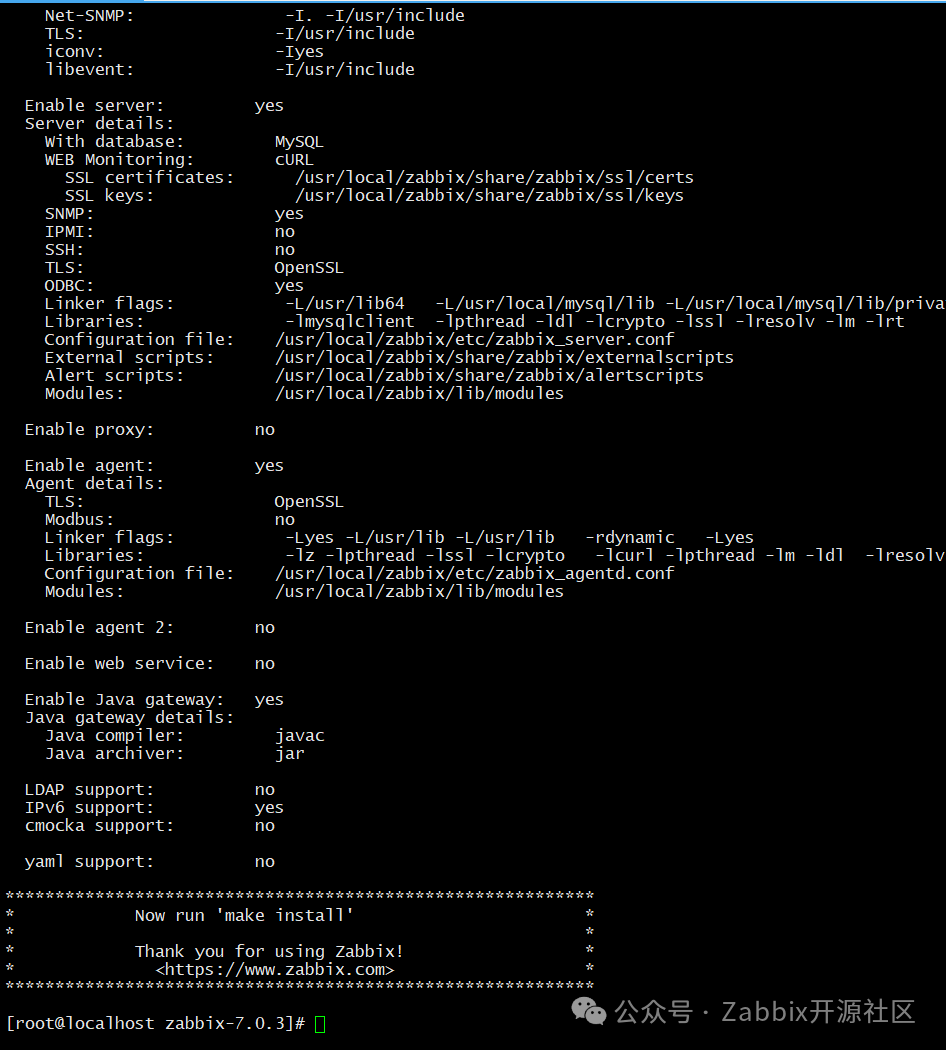
编译安装
# make install
make[2]: Nothing to be done for 'install-exec-am'.
 /usr/bin/mkdir -p '/usr/local/zabbix/share/man/man1'
 /usr/bin/install -c -m 644 'zabbix_get.man' '/usr/local/zabbix/share/man/man1/zabbix_get.1'
 /usr/bin/install -c -m 644 'zabbix_sender.man' '/usr/local/zabbix/share/man/man1/zabbix_sender.1'
 /usr/bin/mkdir -p '/usr/local/zabbix/share/man/man8'
 /usr/bin/install -c -m 644 'zabbix_agentd.man' '/usr/local/zabbix/share/man/man8/zabbix_agentd.8'
 /usr/bin/install -c -m 644 'zabbix_server.man' '/usr/local/zabbix/share/man/man8/zabbix_server.8'
make[2]: Leaving directory '/root/zabbix-7.0.3/man'
make[1]: Leaving directory '/root/zabbix-7.0.3/man'
Making install in misc
make[1]: Entering directory '/root/zabbix-7.0.3/misc'
make[2]: Entering directory '/root/zabbix-7.0.3/misc'
make[2]: Nothing to be done for 'install-exec-am'.
make[2]: Nothing to be done for 'install-data-am'.
make[2]: Leaving directory '/root/zabbix-7.0.3/misc'
make[1]: Leaving directory '/root/zabbix-7.0.3/misc'
make[1]: Entering directory '/root/zabbix-7.0.3'
make[2]: Entering directory '/root/zabbix-7.0.3'
make[2]: Nothing to be done for 'install-exec-am'.
make[2]: Nothing to be done for 'install-data-am'.
make[2]: Leaving directory '/root/zabbix-7.0.3'
make[1]: Leaving directory '/root/zabbix-7.0.3'
确认Zabbix是否成功安装
# ln -s /usr/local/mysql/lib/libmysqlclient.so.21.2.32 /usr/lib64/libmysqlclient.so.21

# /usr/local/zabbix/sbin/zabbix_server -V
zabbix_server (Zabbix) 7.0.3
Revision d93ce022627 19 August 2024, compilation time: Sep 26 2024 16:14:19

Copyright (C) 2024 Zabbix SIA
License AGPLv3: GNU Affero General Public License version 3 <https://www.gnu.org/licenses/>.
This is free software: you are free to change and redistribute it according to
the license. There is NO WARRANTY, to the extent permitted by law.

This product includes software developed by the OpenSSL Project
for use in the OpenSSL Toolkit (http://www.openssl.org/).

Compiled with OpenSSL 1.1.1k  FIPS 25 Mar 2021
Running with OpenSSL 1.1.1k  FIPS 25 Mar 2021
4.3 导入库表
初始化Zabbix库表
# mysql -uroot -p
password
mysql> create database zabbix character set utf8mb4 collate utf8mb4_bin;
mysql> create user zabbix@localhost identified by '111111';
mysql> grant all privileges on zabbix.* to zabbix@localhost;
mysql> create user zabbix@127.0.0.1 identified by '111111';
mysql> grant all privileges on zabbix.* to zabbix@127.0.0.1;
mysql> set global log_bin_trust_function_creators = 1;
mysql> quit;
导入SQL
# cd zabbix-7.0.3/database/mysql
# mysql -u root -p111111 zabbix < schema.sql
# mysql -u root -p111111 zabbix < images.sql
# mysql -u root -p111111 zabbix < data.sql
4.4 配置服务
注意:不进行一下步骤,直接配置service文件即可
# cd zabbix-7.0.3/
# cp misc/init.d/fedora/core/zabbix_* /etc/init.d/
# ll -d /etc/init.d/zabbix_*
# chmod +x /etc/init.d/zabbix_*
# chown -R zabbix: /usr/local/zabbix/
修改启动文件:
# vi /etc/init.d/zabbix_server
将
BASEDIR=/usr/local
修改为
BASEDIR=/usr/local/zabbix

# vi /etc/init.d/zabbix_agentd
将
BASEDIR=/usr/local
修改为
BASEDIR=/usr/local/zabbix
修改配置文件:
# grep -Ev "^#|^$" /usr/local/zabbix/etc/zabbix_server.conf
LogFile=/usr/local/zabbix/logs/zabbix_server.log
PidFile=/usr/local/zabbix/run/zabbix_server.pid
DBHost=127.0.0.1
DBName=zabbix
DBUser=zabbix
DBPassword=111111
DBPort=3306
Include=/usr/local/zabbix/etc/zabbix_server.conf.d/*.conf
StatsAllowedIP=127.0.0.1
EnableGlobalScripts=0
配置随机启动
# chkconfig --add zabbix_server
# chkconfig  zabbix_server on
# service zabbix_server start

# chkconfig --add zabbix_agentd
# chkconfig  zabbix_agentd on
# service start zabbix_agentd  start
五、Nginx安装
笔者使用离线资源安装NGINX,作为Zabbix的Web服务器。
5.1 安装部署
解压离线包
# tar -zxvf nginx-1.24.0.tar.gz
# cd nginx-1.24.0/
./configure --user=zabbix --group=zabbix --prefix=/usr/local/nginx --with-http_stub_status_module --with-http_ssl_module --with-http_gzip_static_module --with-pcre
# make -j 8 && make install
# /usr/local/nginx/sbin/nginx -V
测试版本
# /usr/local/nginx/sbin/nginx -V
nginx version: nginx/1.24.0
built by gcc 8.5.0 20210514 (Red Hat 8.5.0-18) (GCC)
built with OpenSSL 1.1.1k  FIPS 25 Mar 2021
TLS SNI support enabled
configure arguments: --user=zabbix --group=zabbix --prefix=/usr/local/nginx --with-http_stub_status_module --with-http_ssl_module --with-http_gzip_static_module --with-pcre
5.2 加载配置
nginx服务配置文件
# tee > /usr/local/nginx/conf/nginx.conf << "EOF"

user zabbix zabbix;
worker_processes auto;
error_log  logs/error.log  crit;
error_log  logs/error.log  notice;
error_log  logs/error.log  info;
pid        logs/nginx.pid;

events {
    worker_connections  1024;
}

http {
    include       mime.types;
    default_type  application/octet-stream;
    #access_log  logs/access.log  main;

    sendfile        on;
    #tcp_nopush     on;
    #keepalive_timeout  0;
    keepalive_timeout  65;
    #gzip  on;

    server {
        listen       80;
        server_name  localhost;
        #charset koi8-r;
        #access_log  logs/host.access.log  main;
        location / {
            root   html;
            index  index.html index.htm index.php;
        }
        error_page   500 502 503 504  /50x.html;
        location = /50x.html {
            root   html;
        }
        location ~ \.php$ {
            fastcgi_pass   127.0.0.1:9000;
            fastcgi_index  index.php;
            fastcgi_param  SCRIPT_FILENAME  $document_root$fastcgi_script_name;
            include        fastcgi_params;
        }
    }
}
EOF
5.3 配置服务
nginx服务services启动文件
# tee > /usr/lib/systemd/system/nginx.service << "EOF"

[Unit]
Description=nginx
After=network.target

[Service]
Type=forking
ExecStart=/usr/local/nginx/sbin/nginx -c /usr/local/nginx/conf/nginx.conf
ExecReload=-/usr/local/nginx/sbin/nginx -s reload
ExecStop=-/usr/local/nginx/sbin/nginx -s quit
PrivateTmp=true

[Install]
WantedBy=multi-user.target
EOF
启动服务,并设置其为开机自启。
# systemctl daeon-reload
# systemctl start nginx
# systemctl status nginx
# systemctl enable nginx
测试
# curl localhost -I
HTTP/1.1 200 OK
Server: nginx/1.24.0
Date: Sat, 14 Sep 2024 09:34:36 GMT
Content-Type: text/html
Content-Length: 615
Last-Modified: Sat, 14 Sep 2024 09:22:49 GMT
Connection: keep-alive
ETag: "66e555e9-267"
Accept-Ranges: bytes
六、PHP8安装
6.1 安装依赖
安装依赖环境
# yum install -y unzip gcc gcc-c++ perl readline readline-devel openssl openssl-devel zlib zlib-devel ncurses-devel perl-ExtUtils-Embed libxslt* python3-devel安装依赖环境
# yum -y install libevent-devel unixODBC unixODBC-devel java-1.8.0-openjdk-devel openssl-devellibssh2 libssh2-devel OpenIPMI-devel 这三个包有问题
安装cmake
# yum install cmake -y
# cmake --version
cmake版本需大于3.4版本,如yum方式安装cmake版本低,则需要用手动编译方式进行替换
6.2 编译安装
执行配置脚本
# tar xf php-8.3.3.tar.gz
# cd php-8.3.3/
第一次编译安装PHP 8.0(试错)
# ./configure --prefix=/usr/local/php --sysconfdir=/etc/php --with-openssl --with-zlib --with-bz2 --with-curl --enable-bcmath --enable-gd --with-webp --with-jpeg --with-mhash --enable-mbstring --with-imap-ssl --with-mysqli --enable-exif --with-ffi --with-zip --enable-sockets --with-pcre-jit --enable-fpm --with-pdo-mysql --enable-pcntl --with-gettext --with-freetype执行配置脚本,报错系统无法找到满足要求的 SQLite3 版本(至少为 3.7.7)
checking whether to enable the SQLite3 extension... yes
checking for sqlite3 >= 3.7.7... no
configure: error: Package requirements (sqlite3 >= 3.7.7) were not met:

No package 'sqlite3' found

Consider adjusting the PKG_CONFIG_PATH environment variable if you
installed software in a non-standard prefix.
安装 sqlite开发库
# yum -y install sqlite-devel再次执行配置脚本,报错系统检测到需要 BZip2支持,但在默认路径下没有找到 BZip2库
checking whether to enable bc style precision math functions... yes
checking for BZip2 support... yes
checking for BZip2 in default path... not found
configure: error: Please reinstall the BZip2 distribution
安装 zip2开发库
[root@zabbix02 php-8.3.8]# yum -y install bzip2-devel再次执行配置脚本,报错系统需要找到 libffi 库且其版本需要大于或等于 3.0.11,但是并没有找到满足条件的库
checking whether to enable EXIF (metadata from images) support... yes
checking for FFI support... yes
checking for libffi >= 3.0.11... no
configure: error: Package requirements (libffi >= 3.0.11) were not met:

No package 'libffi' found

Consider adjusting the PKG_CONFIG_PATH environment variable if you
installed software in a non-standard prefix.
安装 libffi开发库
[root@zabbix02 php-8.3.8]# yum -y install libffi-devel再次执行配置脚本,报错系统没有找到 libpng 库
checking for zlib... yes
checking for libpng... no
configure: error: Package requirements (libpng) were not met:

No package 'libpng' found

Consider adjusting the PKG_CONFIG_PATH environment variable if you
installed software in a non-standard prefix.
安装 libpng开发库
[root@zabbix02 php-8.3.8]# yum -y install libpng-devel再次执行配置脚本,报错系统没有找到 libwebp 库,或者找到的版本低于所需的 0.2.0
checking for libpng... yes
checking for libwebp >= 0.2.0... no
configure: error: Package requirements (libwebp >= 0.2.0) were not met:

No package 'libwebp' found

Consider adjusting the PKG_CONFIG_PATH environment variable if you
installed software in a non-standard prefix.
安装 libwebp 开发库
[root@zabbix02 php-8.3.8]# yum -y install libwebp-devel再次执行配置脚本,报错系统没有找到 libjpeg 库
checking for libwebp >= 0.2.0... yes
checking for libjpeg... no
configure: error: Package requirements (libjpeg) were not met:

No package 'libjpeg' found

Consider adjusting the PKG_CONFIG_PATH environment variable if you
installed software in a non-standard prefix.
安装 libjpeg开发库
[root@zabbix02 php-8.3.8]# yum -y install libjpeg-devel再次执行配置脚本,报错系统没有找到 oniguruma 库
checking whether to enable multibyte regex support (requires oniguruma)... yes
checking for oniguruma... no
configure: error: Package requirements (oniguruma) were not met:

No package 'oniguruma' found

Consider adjusting the PKG_CONFIG_PATH environment variable if you
installed software in a non-standard prefix.
安装 oniguruma开发库
# yum install autoconf automake libtool -y
# wget https://github.com/kkos/oniguruma/archive/v6.9.4.tar.gz -O oniguruma-6.9.4.tar.gz
# tar xf oniguruma-6.9.4.tar.gz
# cd oniguruma-6.9.4/
# ./autogen.sh && ./configure --prefix=/usr
# make && make install
再次执行配置脚本,报错系统没有找到符合要求的 libzip 库版本
checking for zip archive read/write support... yes
checking for libzip >= 0.11 libzip != 1.3.1 libzip != 1.7.0... no
configure: error: Package requirements (libzip >= 0.11 libzip != 1.3.1 libzip != 1.7.0) were not met:

No package 'libzip' found
No package 'libzip' found
No package 'libzip' found

Consider adjusting the PKG_CONFIG_PATH environment variable if you
installed software in a non-standard prefix.
安装 libzip开发库
[root@zabbix02 php-8.3.8]# wget ftp://ftp.icm.edu.pl/packages/linux-pbone/rpms.remirepo.net/enterprise/7/remi/x86_64/libzip5-devel-1.10.0-1.el7.remi.x86_64.rpm
[root@zabbix02 php-8.3.8]# wget ftp://ftp.icm.edu.pl/packages/linux-pbone/rpms.remirepo.net/enterprise/7/remi/x86_64/libzip5-1.10.0-1.el7.remi.x86_64.rpm
[root@zabbix02 php-8.3.8]# yum -y install ./libzip5-*
安装libcurl开发库
configure: error: Package requirements (libcurl >= 7.29.0) were not met:

Package 'libcurl', required by 'virtual:world', not found

Consider adjusting the PKG_CONFIG_PATH environment variable if you
installed software in a non-standard prefix.

Alternatively, you may set the environment variables CURL_CFLAGS
and CURL_LIBS to avoid the need to call p# yum install -y libcurl-devel解决PHP gd FreeType不支持
下载解压freetype源码包,执行配置脚本
# curl -LO https://jaist.dl.sourceforge.net/project/freetype/freetype2/2.13.2/freetype-2.13.2.tar.xz
# tar xf freetype-2.13.2.tar.xz
# cd freetype-2.13.2
# ./configure
执行成功,这里会有一个WARNING,可以不予理会
Library configuration:
  external zlib: yes (pkg-config)
  bzip2:         yes (autoconf test)
  libpng:        yes (pkg-config)
  harfbuzz:      no
  brotli:        no
  pthread:       yes

configure: WARNING:
  `make refdoc' will fail since pip package `docwriter' is not installed.
  To install, run `pip install docwriter', or to use a Python
  virtual environment, run `make refdoc-venv' (requires pip package
  `virtualenv').  These operations require Python >= 3.5.
编译安装
[root@zabbix02 freetype-2.13.2]# make && make install安装成功
/usr/bin/install -c -m 644 /root/freetype-2.13.2/include/ft2build.h                  \
          /usr/local/include/freetype2/ft2build.h
/usr/bin/install -c -m 644 ./builds/unix/ftconfig.h                        \
          /usr/local/include/freetype2/freetype/config/ftconfig.h
/usr/bin/install -c -m 644 /root/freetype-2.13.2/objs/ftmodule.h                          \
          /usr/local/include/freetype2/freetype/config/ftmodule.h
/usr/bin/install -c -m 644 ./builds/unix/ftoption.h                        \
          /usr/local/include/freetype2/freetype/config/ftoption.h
/usr/bin/install -c -m 644 ./builds/unix/freetype2.m4          \
          /usr/local/share/aclocal/freetype2.m4
/usr/bin/install -c -m 644 ./builds/unix/freetype2.pc             \
          /usr/local/lib/pkgconfig/freetype2.pc
重新编译PHP
# cd php-8.3.8/
# make clean
# export PKG_CONFIG_PATH=/usr/local/lib/pkgconfig:$PKG_CONFIG_PATH
# ./configure --prefix=/usr/local/php --sysconfdir=/etc/php --with-openssl --with-zlib --with-bz2 --with-curl --enable-bcmath --enable-gd --with-webp --with-jpeg --with-mhash --enable-mbstring --with-imap-ssl --with-mysqli --enable-exif --with-ffi --with-zip --enable-sockets --with-pcre-jit --enable-fpm --with-pdo-mysql --enable-pcntl --with-gettext --with-freetype
完成最终安装
# make -j 4 && make install
Installing shared extensions:     /usr/local/php/lib/php/extensions/no-debug-non-zts-20230831/
Installing PHP CLI binary:        /usr/local/php/bin/
Installing PHP CLI man page:      /usr/local/php/php/man/man1/
Installing PHP FPM binary:        /usr/local/php/sbin/
Installing PHP FPM defconfig:     /etc/php/
Installing PHP FPM man page:      /usr/local/php/php/man/man8/
Installing PHP FPM status page:   /usr/local/php/php/php/fpm/
Installing phpdbg binary:         /usr/local/php/bin/
Installing phpdbg man page:       /usr/local/php/php/man/man1/
Installing PHP CGI binary:        /usr/local/php/bin/
Installing PHP CGI man page:      /usr/local/php/php/man/man1/
Installing build environment:     /usr/local/php/lib/php/build/
Installing header files:          /usr/local/php/include/php/
Installing helper programs:       /usr/local/php/bin/
  program: phpize
  program: php-config
Installing man pages:             /usr/local/php/php/man/man1/
  page: phpize.1
  page: php-config.1
Installing PDO headers:           /usr/local/php/include/php/ext/pdo/
准备PHP配置文件
# cd php-8.3.3/
# mv /etc/php/php-fpm.d/www.conf.default /etc/php/php-fpm.d/www.conf
# mv /etc/php/php-fpm.conf.default /etc/php/php-fpm.conf
# ln -s /usr/local/php/bin/* /usr/bin/
# cp ./sapi/fpm/php-fpm.service /lib/systemd/system/
# cp php.ini-development /usr/local/php/lib/php.ini
# ln -s /usr/local/php/lib/php.ini /etc/php.ini
6.3 配置服务
准备nginx配置文件
# cat /usr/local/nginx/conf/nginx.conf
user  zabbix;
worker_processes  1;

error_log  /apps/nginx/logs/error.log warn;

events {
    worker_connections  1024;
}


http {
    include     /apps/nginx/conf.d/*.conf;
    include       mime.types;
    log_format  main  '$remote_addr - $remote_user [$time_local] "$request" '
                      '$status $body_bytes_sent "$http_referer" '
                      '"$http_user_agent" "$http_x_forwarded_for"';
    access_log  /apps/nginx/logs/access.log  main;
    default_type  application/octet-stream;
    sendfile        on;
    keepalive_timeout  65;
}
[root@zabbix01 zabbix-7.0.0]# cat /usr/local/nginx/conf.d/zabbix.conf
server {
        listen 80;
        server_name localhost;
        root /apps/nginx/html;
        index index.php;
        location ~ \.php$ {
                index index.php;
                fastcgi_pass 127.0.0.1:9000;
                fastcgi_index index.php;
                fastcgi_param SCRIPT_FILENAME $document_root$fastcgi_script_name;
                include fastcgi_params;
        }
}
重启nginx
# systemctl restart nginx启动php-fpm
# systemctl daemon-reload
# systemctl enable --now php-fpm
这时php启动没有报错,但查看状态是failed,修改service文件
# vim /usr/lib/systemd/system/php-fpm.service
ProtectSystem=full   #将这一行修改为ProtectSystem=false
# systemctl daemon-reload
# systemctl start php-fpm
查看状态,服务已成功运行!
# systemctl status php-fpm
● php-fpm.service - The PHP FastCGI Process Manager
   Loaded: loaded (/usr/lib/systemd/system/php-fpm.service; enabled; vendor preset: disabled)
   Active: active (running) since Thu 2024-09-19 15:44:47 CST; 26s ago
 Main PID: 266392 (php-fpm)
    Tasks: 3 (limit: 23008)
   Memory: 8.4M
   CGroup: /system.slice/php-fpm.service
           ├─266392 php-fpm: master process (/etc/php/php-fpm.conf)
           ├─266393 php-fpm: pool www
           └─266394 php-fpm: pool www

Sep 19 15:44:47 localhost.localdomain systemd[1]: Started The PHP FastCGI Process Manager.
七、ZBX登录
7.1 加载前端
拷贝前端文件到nginx目录下
# rm -rf /usr/local/nginx/html
# cp -r zabbix-7.0.3/ui /usr/local/nginx/html
# chown -R zabbix.zabbix /usr/local/nginx
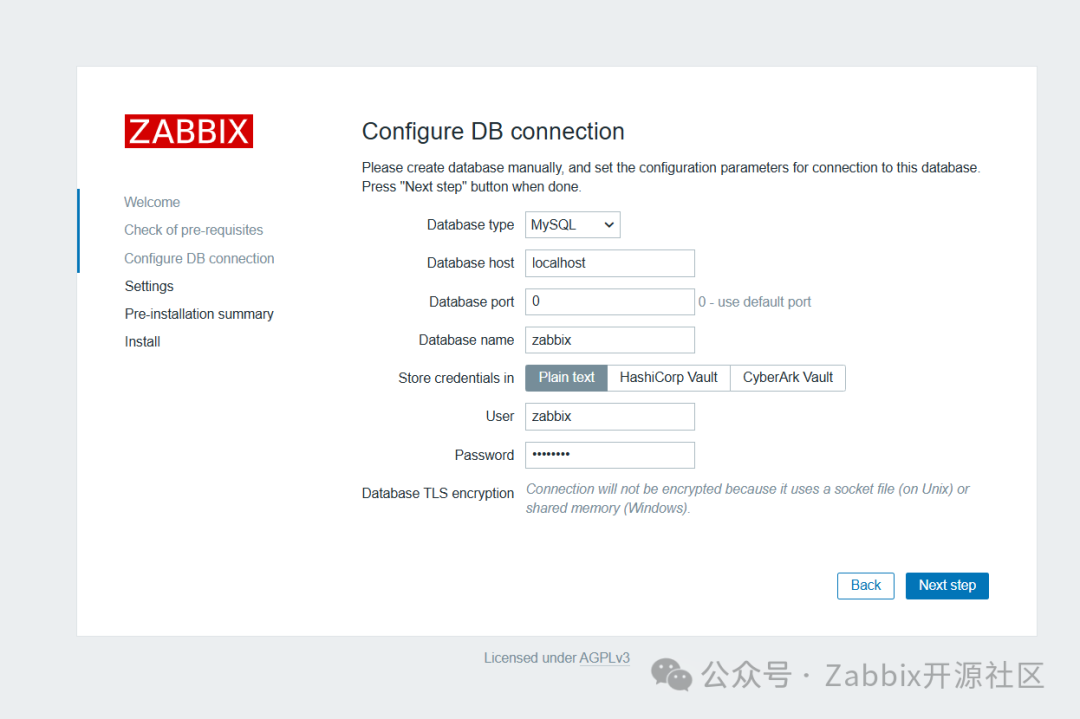
# systemctl restart php-fpm7.2 配置数据库
浏览器访问,可以打开zabbix前端
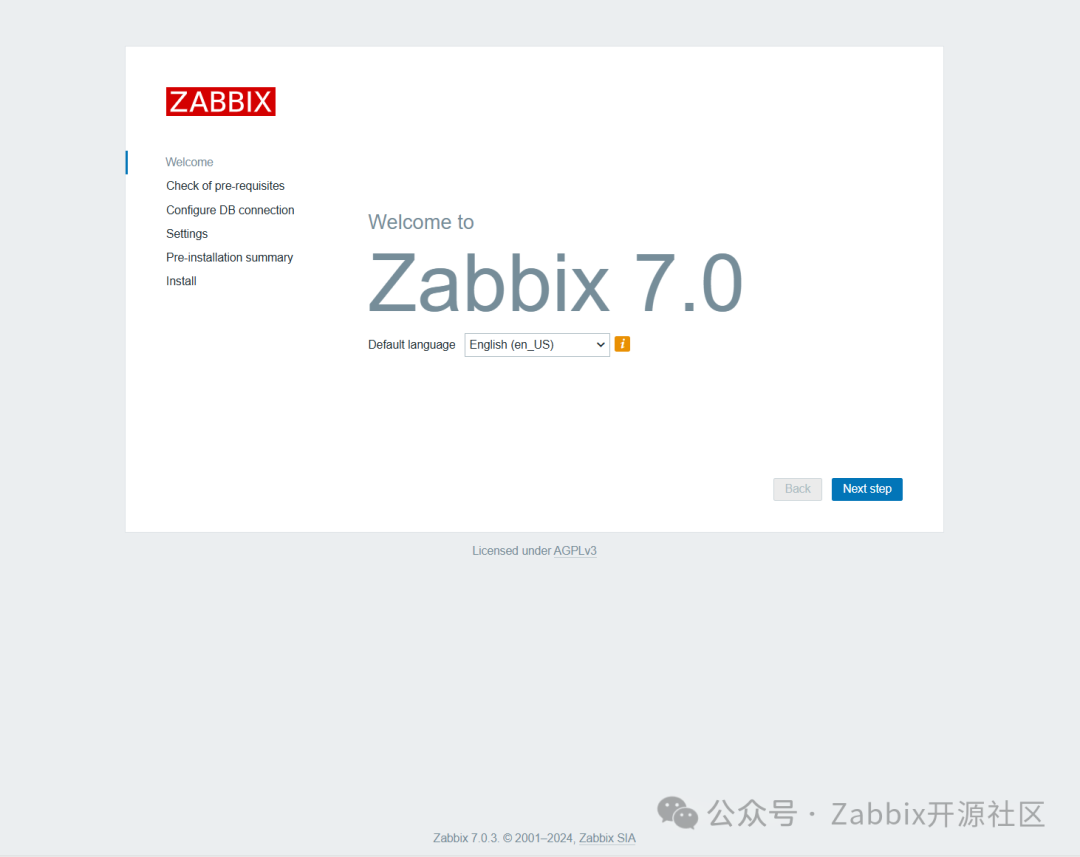
选择完语言后,提示
- Minimum required size of PHP post is 16M (configuration option "post_max_size").
- Minimum required limit on execution time of PHP scripts is 300 (configuration option "max_execution_time").
- Minimum required limit on input parse time for PHP scripts is 300 (configuration option "max_input_time").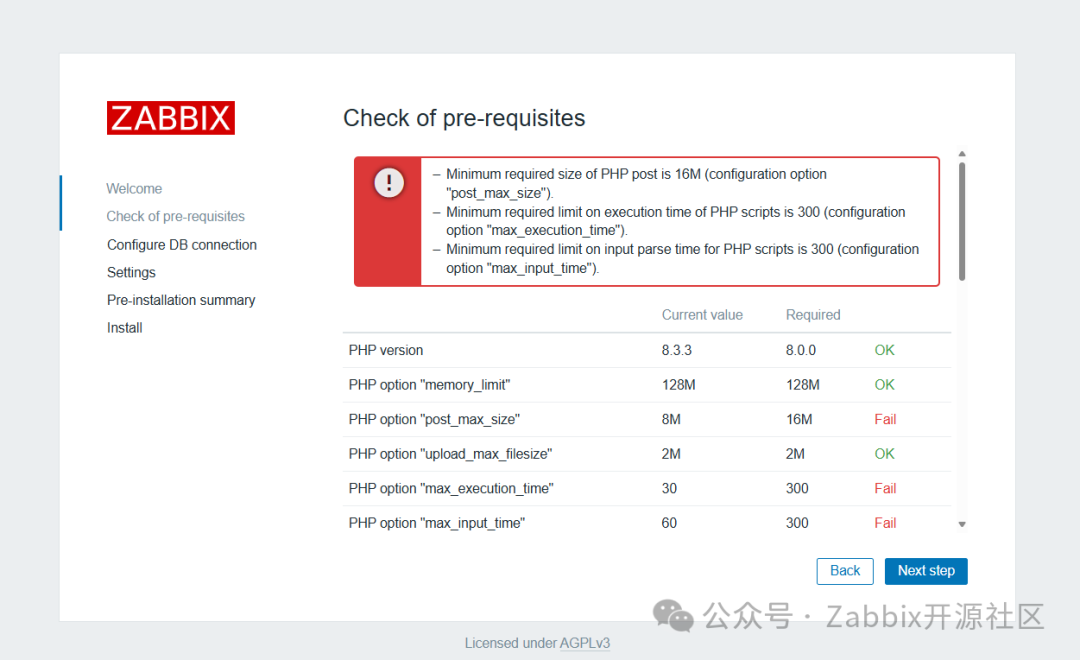
按照要求修改配置文件
# grep -E "^post_max_size|^max_execution_time|^max_input_time" /etc/php.ini
max_execution_time = 300
max_input_time = 300
post_max_size = 16M
重启PHP
# systemctl restart php-fpm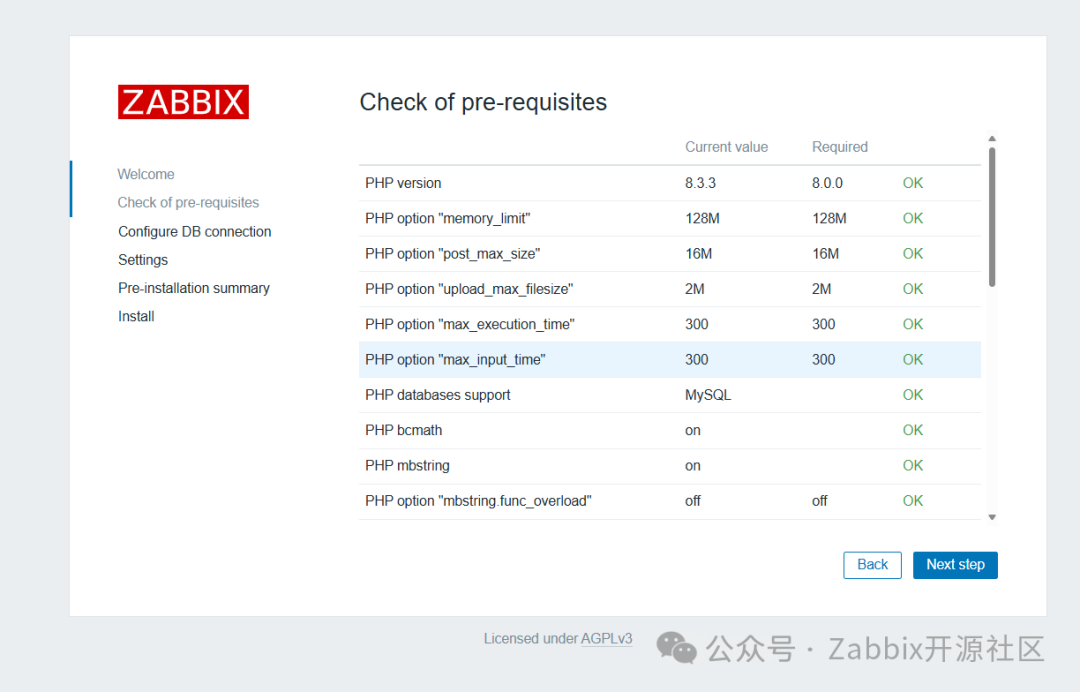
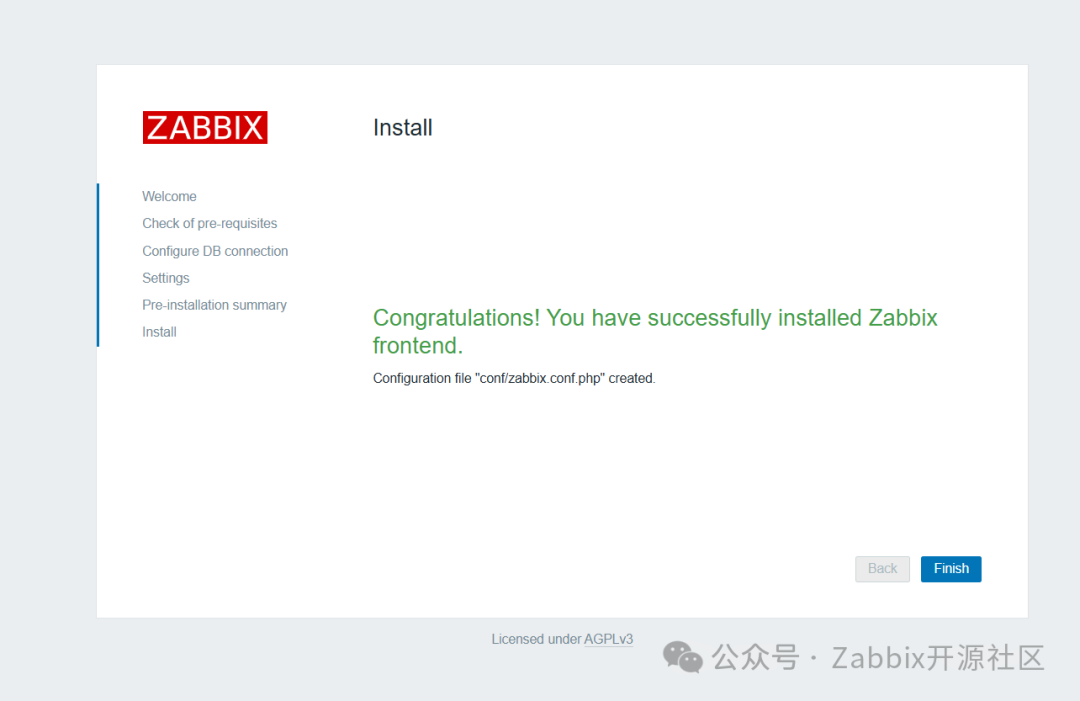
web页面继续后续步骤时,还会有个报错,无法创建/apps/nginx/html/conf/zabbix.conf.php
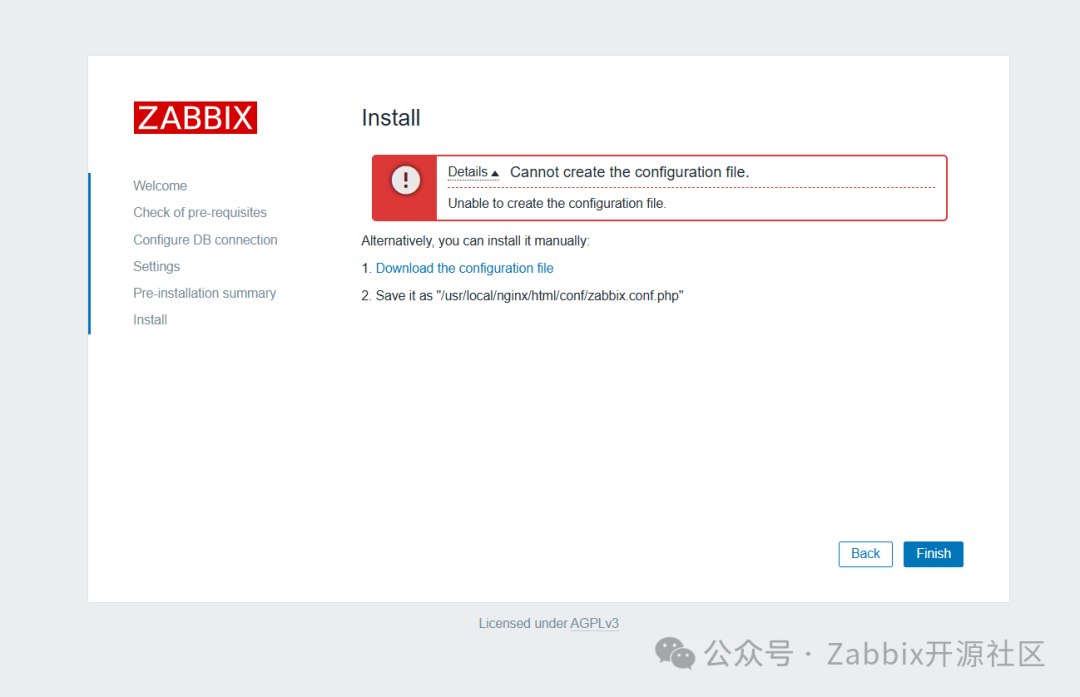
需要修改PHP配置文件,将php的运行用户改为zabbix然后重启zabbix
# grep -E "^user|^group" /etc/php/php-fpm.d/www.conf
user = zabbix
group = zabbix
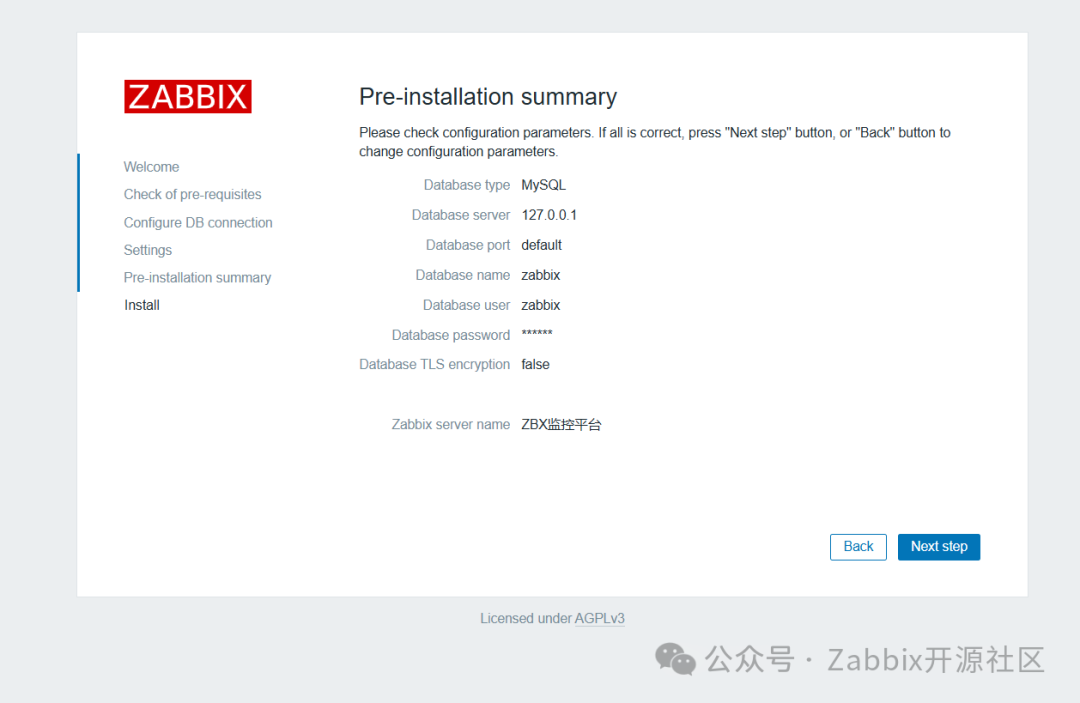
[root@zabbix01 php-8.3.8]# systemctl restart php-fpm点击Back,然后再点击下一步,提示保存成功。
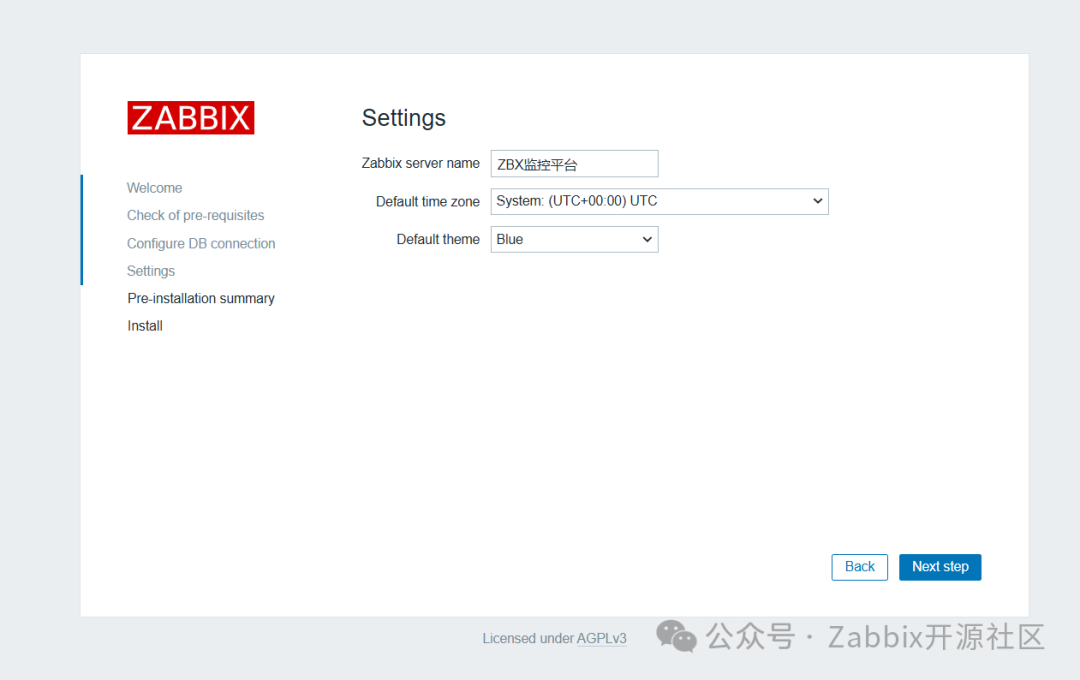
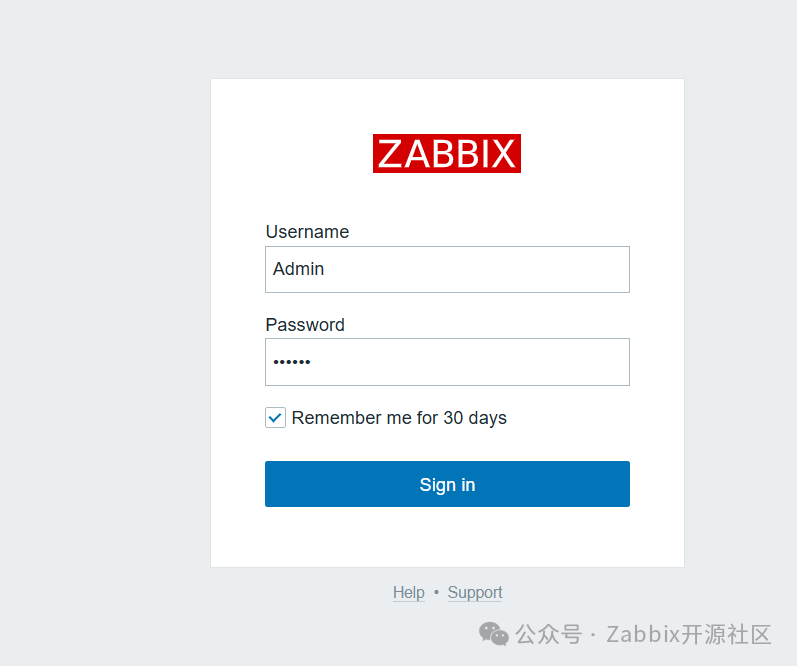
7.3 登陆平台
使用默认账密登录:Admin/zabbix
正常登录后,简单地配置仪表盘,可以展示很多7.0的新组件,页面如下图所示:

八、部署总结
以上分别详尽地介绍了RHEL8本地源配置以解决相关组件的基础依赖、二进制部署MySQL8.0开箱即用,Zabbix7.0编译安装、还有PHP8.0的编译和各种依赖组件解决的全过程。笔者最终成功地在某银行机房的全离线环境中部署了基于LNMP架构的Zabbix 7.0 LTS,为银行机房的系统监控提供了有力的支持。
当然,在实际部署过程中,大家可以根据银行机房的具体环境和需求进行适当的部署调整和配置优化,以确保系统的稳定性和安全性。
本文参与 腾讯云自媒体同步曝光计划,分享自微信公众号。
原始发表:2024-11-25,如有侵权请联系 cloudcommunity@tencent.com 删除
评论
登录后参与评论
推荐阅读
目录
腾讯云开发者

Copyright © 2013 - 2026 Tencent Cloud. All Rights Reserved. 腾讯云 版权所有
深圳市腾讯计算机系统有限公司 ICP备案/许可证号:粤B2-20090059 ![]() 粤公网安备44030502008569号
粤公网安备44030502008569号
腾讯云计算(北京)有限责任公司 京ICP证150476号 | 京ICP备11018762号