操作场景
本文为您介绍如何在安全增强内存型 M6ce 实例中构建 Tencent SGX 机密计算环境,并使用 Intel SGXSDK 验证 SGX 功能。
前提条件
已创建并登录 安全增强内存型 M6ce 实例。
如何创建实例,请参见 通过购买页创建实例。
如何登录实例,请参见 使用标准登录方式登录 Linux 实例(推荐)。
云服务器需外网访问能力,您可在创建云服务器时选择分配公网 IP,或在云服务器创建后为其配置 弹性公网 IP。
说明:
本文以使用操作系统为 TencentOS Server 3.1(TK4) 的实例为例,不同操作系统版本步骤存在一定区别,请根据您的实际情况操作。
安装 Intel SGXSDK
1. 执行以下命令,检查 kernel 版本。
uname -a
查看 kernel 版本是否低于5.4.119-19.0008:
是,请执行以下命令更新 kernel。
警告:
升级操作系统内核是一个比较复杂和风险较高的操作,可能导致系统不稳定或出现兼容性问题。在进行升级前,建议备份重要数据,了解升级过程和可能出现的问题,并谨慎操作。
yum update kernel
否,则请执行下一步。
2. 执行以下命令,安装 SGX runtime 所需的软件包。其中,SGX AESM 服务的默认安装目录为
/opt/intel/sgx-aesm-service。yum install \\libsgx-ae-le libsgx-ae-pce libsgx-ae-qe3 libsgx-ae-qve \\libsgx-aesm-ecdsa-plugin libsgx-aesm-launch-plugin libsgx-aesm-pce-plugin libsgx-aesm-quote-ex-plugin \\libsgx-dcap-default-qpl libsgx-dcap-default-qpl-devel libsgx-dcap-ql libsgx-dcap-ql-devel \\libsgx-dcap-quote-verify libsgx-dcap-quote-verify-devel libsgx-enclave-common libsgx-enclave-common-devel libsgx-epid-devel \\libsgx-launch libsgx-launch-devel libsgx-pce-logic libsgx-qe3-logic libsgx-quote-ex libsgx-quote-ex-devel \\libsgx-ra-network libsgx-ra-uefi libsgx-uae-service libsgx-urts sgx-ra-service \\sgx-aesm-service -y
3. 执行以下命令,安装 Intel SGXSDK。
wget https://mia-1251783334.cos.ap-shanghai.myqcloud.com/sgx_linux_x64_sdk_2.23.100.2.bin -O sgx_linux_x64_sdk_2.23.100.2.binchmod +x ./sgx_linux_x64_sdk_2.23.100.2.bin./sgx_linux_x64_sdk_2.23.100.2.bin
说明:
执行
./sgx_linux_x64_sdk时,需要选择安装目录,建议不要安装到当前目录,安装到/opt/intel/。此时,Intel SGXSDK 的默认安装目录为/opt/intel/sgxsdk。您可参见 Intel SGXSDK 用户手册开发 SGX 程序。4. SGX runtime 和 Intel SGXSDK 安装完成后,请重启实例。详情请参见 重启实例。
注意:
重启期间实例将无法正常提供服务,因此在重启之前,请确保云服务器已暂停业务请求。
配置腾讯云 SGX 远程证明服务
腾讯云 SGX 远程证明服务采用区域化部署,建议您访问 SGX 云服务器实例所在地域的远程证明服务,以获得最佳体验。
注意事项
腾讯云 SGX 远程证明服务部署在北京、上海、广州、南京、新加坡地域。
即便您的 SGX 云服务器实例不在上述地域,也依然可以正常使用 SGX 远程证明服务。只需就近选择任一已部署地域的服务进行访问即可,各地域间请求互通,不影响功能可用性。地域 | [Region-ID] |
北京 | bj |
上海 | sh |
广州 | gz |
南京 | nj |
新加坡 | sg |
Intel Ice Lake 仅支持基于 Intel SGX DCAP 远程证明方式,不支持 Intel EPID 远程证明方式。
腾讯云 SGX 远程证明服务升级
根据 Intel 相关公告,Intel 将于 北京时间 2026 年 4 月 30 日 23:00 完全停止 Intel® SGX PCS API 版本 2 和版本 3 的服务。 如您当前仍在使用 SGX 远程证明服务,请务必确保在此时间前升级至 Intel® SGX PCS API 版本 4。
升级 Intel® SGX PCS API 版本 4,您只需修改 /etc/sgx_default_qcnl.conf 配置文件中的远程证明服务 URL,将 v3 替换为 v4,保存后重新验证 SGX 远程证明功能即可。具体配置修改,请参见 操作步骤。
操作步骤
请根据以下步骤手动修改文件
/etc/sgx_default_qcnl.conf说明:
安装 Intel SGXSDK 后将自动生成远程证明服务的默认配置文件
/etc/sgx_default_qcnl.conf/etc/sgx_default_qcnl.conf属于 rpm 包 libsgx-dcap-default-qpl,其格式同时支持 toml 与 JSON 文件两种格式,下文将介绍两种情况下如何配置。
若采用 JSON 配置 /etc/sgx_default_qcnl.conf:使用 VIM 编辑器,打开
/etc/sgx_default_qcnl.conf,找到pccs_url,将该行修改为如下内容:"pccs_url": "https://sgx-dcap-server-tc.[Region-ID].tencent.cn/sgx/certification/v4/"
"pccs_url": "https://sgx-dcap-server-tc.bj.tencent.cn/sgx/certification/v4/"
若采用 toml 配置
/etc/sgx_default_qcnl.conf:使用 VIM 编辑器,将 /etc/sgx_default_qcnl.conf 修改为如下内容:# PCCS server addressPCCS_URL=https://sgx-dcap-server-tc.[Region-ID].tencent.cn/sgx/certification/v4/# To accept insecure HTTPS cert, set this option to FALSEUSE_SECURE_CERT=TRUE
# PCCS server addressPCCS_URL=https://sgx-dcap-server-tc.bj.tencent.cn/sgx/certification/v4/# To accept insecure HTTPS cert, set this option to FALSEUSE_SECURE_CERT=TRUE
验证 SGX 功能示例
示例1:启动 Enclave
Intel SGXSDK 中提供了 SGX 示例代码用于验证 SGX 功能,默认目录为
/opt/intel/sgxsdk/SampleCode。本示例中的代码(SampleEnclave)效果为启动一个 Enclave,以验证是否正常使用安装的 SGXSDK,以及 SGX 云服务器实例的机密内存资源是否可用。1. 执行以下命令,设置 Intel SGXSDK 相关的环境变量。
source /opt/intel/sgxsdk/environment
2. 执行以下命令,编译示例代码 SampleEnclave。
cd /opt/intel/sgxsdk/SampleCode/SampleEnclave && make
3. 执行以下命令,运行编译出的可执行文件。
./app
返回如下图所示结果,则说明已启动成功。

示例2:SGX 远程证明
Intel SGX 的 code tree 提供了示例代码用于验证 SGX 远程证明功能(DCAP)。本示例为生成和验证 Quote,示例涉及 Quote 生成方(QuoteGenerationSample)和 Quote 验证方(QuoteVerificationSample)。
1. 执行以下命令,设置 Intel SGXSDK 相关的环境变量。
source /opt/intel/sgxsdk/environment
2. 依次执行以下命令,安装 git 并下载 intel sgx DCAP code tree。
cd /root && yum install git -y
git clone https://github.com/intel/SGXDataCenterAttestationPrimitives.gitgit checkout DCAP_1.20
3. 依次执行以下命令,编译并运行 Quote 生成方示例代码 QuoteGenerationSample。
3.1 进入 QuoteGenerationSample 目录。
cd /root/SGXDataCenterAttestationPrimitives/SampleCode/QuoteGenerationSample
3.2 编译 QuoteGenerationSample。
make
3.3 运行 QuoteGenerationSample 并生成 Quote。
./app
4. 执行以下命令,编译 Quote 验证方示例代码 QuoteVerificationSample。
cd /root/SGXDataCenterAttestationPrimitives/SampleCode/QuoteVerificationSample && make
5. 执行以下命令,对 QuoteVerificationSample Enclave 进行签名。
sgx_sign sign -key Enclave/Enclave_private_sample.pem -enclave enclave.so -out enclave.signed.so -config Enclave/Enclave.config.xmlsgx_sign sign -key ../QuoteGenerationSample/Enclave/Enclave_private_sample.pem -enclave enclave.so -out enclave.signed.so -config Enclave/Enclave.config.xml # DCAP_1.16新版本路径
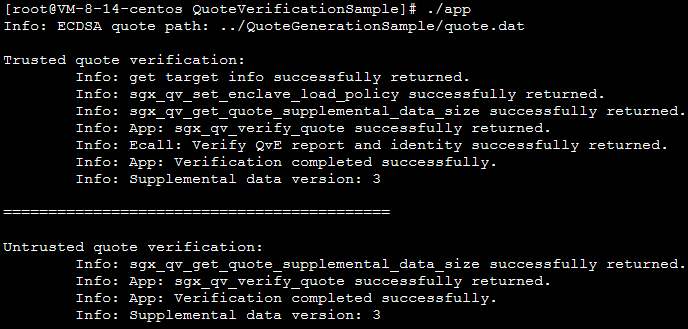
6. 执行以下命令,运行 QuoteVerificationSample 以验证 Quote。
./app
返回如下图所示结果,则说明已验证成功。