使用场景
持续集成和持续交付 (Continuous integration and continuous delivery,CI/CD) 是指通过使用自动化流水线,以短周期、高频率的方式开发和交付软件的过程。CI/CD 在软件开发中很常见,并且对数据工程和数据科学也越来越重要。相比手动流程,通过自动化代码的构建、测试和部署,开发团队能够更可靠地交付版本。
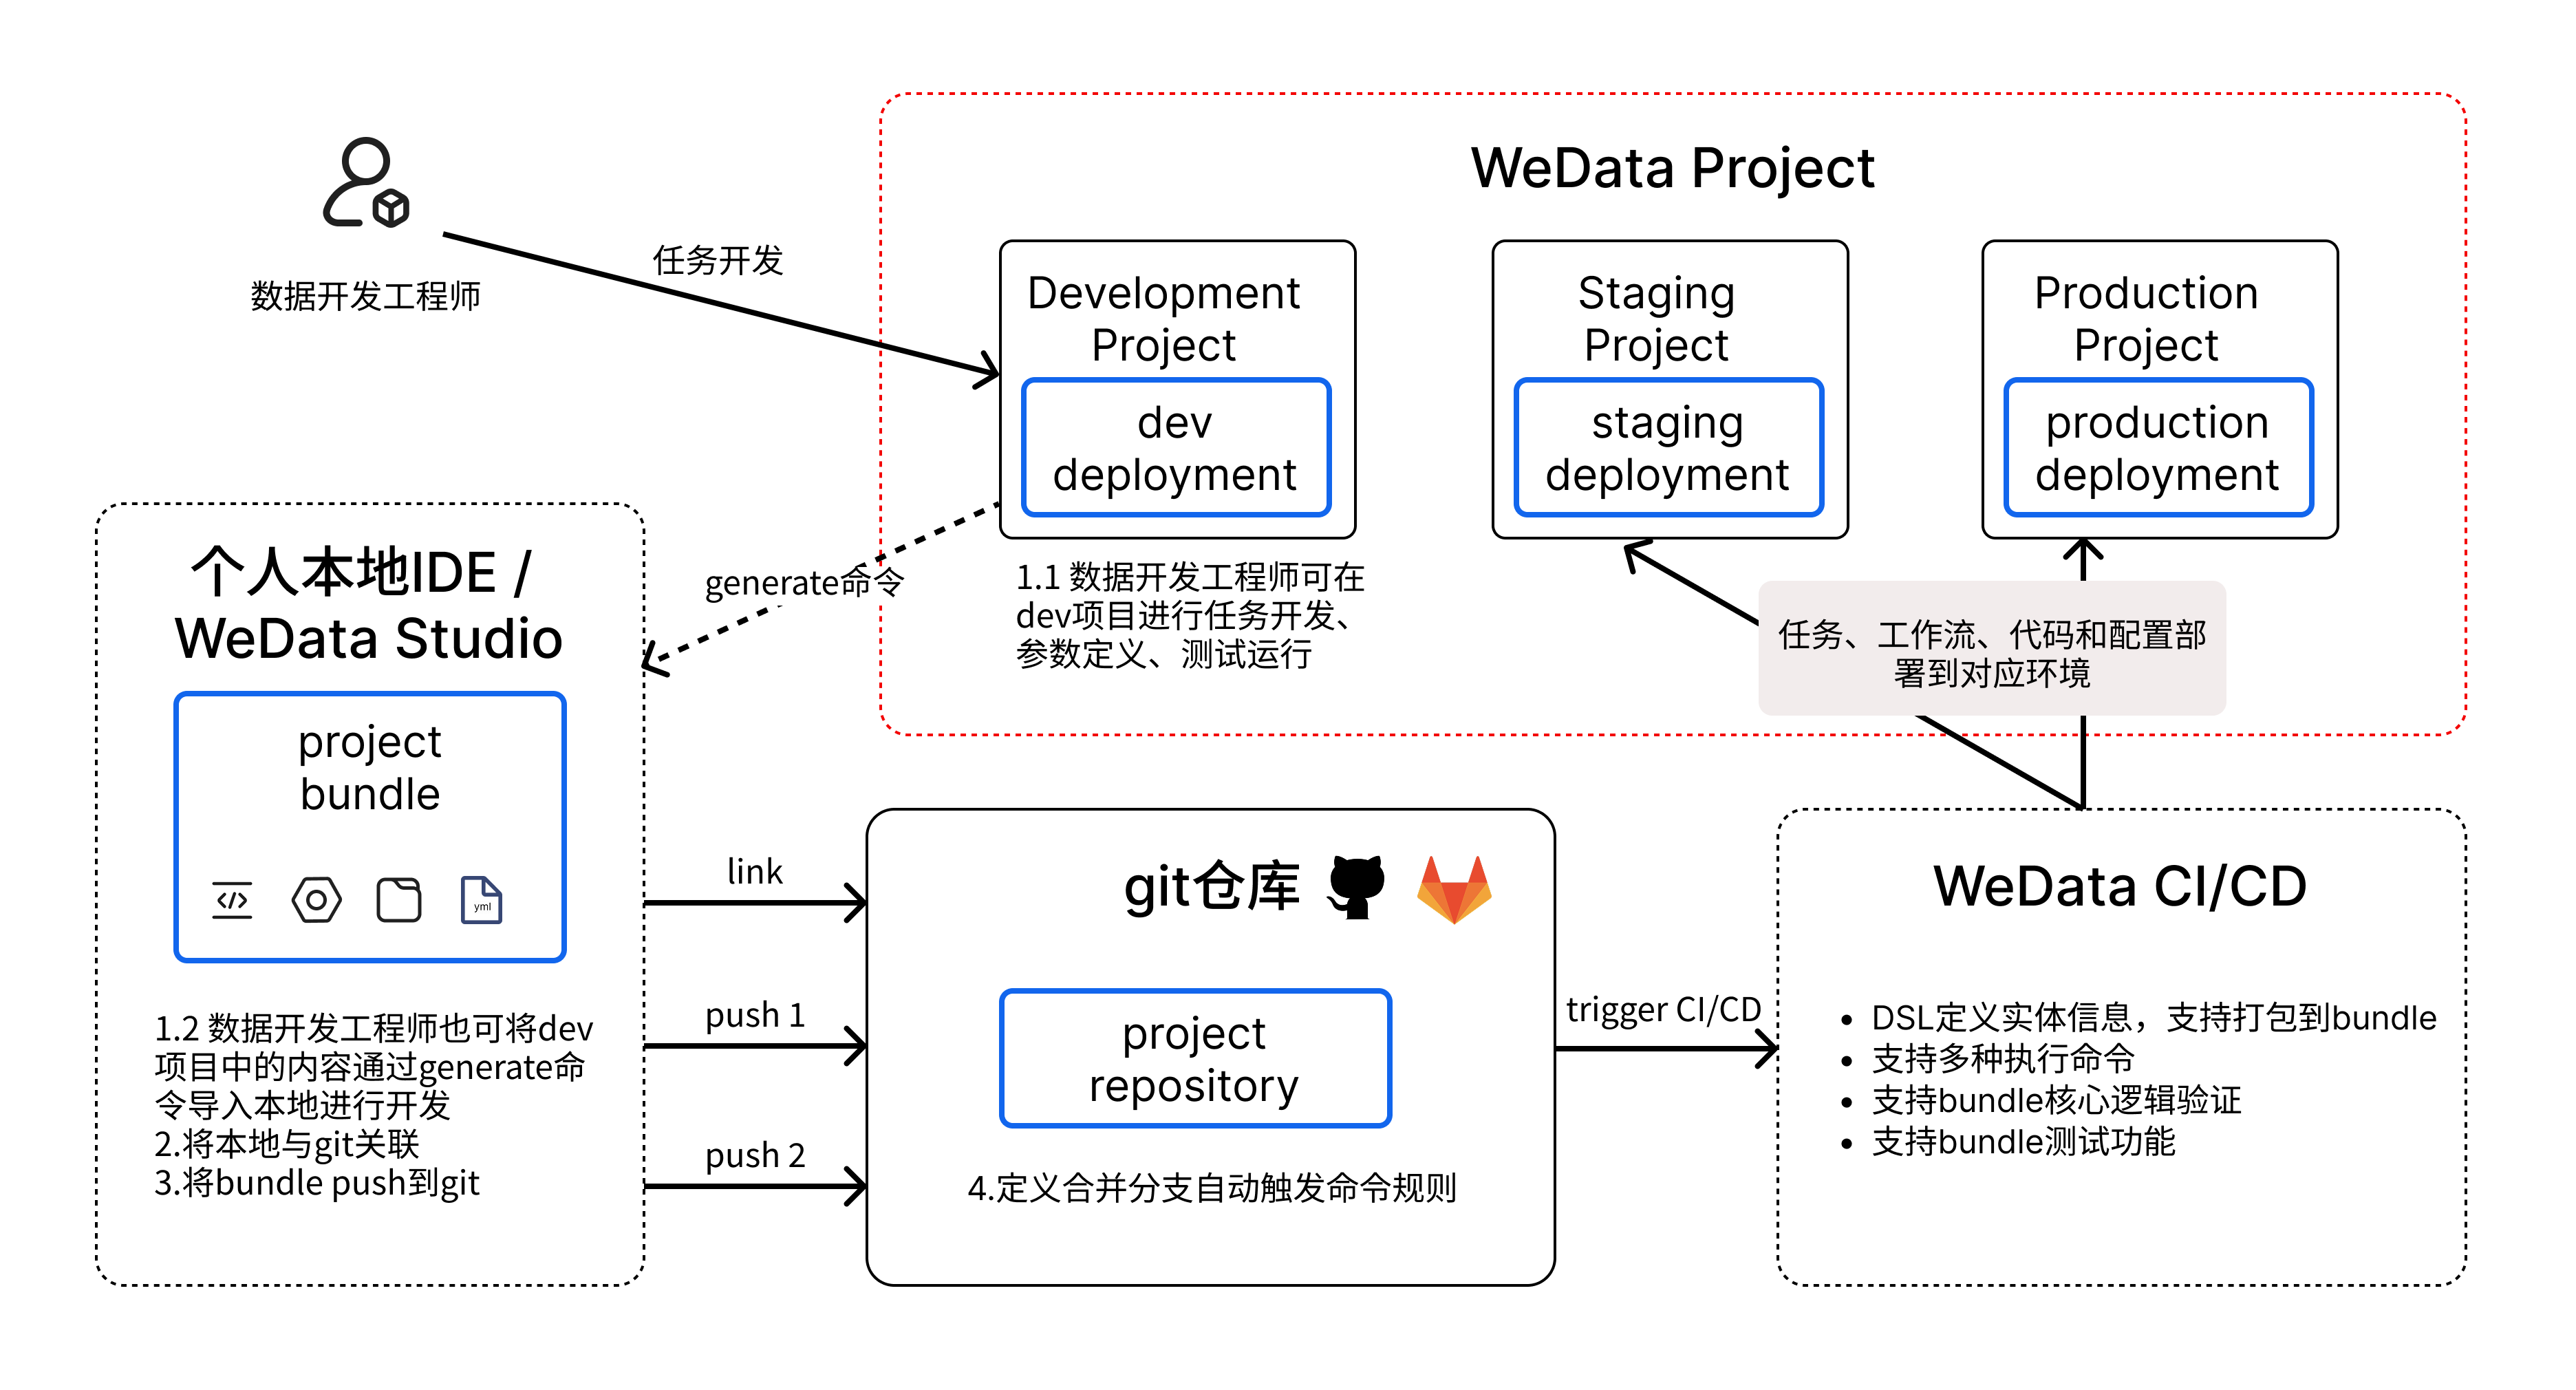
WeData 使用 WeData bundle 功能实现 CI/CD 能力。使用 bundle 将 WeData 上的资源(工作流、任务、资源文件、项目参数、告警规则、事件)描述为源文件,这些文件包可以进行源代码控制,并且您可以使用外部 CI/CD 自动化(例如 GitHub Actions)来触发运行、测试和部署。
功能简介:
将项目内资源配置信息定义为 yml 文件,可通过修改 yml 文件修改资源配置信息。
提供 bundle 相关命令,可实现资源运行、测试、部署等能力。
支持在 bundle 中配置开发和生产项目信息,从而实现开发生产隔离。
可结合外部版本管控系统(如 GitHub、GitLab)实现自动化触发运行、测试、部署的能力。
使用限制
功能架构
使用 bundle 开发
第一步:安装并登录
1. 安装客户端。
命令行中执行安装命令:
#Install the WeData client (no installation package required, simply run the program).#macOS system installationcurl https://wedata-agent-gz-1257305158.cos.ap-guangzhou.myqcloud.com/bundle/install-script/linux/install.sh |sudo sh#windows system installationcurl.exe -fsSL https://wedata-agent-gz-1257305158.cos.ap-guangzhou.myqcloud.com/bundle/install-script/windows/install.bat -o install.bat && install.bat
返回 Installation successful 即表示安装成功。

2. 登录客户端。
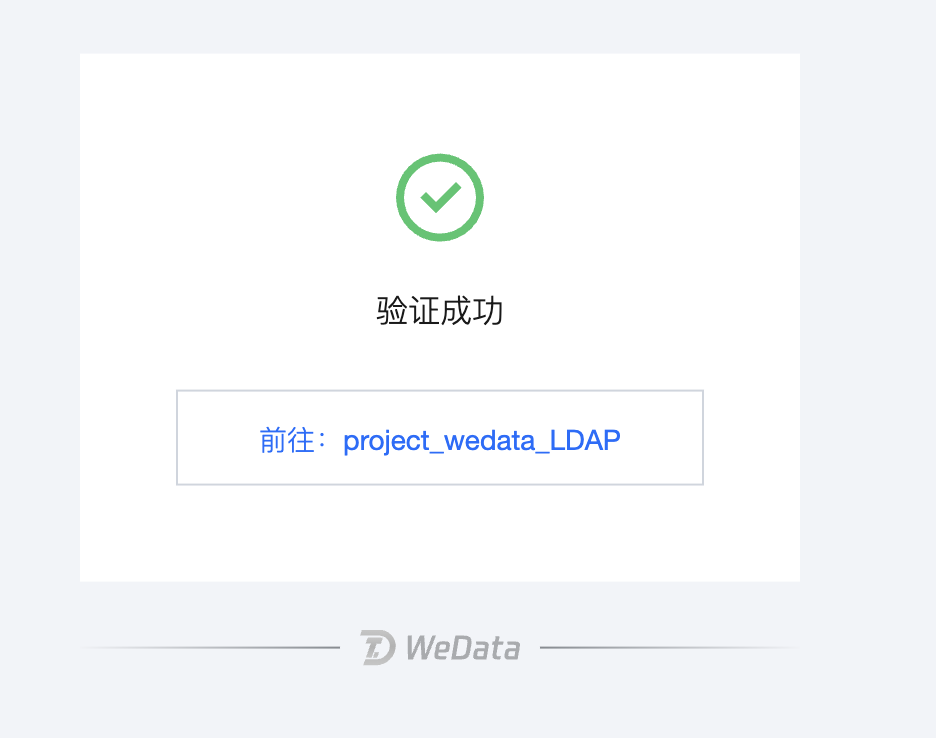
执行登录命令后将跳转到产品登录界面,完成登录后即可自动完成客户端登录。
wedata auth login
页面出现验证成功即表示客户端登录成功。

第二步:初始化 bundle 包
1. 初始化并配置 bundle 包。
执行初始化 bundle 命令。
wedata bundle init
2. 配置 wedata.yml 文件。
在 wedata.yml 文件的 targets 中,修改开发环境和生产环境对应的项目 url。
mode:development 表示开发环境、production 表示生产环境。
host:表示某环境对应的项目 url,选择任意带地域信息和项目 ID 信息的 url 即可。
root_path:production 项目可以指定 bundle 包在 WeData Studio 存储的位置。
targets:dev:mode: developmentworkspace:host: https://wedata-studio-fusion.cloud.tencent.com/studio/clone/packages/edit/11336a82-dd7c-4ba6-b3a6-74bda71cc237?ProjectId=2998786495253803008default: trueprod:mode: productionworkspace:host: https://wedata-studio-fusion.cloud.tencent.com/studio/datadev/workflow?ProjectId=2995753587734867968root_path: /Workspace/Users/test5-auto-test1/.bundle/${bundle.name}/${bundle.target}
3. 拉取资源并绑定。
从产品中拉取需要的资源进行绑定,绑定后按需要进行本地开发(修改本地资源 yml 文件)。
拉取资源:拉取工作流后,会将工作流下的任务也一并拉取到本地 bundle 包中。
${profile_name}:登录时配置的名称,表示使用对应登录账号进行操作鉴权。
wedata bundle generate workflow --existing-workflow-id ${workflow_id} -t dev -p ${profile_name}
若为工作流调度模式,则命令为:
wedata bundle generate triggerWorkflow --existing-triggerWorkflow-id ${workflow_id} -t dev -p ${profile_name}
绑定资源:
执行下面的命令绑定工作流和任务。
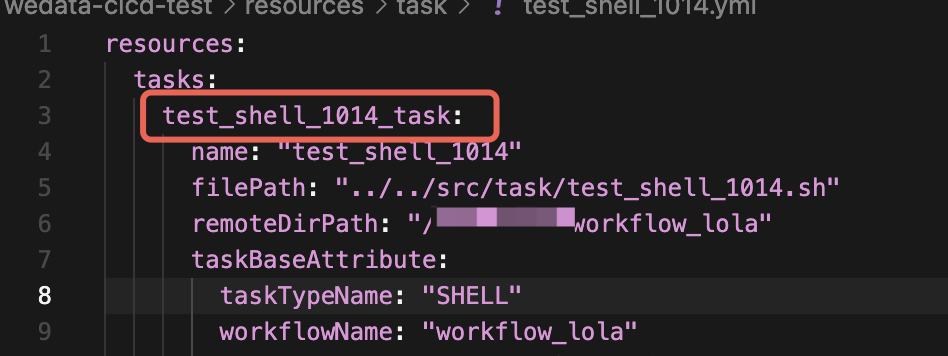
${resource key}:当前资源实体在本地 bundle 包中的唯一 key,在资源对应 YAML 文件下图所示位置。
wedata bundle deployment bind task ${resource key} ${task_id} -t dev -p ${profile_name}wedata bundle deployment bind workflow ${resource key} ${workflow_id} -t dev -p ${profile_name}
若为工作流调度模式,则命令为:
wedata bundle deployment bind triggerTask ${resource key} ${task_id} -t dev -p ${profile_name}wedata bundle deployment bind triggerWorkflow ${resource key} ${workflow_id} -t dev -p ${profile_name}
第三步:验证、运行并部署
1. 执行验证命令,部署前验证 bundle 包是否存在异常问题。
2. 执行运行命令,运行任务进行验证。
3. 执行部署命令,完成部署。
wedata bundle validate -t devwedata bundle run task ${resource key} -t dev -p ${profile_name}wedata bundle deploy -t dev
若为工作流调度模式,则命令为:
wedata bundle validate -t devwedata bundle run triggerTask ${resource key} -t dev -p ${profile_name}wedata bundle deploy -t dev
实践教程(与 GitLab 联动实现自动触发流水线部署)
第一步:安装并登录
1. 安装客户端。
命令行中执行安装命令。
#Install the WeData client (no installation package required, simply run the program).#macOS system installationcurl https://wedata-agent-gz-1257305158.cos.ap-guangzhou.myqcloud.com/bundle/install-script/linux/install.sh |sudo sh#windows system installationcurl.exe -fsSL https://wedata-agent-gz-1257305158.cos.ap-guangzhou.myqcloud.com/bundle/install-script/windows/install.bat -o install.bat && install.bat
返回 Installation successful 即表示安装成功。

2. 登录客户端。
执行登录命令后将跳转到产品登录界面,完成登录后即可自动完成客户端登录。
wedata auth login
页面出现验证成功即表示客户端登录成功。
第二步:初始化 bundle 包
1. 初始化并配置 bundle 包。
执行初始化 bundle 命令
wedata bundle init
2. 配置 wedata.yml 文件。
在 wedata.yml 文件的 targets 中,修改开发环境和生产环境对应的项目 url。
mode:development 表示开发环境、production 表示生产环境。
host:表示某环境对应的项目 url,选择任意带地域信息和项目 ID 信息的 url 即可。
root_path:production 项目可以指定 bundle 包在 WeData Studio 存储的位置。
targets:dev:mode: developmentworkspace:host: https://wedata-studio-fusion.cloud.tencent.com/studio/clone/packages/edit/11336a82-dd7c-4ba6-b3a6-74bda71cc237?ProjectId=2998786495253803008default: trueprod:mode: productionworkspace:host: https://wedata-studio-fusion.cloud.tencent.com/studio/datadev/workflow?ProjectId=2995753587734867968root_path: /Workspace/Users/test5-auto-test1/.bundle/${bundle.name}/${bundle.target}
第三步:绑定 git 仓库,构建流水线
1. 构建 git 仓库,使用 git 仓库工具,将本地仓库与远端 git 仓库进行绑定。
构建远端 git 仓库,仓库包含两个分支,一个是 dev 分支,一个是 prod 分支。
这里使用的是 ugit 工具,客户也可以使用其他工具进行本地和远端仓库的绑定。
2. 配置流水线文件,并放在 git 仓库中。
编写流水线触发文件,逻辑为若向 dev 分支 push 则执行验证和部署到 dev 环境的 bundle 命令,若向 prod 分支合并则执行验证和部署到 prod 环境的 bundle 命令。
注意:
这里为系统推荐触发逻辑,您也可以按需定义所需环境及触发流水线逻辑。
对应命令如下:
dev 环境对应命令:
wedata bundle validate -t devwedata bundle deploy -t dev
prod 环境对应命令:
wedata bundle validate -t prodwedata bundle deploy -t prod
git 流水线触发文件:将当前文件放在 git 仓库的第一层目录下。
注意:
该内容需按照注释进行修改,且不同的 GitLab 版本可能存在差异,需按情况进行修改和调整才能使用。
stages:- build# The build logic of the dev branchbuild_dev:stage: buildtags:- docker #CICD machine label, modify as neededscript:- |set -exapk add --no-cache curl sudocurl https://wedata-agent-sg-1257305158.cos.ap-singapore.myqcloud.com/bundle/install-script/linux/install.sh |sudo sh -s -- --region 'https://api-ap-singapore.wedata.tencentcloud.com'#Download the client script; it needs to be modified to suit different environments.# Create configuration fileconfig_file="$HOME/.wedatacfg"if [ ! -f "$config_file" ]; thenecho "The configuration file does not exist; create a new configuration file..."echo "host =https://ap-singapore.wedata.cloud.tencent.com/studio/datadev/workflow?ProjectId=2430455587205529600" > "$config_file"#It needs to be modified to any wedata URL in the current environment.echo "secret_id =******" >> "$config_file"#current user's secret_idecho "secret_key =******" >> "$config_file"#current user's secret_keyecho "region =ap-singapore" >> "$config_file"#Modify to the corresponding areaecho "is_intl =false" >> "$config_file"echo "The content is as follows:"cat "$config_file"elseecho "Current configuration details:"cat "$config_file"ficd wedata-cicd-test/cicd_bjjr/v_vyuyudu_bjjr/# Path to the corresponding bundleecho "This is the build logic for the dev branch."wedata bundle validate -t devecho "Start pushing to the dev environment:"wedata bundle deploy -t devonly:- dev #Change to the git branch name# The construction logic of the prod branchbuild_prod:stage: buildtags:- dockerscript:- |set -exapk add --no-cache curl sudocurl https://wedata-agent-sg-1257305158.cos.ap-singapore.myqcloud.com/bundle/install-script/linux/install.sh |sudo sh -s -- --region 'https://api-ap-singapore.wedata.tencentcloud.com'#Download the client script; you'll need to modify it to suit different environments.# Create configuration fileconfig_file="$HOME/.wedatacfg"if [ ! -f "$config_file" ]; thenecho "The configuration file does not exist; create a new configuration file..."echo "host =https://ap-singapore.wedata.cloud.tencent.com/studio/datadev/workflow?ProjectId=2430455587205529600" > "$config_file"#It needs to be modified to any wedata URL in the current environment.echo "secret_id =******" >> "$config_file"echo "secret_key =******" >> "$config_file"echo "region =ap-singapore" >> "$config_file"echo "is_intl =false" >> "$config_file"echo "The content is as follows:"cat "$config_file"elseecho "Current configuration details:"cat "$config_file"ficd wedata-cicd-test/cicd_bjjr/v_vyuyudu_bjjr/echo "This is the build logic for the prod branch."wedata bundle validate -t prodecho "Start pushing to the prod environment:"wedata bundle deploy -t prodonly:- merge_requests # Triggered for merge scenarios- prod # Triggered on the prod branch
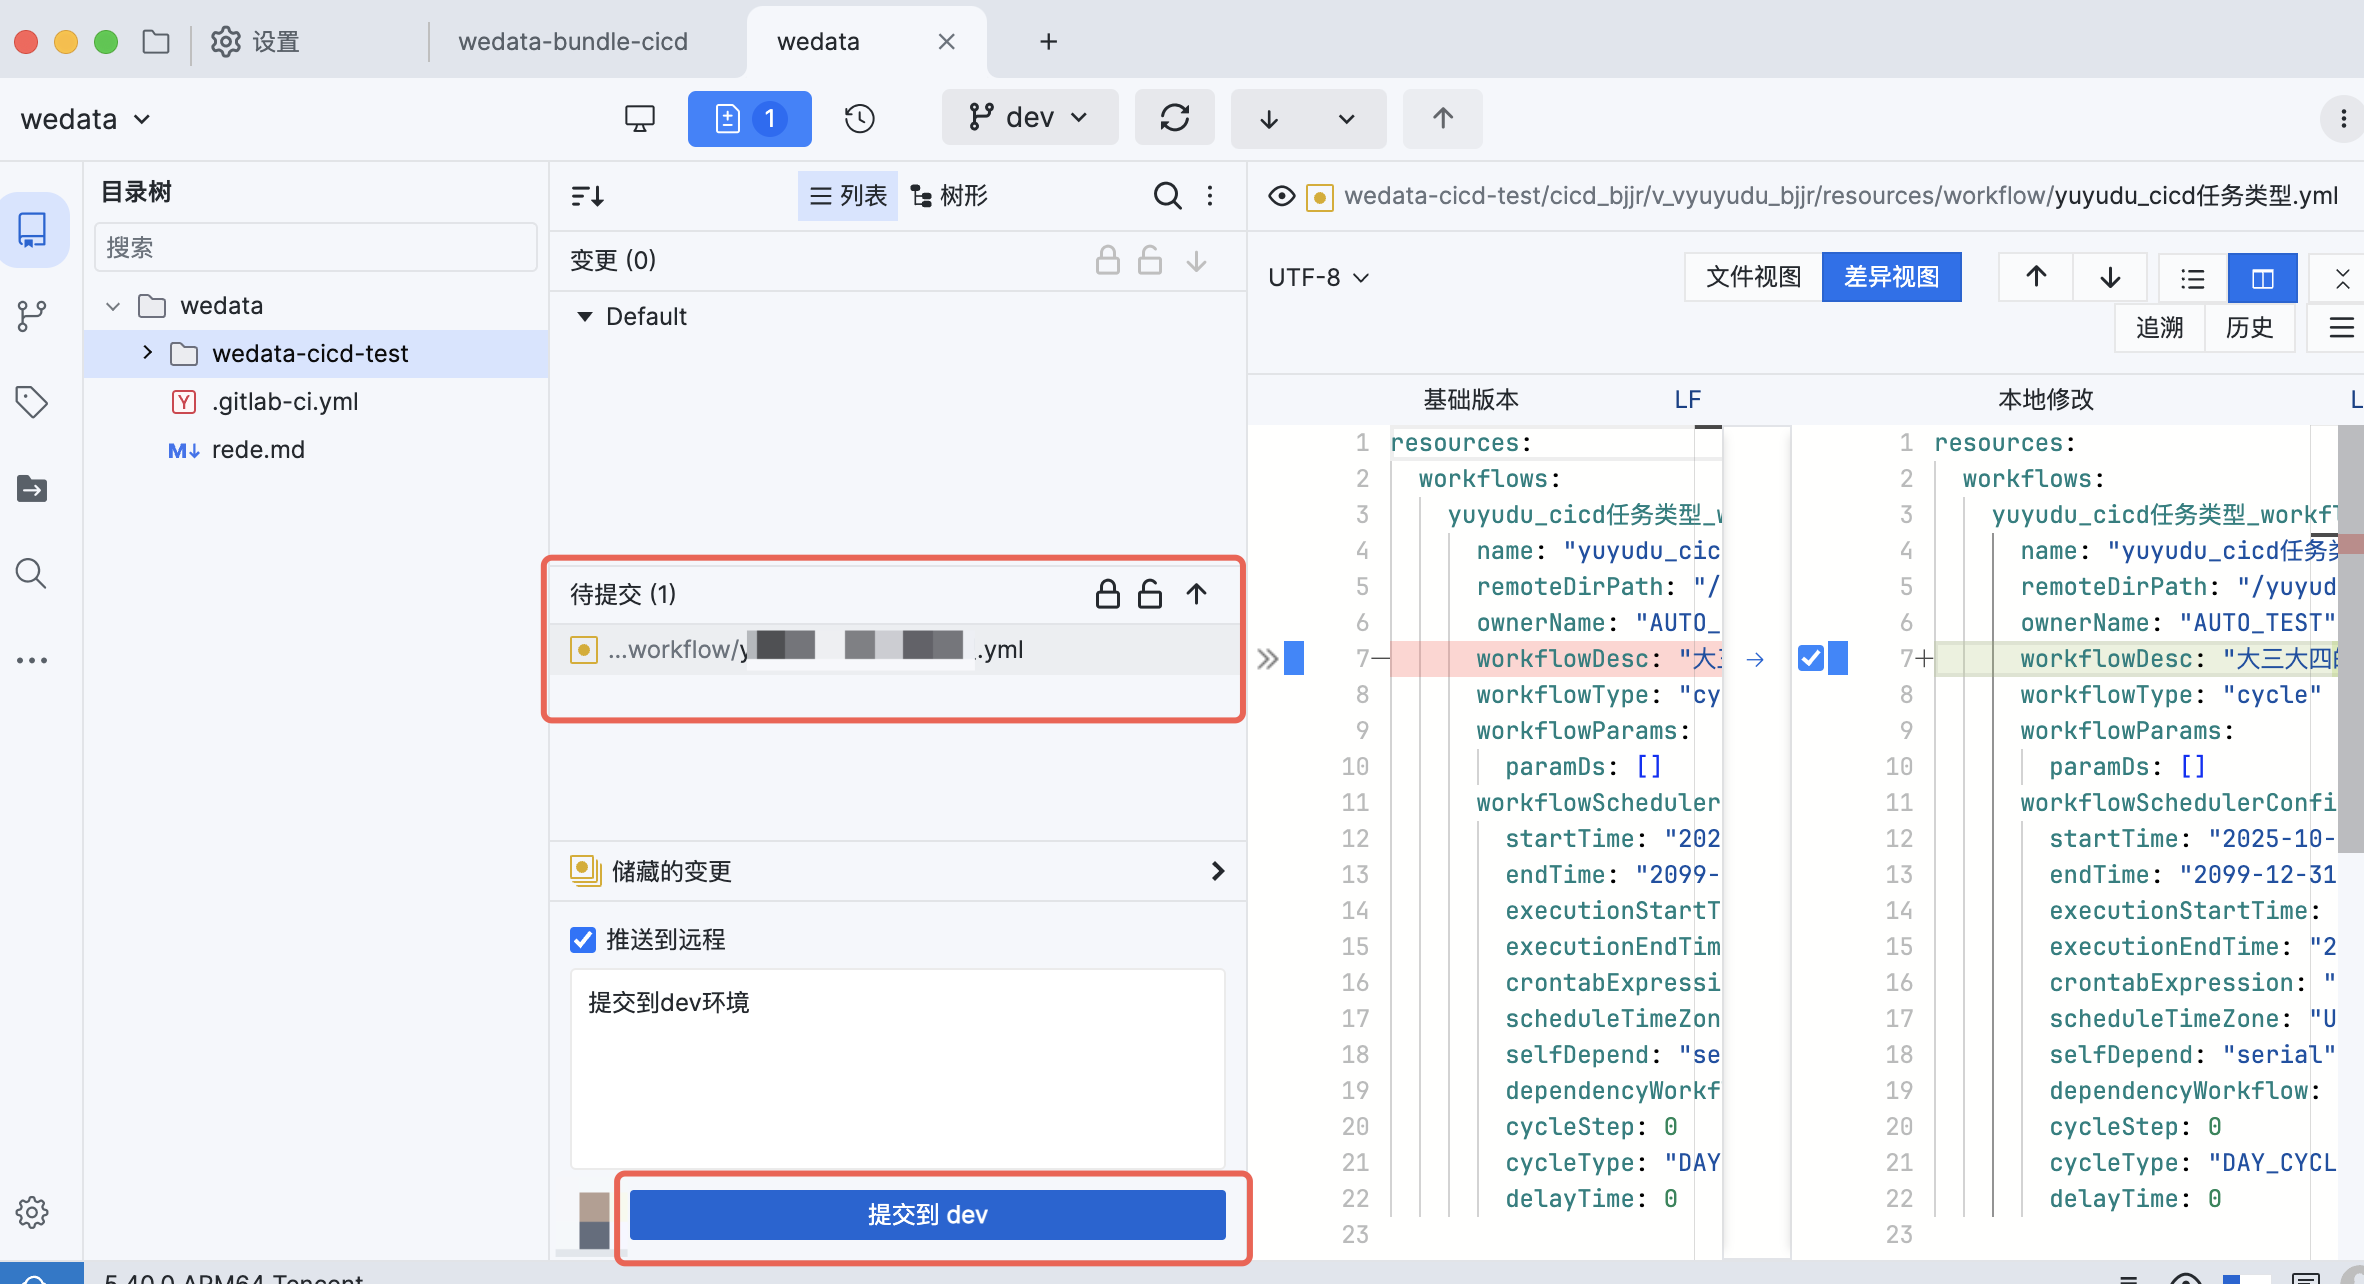
第四步:dev 环境开发并提交
本地编辑器上修改 bundle 包内容来进行开发,开发完后使用 ugit 提交到 dev 分支。
提交后将自动触发流水线并将修改内容部署到 dev 环境对应的项目中。
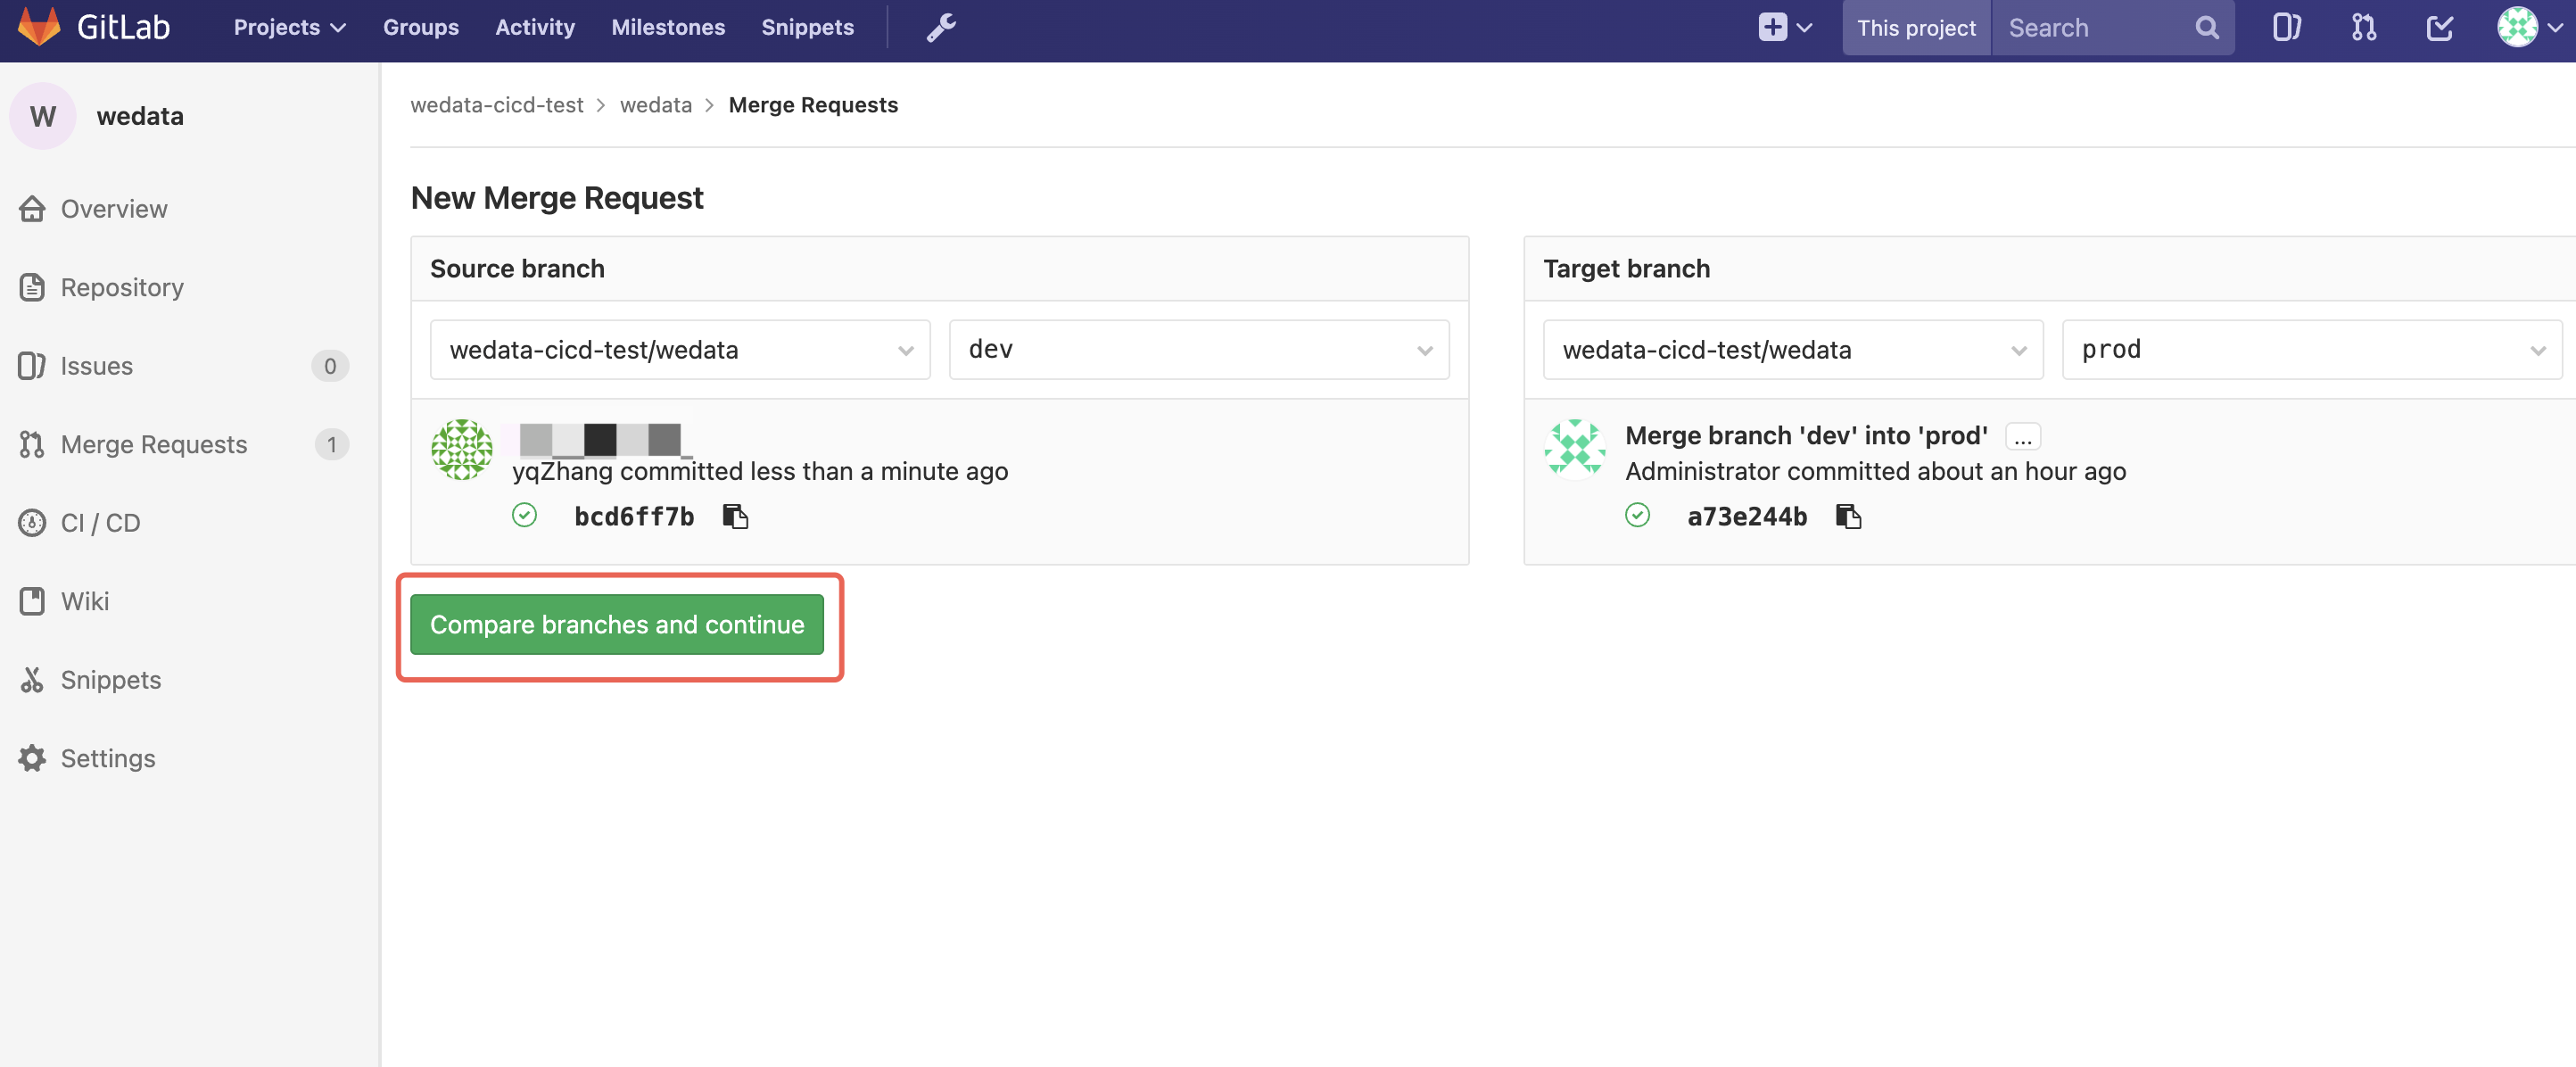
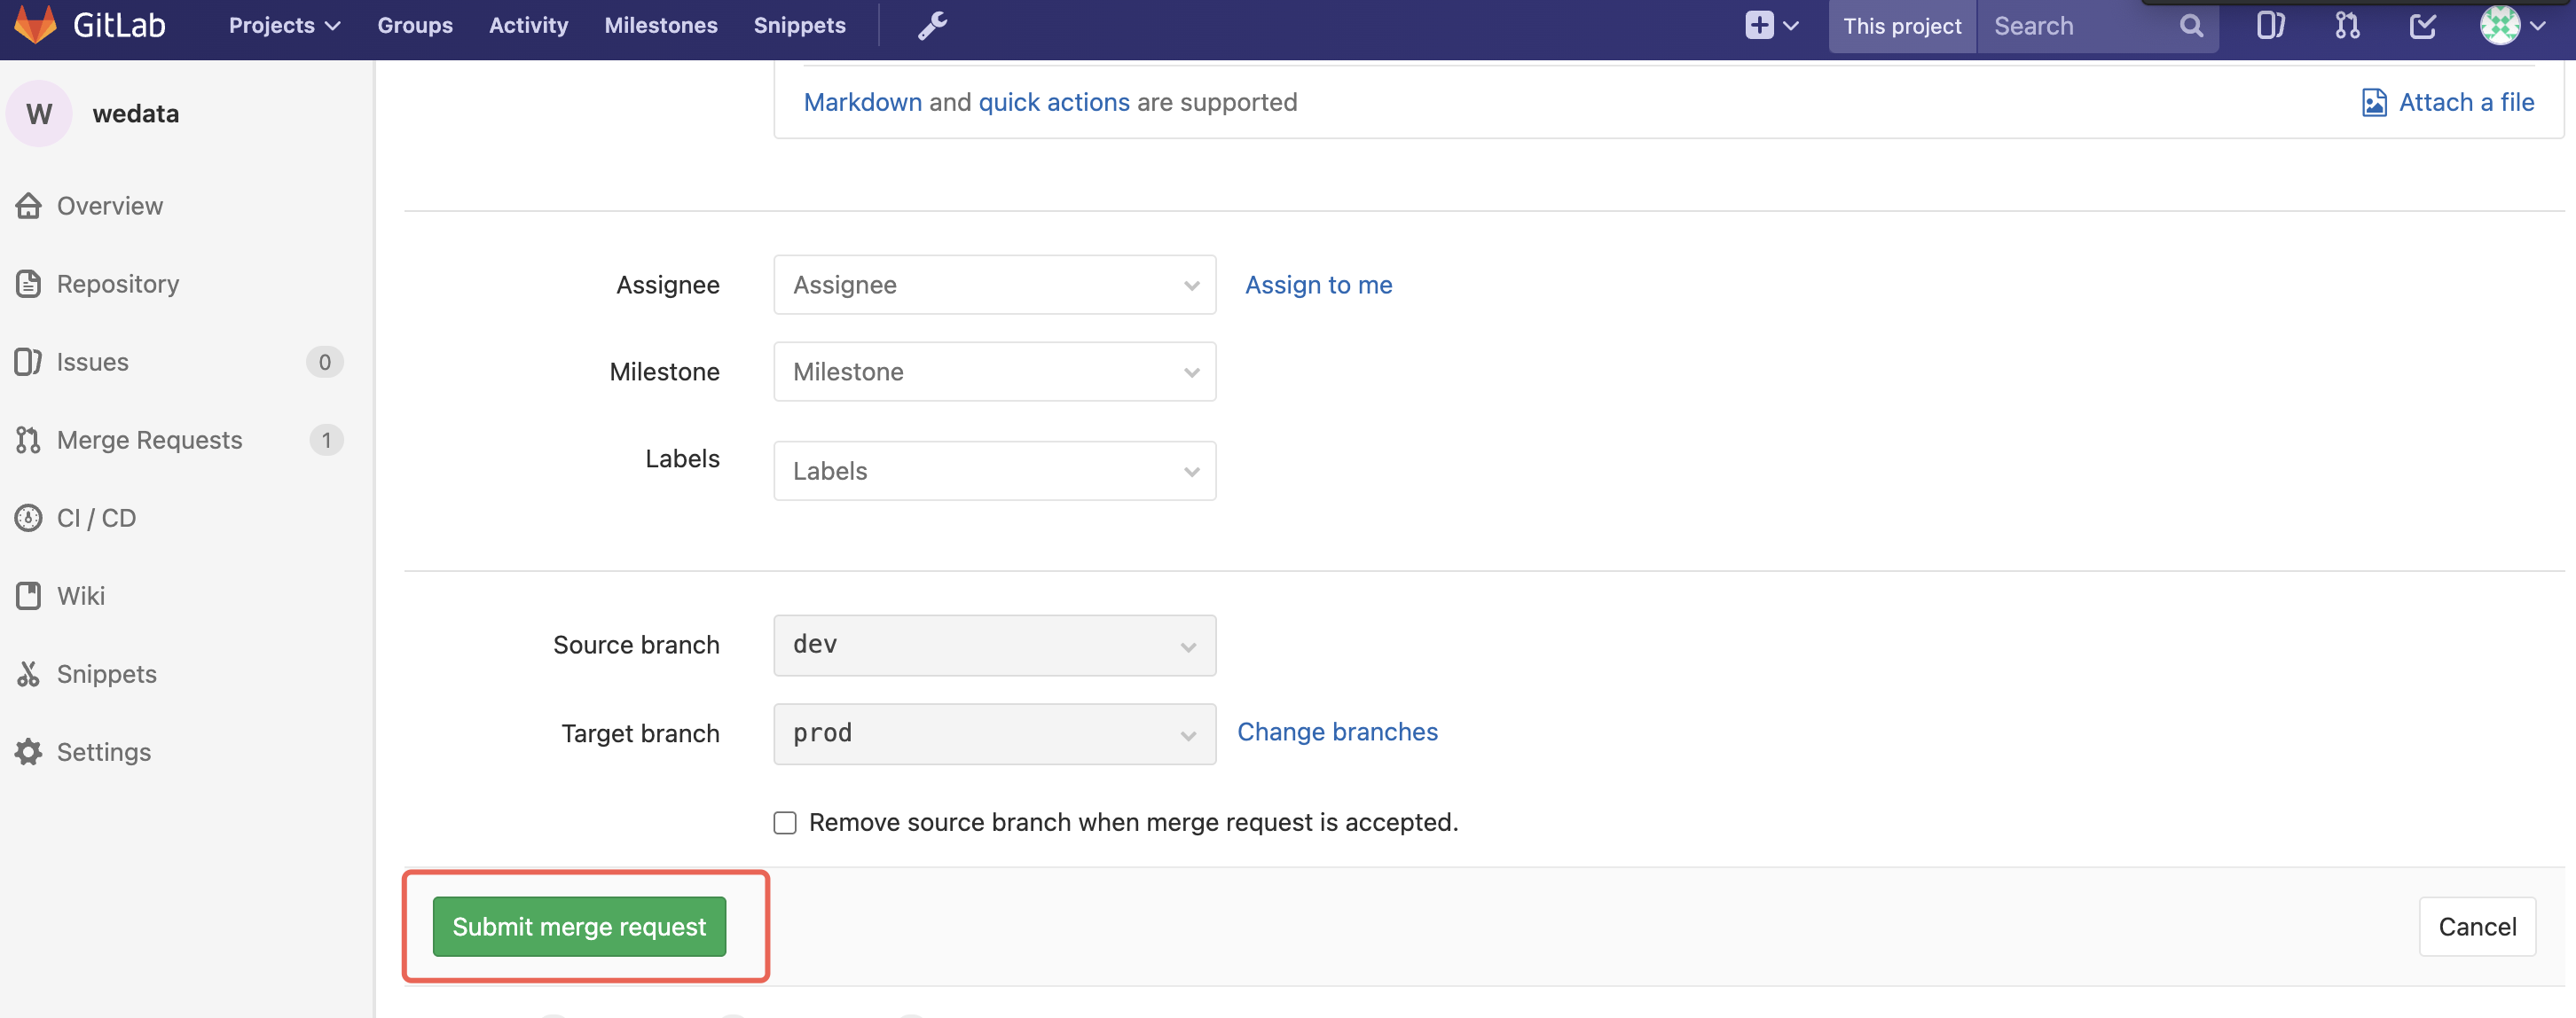
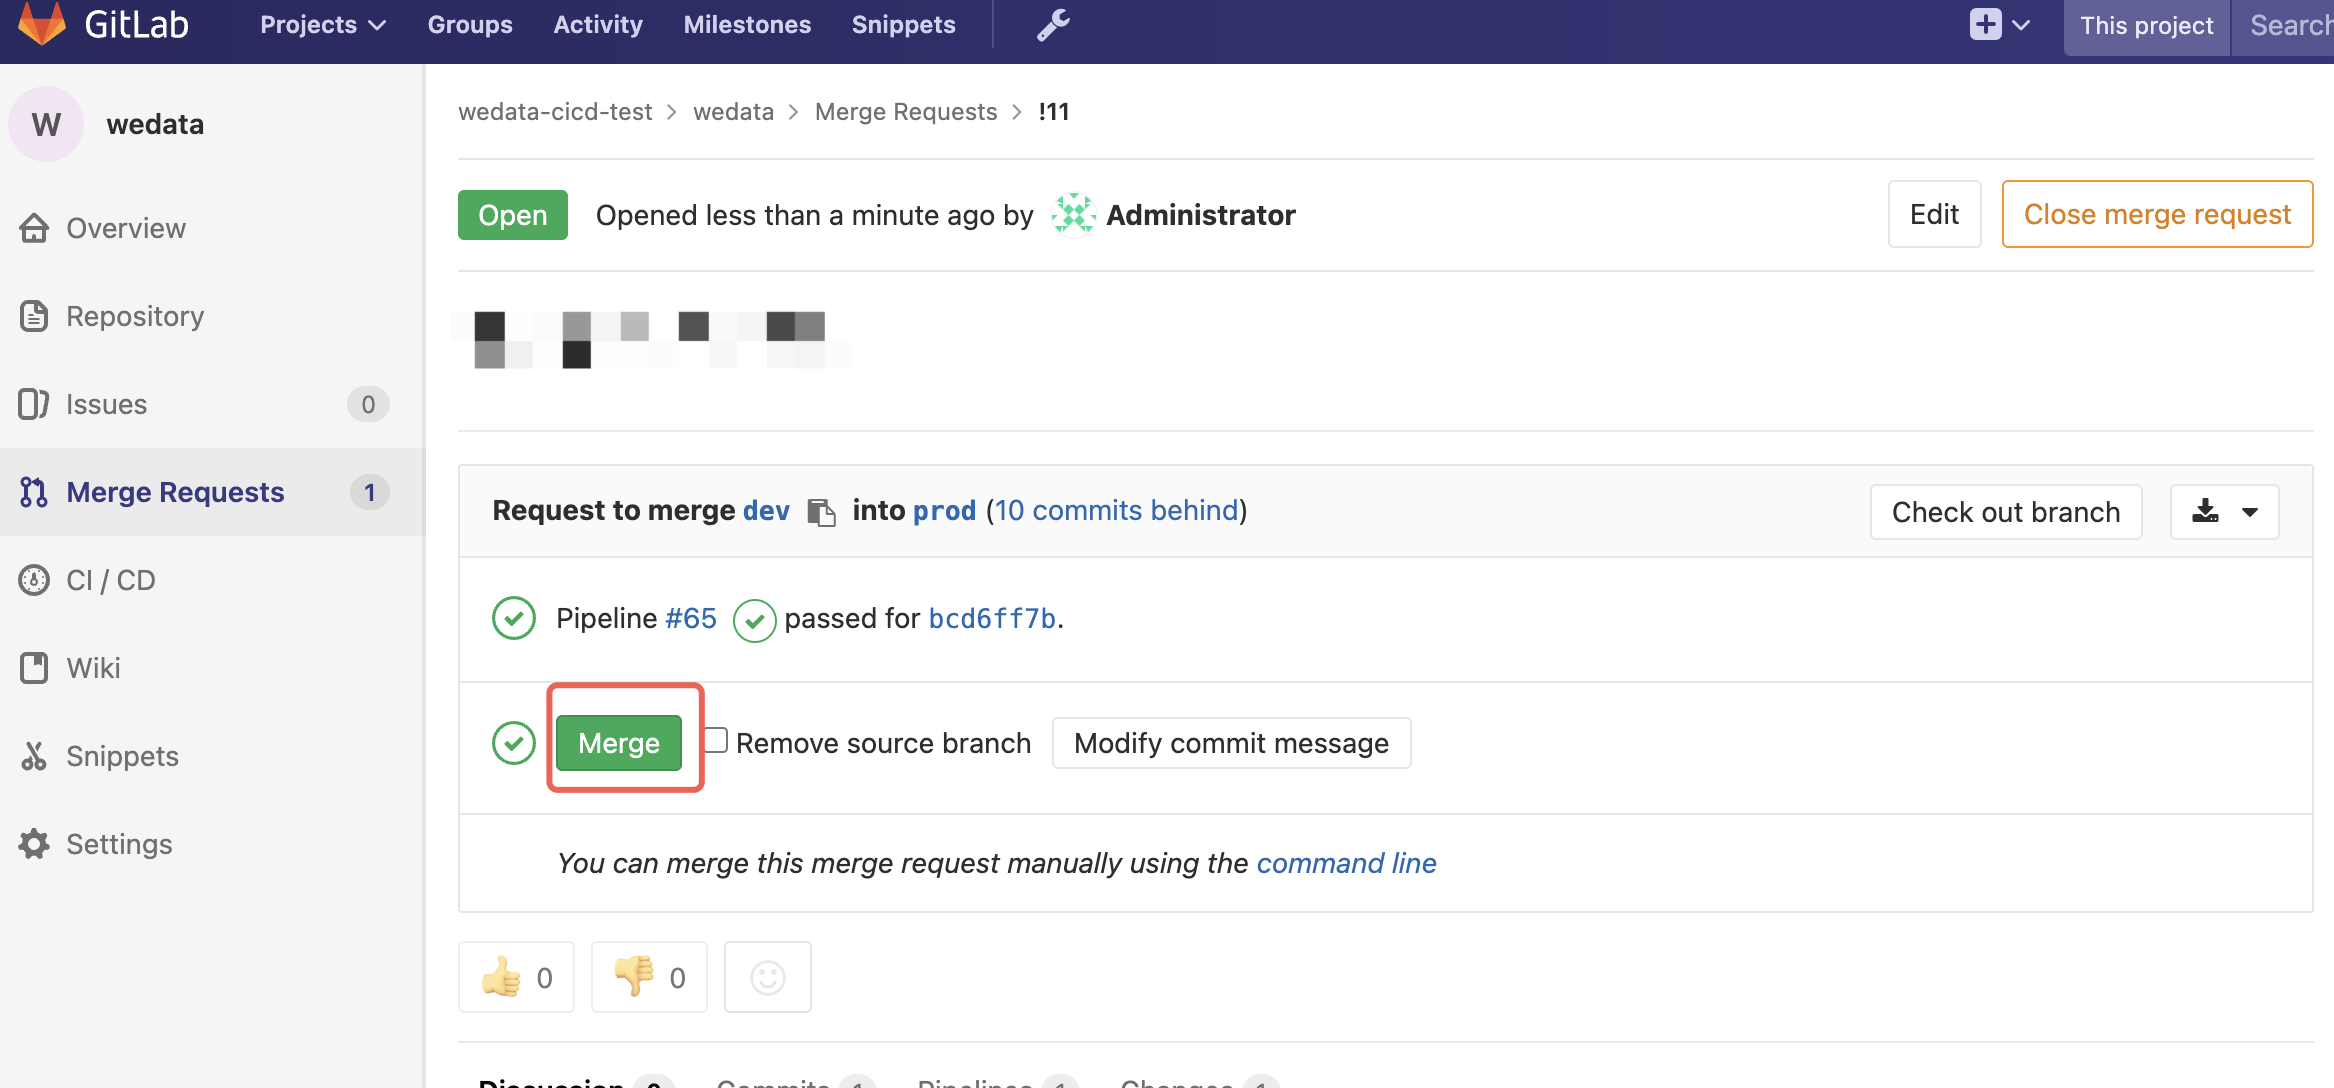
第五步:合并到 prod 分支
将 dev 分支的变动合并到 prod 分支,并自动触发流水线将修改内容部署到 prod 环境对应的项目中。
bundle 包定义
1. wedata.yml
1.1 基础配置
用于定义 bundle 基础信息和 target 信息,包含内容为:
bundle 基础信息:名称、uuid、客户端版本。
include:包含文件路径,bundle 的资源范围,resources/*/*.yml 表示 resource 下所有 YAML 文件,客户可自行定义 bundle 包的资源范围。
target:用于定义目标项目,可按需定义不同环境对应的项目。
mode:development 表示开发环境、production 表示生产环境。
host:表示某环境对应的项目 url,选择任意带地域信息和项目 ID 信息的 url 即可。
root_path:production 项目可以指定 bundle 包在 WeData Studio 存储的位置。
variables:定义在 bundle 中需要使用的参数,常用场景是不同环境对应的配置信息不同,可通过在不同环境定义不同的参数值来解决这个问题。
# This is a Wedata asset bundle definitionbundle:name: wedataBundleDemouuid: e1e95042-9e18-4806-a2e6-8de5e535881cwedata_cli_version: '0.18.*'# Paths to match based on root directoryinclude:- resources/*/*.ymltargets:dev:# The default target uses 'mode: development' to create a development copy.# - Deployed resources get prefixed with '[dev my_user_name]'# - Any job schedules and triggers are paused by default.mode: development# Specify the environment configuration for the current bundledefault: truevariables: #You can define different environment variables heretest_worker_group_id: "20241120210318772642"cluster_id: "123"workspace:# projectAddrhost: https://ap-beijing.wedata.cloud.tencent.com/studio/datadev/workflow?ProjectId=1460726726769418240# root_path: ~/.bundle/${bundle.name}/${bundle.target}# ~/ also represents the user's personal path, equivalent to root_path: /Workspace/Users/${workspace.current_user.userName}/.bundle/${bundle.name}/${bundle.target}# Note: root_path must start with '~/' or contain the current username to ensure uniqueness when using 'mode: development'prod:mode: productionvariables: #You can define different environment variables heretest_worker_group_id: "2024112021031872222"cluster_id: "111"workspace:# projectAddrhost: https://ap-beijing.wedata.cloud.tencent.com/studio/datadev/workflow?ProjectId=1460726726769418240# We explicitly deploy to /Workspace/Users/asherxu@tencent.com to make sure we only have a single copy.root_path: /Workspace/Users/demo@tencent.com/.bundle/${bundle.name}/${bundle.target}# Global custom variables, usage definition: ${var.<variable_name>}variables:test_worker_group_id:description: defaultGroupIDdefault: "20241120210318772644"type: stringcluster_id:description: defaultClusterIDdefault: "234"type: string
1.2 参数定义方式
使用场景:当不同项目中需要使用不同配置值时,可以使用参数方式实现。例如:开发项目中任务使用调度资源组为 resource_group_A,对应生产项目中调度资源组为 resource_group_B。
参数定义:在 wedata.yml 文件中定义参数 scheduling_resource_group
variables:scheduling_resource_group:description: "scheduling_resource_group_name"default: "resource_group_A"type: string
参数值定义:在 wedata.yml 文件的不同 target 中定义不同项目中使用的参数值
targets:dev:mode: developmentvariables:scheduling_resource_group: "resource_group_A"prod:mode: productionvariables:scheduling_resource_group: "resource_group_B"
参数使用:在 bundle 任意 yml 文件中使用参数,使用格式为:${var.参数名称}。
resources:tasks:taskResourceKey:this_is_task_keyname: taskNameresourceGroupName: ${var.scheduling_resource_group}
2. 资源实体
bundle 包中可包含的资源类型有:工作流、任务、资源文件、项目参数、告警规则、事件,下面将介绍不同资源在 bundle 中如何配置。
大部分配置与创建实体对应的 OpenAPI 中定义的入参名称完全相同,可参考 OpenAPI 中的定义。
2.1 工作流(任务调度模式)
按项目分为工作流调度项目和任务调度项目,当前 resource 为任务调度模式下的工作流。
resources:workflows:bundle_example_workflow:name: "bundle_example_workflow"remoteDirPath: Default/temp/ownerName: ${var.ownerName}workflowDesc: ""workflowType: "cycle"workflowParams:paramDs: []workflowSchedulerConfiguration:startTime: "2025-10-22 11:37:57"endTime: "2099-12-31 23:59:59"executionStartTime: "00:00"executionEndTime: "23:59"crontabExpression: "0 0 0 * * ? *"scheduleTimeZone: "UTC+8"selfDepend: "serial"dependencyWorkflow: "no"cycleStep: 0cycleType: "DAY_CYCLE"delayTime: 0
2.2 任务(任务调度模式)
按项目分为工作流调度项目和任务调度项目,当前 resource 为任务调度模式下的任务。
不同任务类型配置项不同,以下为一个 Python 任务的示例。其他任务类型可参考对应 OpenAPI。
resources:tasks:bundle_example_task_python_task:name: "bundle_example_task_python"filePath: "../../src/task/bundle_example_task_python.py"remoteDirPath: Default/temp/taskBaseAttribute:taskTypeName: "PYTHON"workflowName: "demo"taskDescription: "This is a python task"ownerName: lolayqzhangtaskConfiguration:resourceGroupName: test_workerbrokerIp: "any"taskExtConfigurationList:- paramKey: "python_type"paramValue: "python3"- paramKey: "python_sub_version"paramValue: "python3"- paramKey: "extraInfo"paramValue: "{\\"fromMapping\\":false}"taskSchedulingParameterList: []taskSchedulerConfiguration:crontabExpression: "0 0 0 * * ? *"cycleType: "DAY_CYCLE"scheduleTimeZone: "UTC+8"startTime: "2025-10-24 00:00:00"endTime: "2099-12-31 23:59:59"executionStartTime: "00:00"executionEndTime: "23:59"scheduleRunType: 0selfDepend: "serial"upstreamDependencyConfigList: []downstreamDependencyConfigList: []runPriority: "low"retryWait: 5maxRetryAttempts: 4executionTTL: -1waitExecutionTotalTTL: "-1"allowRedoType: "ALL"
离线集成任务-脚本模式说明:离线集成脚本位置为 src/task/,其他配置位置为 resource/task/
For-Each 节点说明
For-Each 主节点的配置内容放在 resource/task
For-Each 主节点的 yml 文件中增加 childPath 标识子节点的位置,举例如下:主节点名称为 test_foreach,test_foreach_end_foreach 表示 end 子节点,test_foreach_start_foreach 表示 start 子节点,test_dlcsql 表示用户配置的一个任务子节点。
childPath:- "../../src/forEachChild/test_foreach_end_foreach.yml"- "../../src/forEachChild/test_foreach_start_foreach.yml"- "../../src/forEachChild/test_dlcsql.yml"
For-Each 子节点的配置内容放在 src/forEachChild
For-Each 子节点的代码内容放在 src/task
若子节点是 start 节点的下游,则在子节点中配置上游节点为 start_foreach,举例如下:
triggerTaskSchedulerConfiguration:upstreamDependencyConfigList:- taskName: "start_foreach"
若子节点是 end 节点的上游,则需在 end 节点中配置上游节点为该子节点。
NoteBook 任务说明
本期仅支持从 studio 引用方式配置的 NoteBook 任务,代码会存放在 src 文件夹下,修改代码会同步修改引用 studio 脚本对应代码。
2.3 工作流(工作流调度模式)
按项目分为工作流调度项目和任务调度项目,当前 resource 为工作流调度模式下的工作流。
resources:triggerWorkflows:bundle_example_triggerWorkflow_triggerWorkflow:name: "bundle_example_triggerWorkflow"remoteDirPath: Default/tempownerName: ${var.ownerName}workflowDesc: "this is a triggerWorkflow"workflowParams:paramDs: []triggerWorkflowSchedulerConfigurations:- schedulerStatus: "ACTIVE"triggerMode: "TIME_TRIGGER"scheduleTimeZone: "UTC+8"startTime: "2025-12-17 20:29:55"endTime: "2099-12-31 23:59:59"configMode: "COMMON"cycleStep: 0cycleType: "DAY_CYCLE"crontabExpression: "0 0 1 * * ? *"delayTime: 0
2.4 任务(工作流调度模式)
按项目分为工作流调度项目和任务调度项目,当前 resource 为工作流调度模式下的任务。
resources:triggerTasks:bundle_example_triggerTask_python_triggerTask:name: "bundle_example_triggerTask_python"filePath: "../../src/triggerTask/bundle_example_triggerTask_python.py"remoteDirPath: Default/temptriggerTaskBaseAttribute:taskTypeName: "PYTHON"workflowName: "bundle_example_triggerWorkflow"taskDescription: "this is a python triggerTask"ownerName: ${var.ownerName}triggerTaskConfiguration:resourceGroupName: ${var.resourceGroupName}brokerIp: "any"taskExtConfigurationList:- paramKey: "python_sub_version"paramValue: "python3"- paramKey: "python_type"paramValue: "python3"- paramKey: "waitExecutionTotalTTL"paramValue: "-1"taskSchedulingParameterList: []triggerTaskSchedulerConfiguration:upstreamDependencyConfigList: []allowRedoType: "ALL"
2.5 资源文件
resources:resourceFiles:resourceFileResourceKey:name: resourceFileName# Wedata remote directoryremoteDirPath: /fd1/test/# filePathfilePath: ../../src/resourceFile/datastudio-service-5.2.0.1.jar# COS bucket namebucketName: wedata-cos# COS bucket regioncosRegion: ap-shanghai
2.6 项目参数
resources:projectParams:paramResourceKey:# Parameter name keyname: paramName# Parameter descriptionparamDescription: paramDescription# Debug run valueparamDefineTest: dryRunVal# Cycle scheduling valueparamDefine: scheduleRunVal
2.7 告警规则
resources:alarms:alarmResourceKey:# Alarm namename: alarmName# Alarm rule descriptiondescription: description# List of monitored object business names (task names)monitorObjectNames:- taskName1- taskName2# Monitor type: task, workflow, projectmonitorObjectType: task# Alarm type: 1.failure alarm, 2.timeout alarm, 3.success alarm, 4.baseline breach, 5.baseline warning, 6.baseline task failure, 7.alarm monitoring, alarm type code list (default 1.failure alarm)alarmTypes:- failAlarmalarmGroups:- alarmRecipientType: Task Owner # Alarm recipient type: 1.specified personnel, 2.task owner, 3.duty roster (default 1.specified personnel)# Alarm level, 1.normal, 2.important, 3.urgent (default 1.normal)alarmLevel: normal# Alarm escalation user namesalarmEscalationRecipientNames:- asherxu@tencent.com# Alarm escalation intervalalarmEscalationInterval: 86400# Alarm user namesalarmRecipientNames:- asherxu@tencent.com# Alarm methods: 1.email, 2.SMS, 3.WeChat, 4.voice, 5.WeCom, 6.Http, 7.WeCom group, 8.Feishu group (default 1.email)alarmWays:webHooks:alarmWay: "Teams"webHooks: "http://open/group"# Alarm notification frequencynotificationFatigue:# Notification count (3 times)notifyCount: 3# Notification interval, in minutesnotifyInterval: 5# Do not disturb timequietIntervals:- daysOfWeek: [ 1, 2 ] # Days of weekstartTime: 02:00:00 # Start time, precise to hour, minute, secondendTime: 06:00:00 # End time, precise to hour, minute, second- daysOfWeek: [ 3 ] # Days of weekstartTime: 01:00:00 # Start time, precise to hour, minute, secondendTime: 05:00:00 # End time, precise to hour, minute, second# Alarm rule detailsalarmRuleDetail:# Failure trigger timing 1 - First failure trigger 2 - All retries completed trigger (default)trigger: 1# Rerun/backfill failure trigger timing 1 - First failure trigger 2 - All retries completed trigger (default)dataBackfillOrRerunTrigger: 1# Timeout configuration detailstimeOutExtInfo:- ruleType: 1 # Timeout strategy: 1.estimated runtime, 2.estimated completion time, 3.estimated scheduling time, 4.not completed within cycle, 5.total waiting time, 6.waiting runtimetype: 1 # Timeout value type 1.specified value (default) 2.average valuehour: 1 # Timeout specified value hours (default 0)min: 30 # Timeout specified value minutes (default 1)scheduleTimeZone: UTC+7 # Configured timezone, defaults to project timezone# Backfill/rerun timeout configuration detailsdataBackfillOrRerunTimeOutExtInfo:- ruleType: 1 # Timeout strategy: 1.estimated runtime, 2.estimated completion time, 3.estimated scheduling time, 4.not completed within cycle, 5.total waiting time, 6.waiting runtimetype: 1 # Timeout value type 1.specified value (default) 2.average valuehour: 1 # Timeout specified value hours (default 0)min: 30 # Timeout specified value minutes (default 1)scheduleTimeZone: UTC+7 # Configured timezone, defaults to project timezone# Project fluctuation alarm configuration detailsprojectInstanceStatisticsAlarmInfoList:alarmType: projectFailureInstanceUpwardFluctuationAlarm # Failed instance upward fluctuation alarm, successful instance downward fluctuation alarminstanceThresholdCountPercent: 10 # Percentage of failed instances for the dayinstanceThresholdCount: 20 # Total threshold: daily failed instances, daily cumulative instances, daily failed instances upward fluctuation, cumulative instances fluctuation thresholdinstanceCount: 20 # Daily cumulative instances, daily failed instances downward fluctuationstabilizeStatisticsCycle: 3 # Stability statistics cycle (anti-jitter configuration statistics cycle count)isCumulate: false # Whether to calculate cumulatively, false: consecutive, true: cumulativestabilizeThreshold: 3 # Stability count threshold (anti-jitter configuration statistics cycle count)reconciliationExtInfo:- ruleType: reconciliationFailuremismatchCount: 1hour: 1min: 30
2.8 事件
resources:events:eventResourceKey:name: eventName# Types include: MIN, HOUR, DAYeventSubType: MIN# Optional, if not filled, use default userownerName: asherxu# Event descriptiondescription: "description"# Event time to livetimeToLive: 1# Time to live unit: DAY, MINtimeUnit: DAYS# Event type: GENERAL, TIME_SERIESeventType: "TIME_SERIES"# Event broadcast type: SINGLE, BROADCASTeventBroadcastType: "BROADCAST"# Time formatdimensionFormat: "yyyymmdd"
3. src 文件
用于存储任务的代码信息和资源文件上传包。可在当前文件中进行任务代码变更或资源文件上传包变更。
bundle 命令
1. 安装&卸载客户端
1. 安装客户端。
功能:本地安装 WeData 客户端。
命令:
#Install the WeData client (no installation package required, simply run the program).#macOS system installationcurl https://wedata-agent-gz-1257305158.cos.ap-guangzhou.myqcloud.com/bundle/install-script/linux/install.sh |sudo sh#windows system installationcurl.exe -fsSL https://wedata-agent-gz-1257305158.cos.ap-guangzhou.myqcloud.com/bundle/install-script/windows/install.bat -o install.bat && install.bat
2. 卸载客户端。
功能:本地卸载 WeData 客户端。
命令:
#Uninstall WeData client#macOS system uninstallationcurl https://wedata-agent-gz-1257305158.cos.ap-guangzhou.myqcloud.com/bundle/install-script/linux/install.sh |sudo sh -s -- --uninstall#windows system uninstallationcurl.exe -fsSL https://wedata-agent-gz-1257305158.cos.ap-guangzhou.myqcloud.com/bundle/install-script/windows/install.bat -o install.bat && install.bat --uninstall
3. 升级为最新版本。
功能:将当前安装的客户端版本升级为最高版本。
命令:
#Upgrade the currently installed client version to the latest version.sudo sh install.sh --upgrade#Update to the latest version#Singapore area#macOS system upgradecurl https://wedata-agent-sg-1257305158.cos.ap-singapore.myqcloud.com/bundle/install-script/linux/install.sh |sudo sh -s -- --upgrade --region 'https://api-ap-singapore.wedata.tencentcloud.com'#windows system upgradecurl.exe -fsSL https://wedata-agent-sg-1257305158.cos.ap-singapore.myqcloud.com/bundle/install-script/windows/install.bat -o install.bat && install.bat --upgrade --region "https://api-ap-singapore.wedata.tencentcloud.com"
4. 获取安装版本。
功能:获取当前安装的 WeData 客户端版本。
命令:
#Get the currently installed client versionwedata -vwedata --version
2. 登录
支持两种客户端登录方式:跳转产品登录验证、使用固定密钥登录。
1. 跳转产品登录验证。
第一步:本地终端输入登录页面,${workspace-url} 替换为需要登录账号下的任意项目内链接,链接中需要包含地域和项目 ID 信息。
#Both commands can be used to log in.wedata auth login --host '${workspace-url}'wedata auth login
第二步:定义登录 profile,输入登录项目 URL 信息。
Please enter the new configuration file name (directly enter to use the current configuration): 这里输入 profile 名称。
Please enter the WeData project address: 若在命令中未指定项目 URL,则需要在这里指定 url。
第三步:跳转到产品并登录。
完善登录命令信息后,若未在产品上登录则会跳转到登录页,您需完成登录。若已登录,则进入下一步。
第四步:首次登录需前往 访问管理 进行授权。
若为首次登录,需要按照页面指引前往访问管理模块进行授权。授权完毕后请返回登录页面并刷新页面重新验证。
2. 使用固定密钥登录。
使用 EntraID 登录的用户,推荐使用配置固定密钥的方式登录
第一步:使用 EntraID 登录 WeData 产品
如果您从未使用过 EntraID 登录,需要先完成初始登录:
在 WeData 产品界面上选择 EntraID 登录方式进行登录
登录成功后,在终端执行以下命令完成 CLI 认证(该命令会将 EntraID 的临时凭证写入本地配置文件
~/.wedata/wedata.json):wedata auth login
第二步:设置 EntraID 的 Token 信息
打开本地凭证文件:
# 使用编辑器打开配置文件code ~/.wedata/wedata.json# 或者vim ~/.wedata/wedata.json
在文件中找到自己账户对应的位置(以您的 UIN 作为 key),将 EntraID 的 Token、SecretId、SecretKey 写入对应字段。
文件结构示例如下:
{"version": 1,"tokens": {"<您的UIN>": {"Token": "<EntraID的Token值>","SecretId": "<EntraID的SecretId值>","SecretKey": "<EntraID的SecretKey值>","ExpireTime": 1770242769,"AppId": "<您的AppId>","Uin": "<您的UIN>","UserName": "<您的EntraID邮箱地址>","OwnerUserId": "<OwnerUserId>","Region": "ap-guangzhou","Language": "zh-CN","IsIntl": false}}}
获取临时凭证的方式:
打开凭证查看入口:集团账号管理>身份中心管理>设置>登录页快速获取临时密钥:开启开关
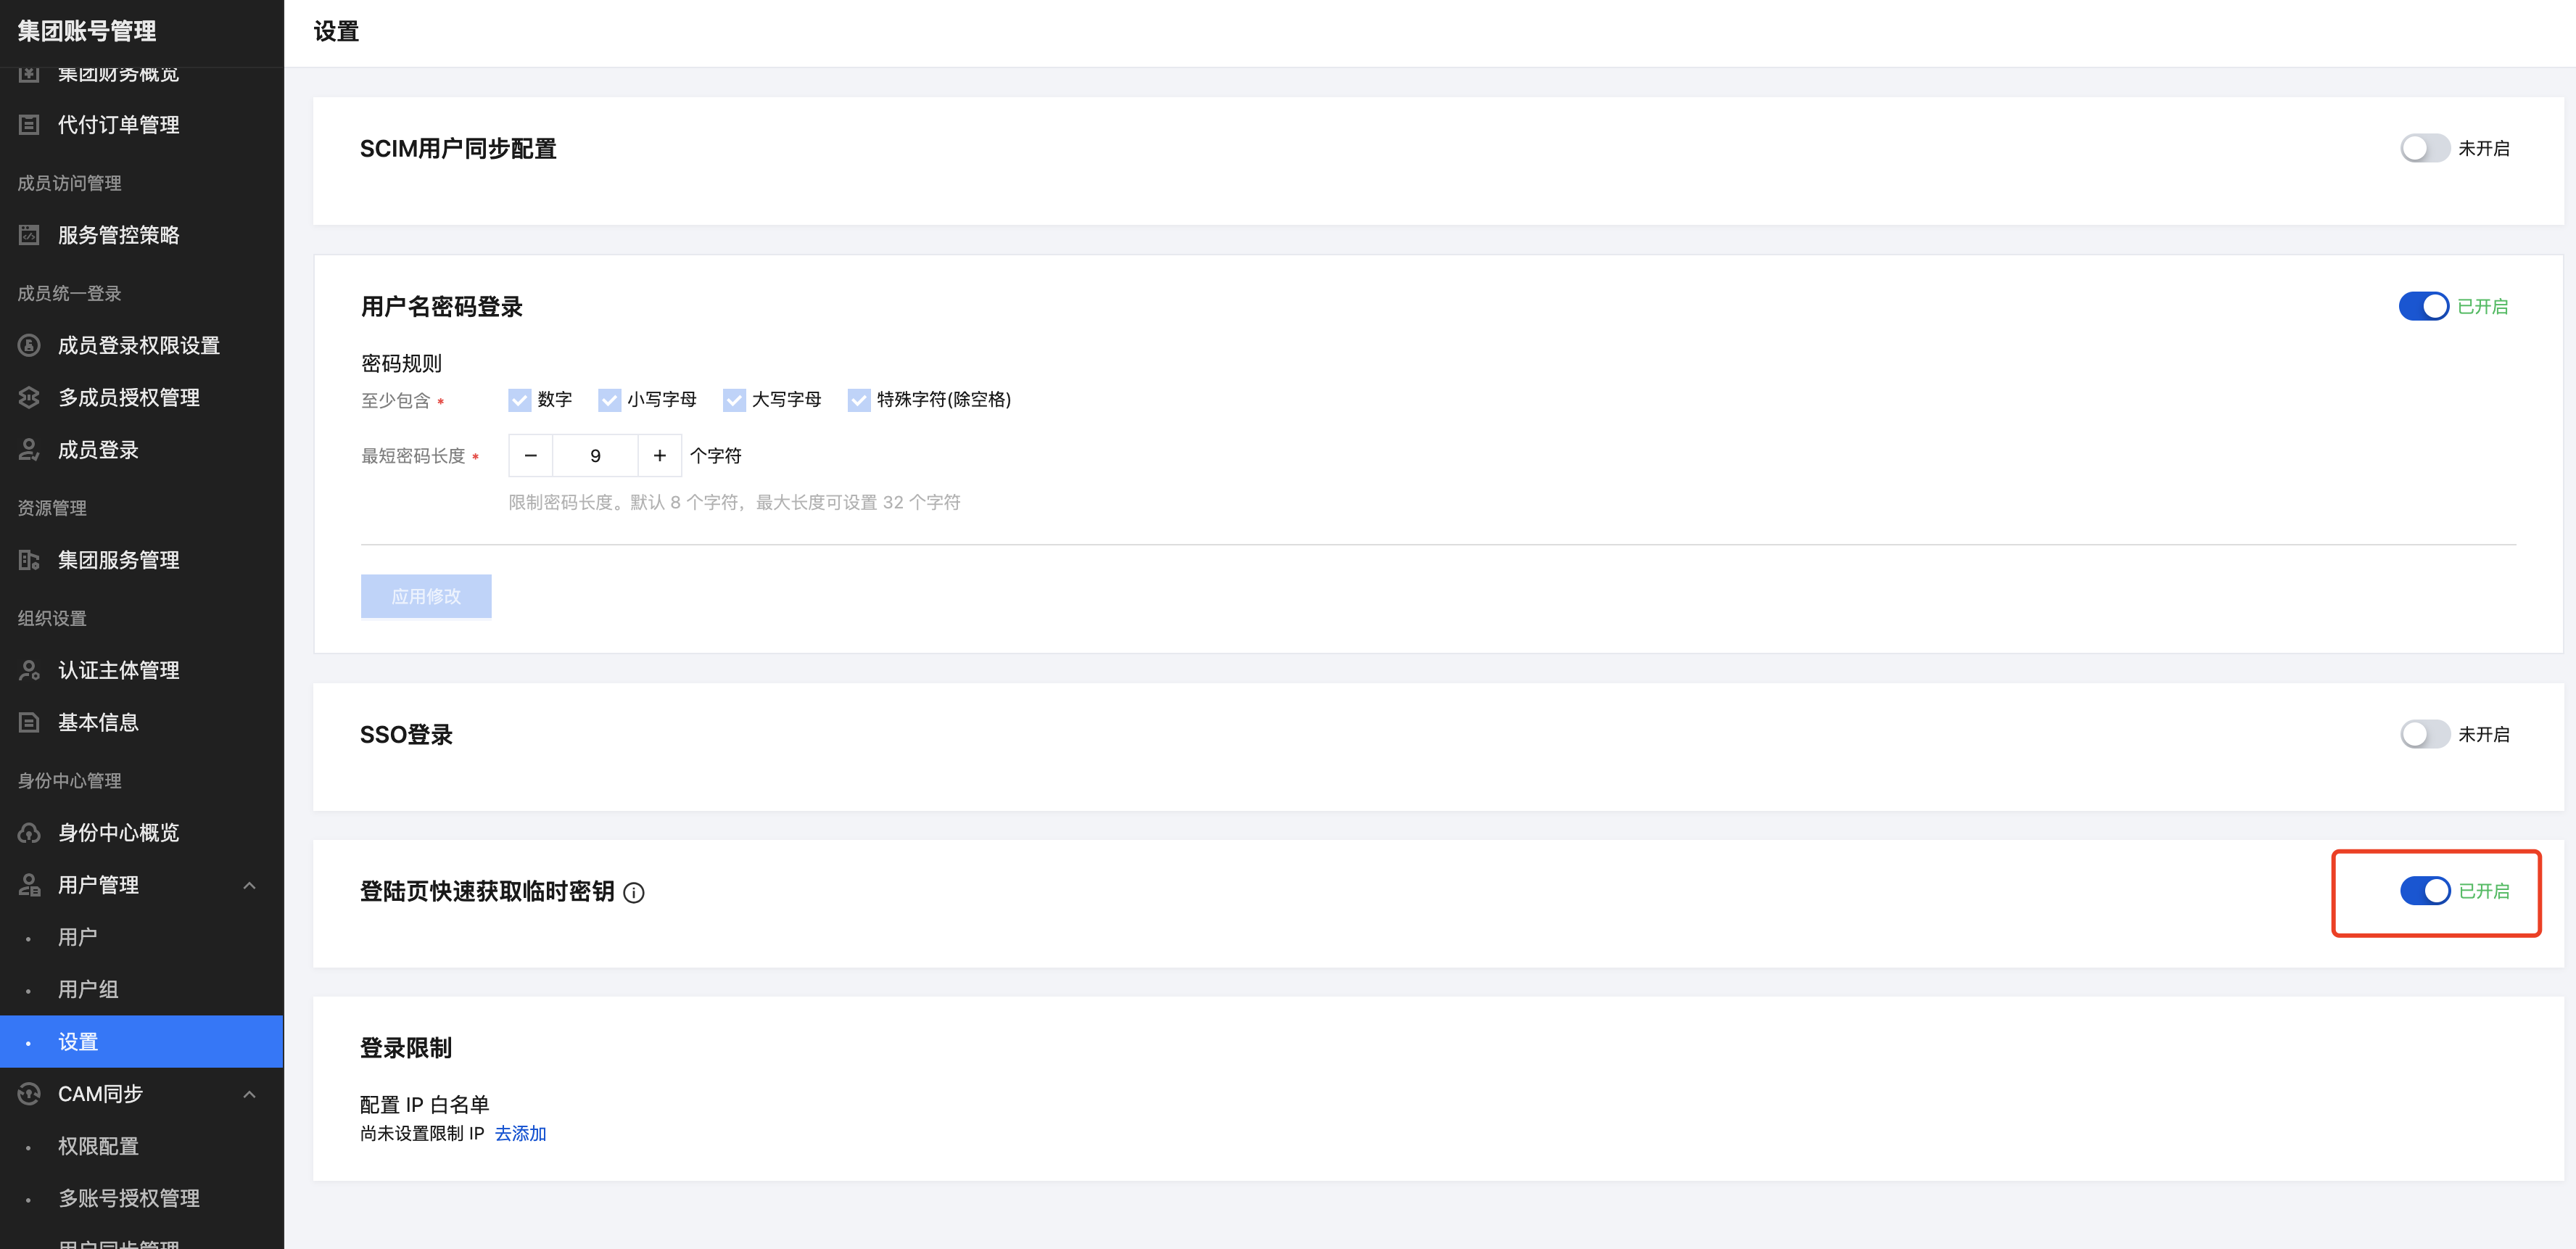
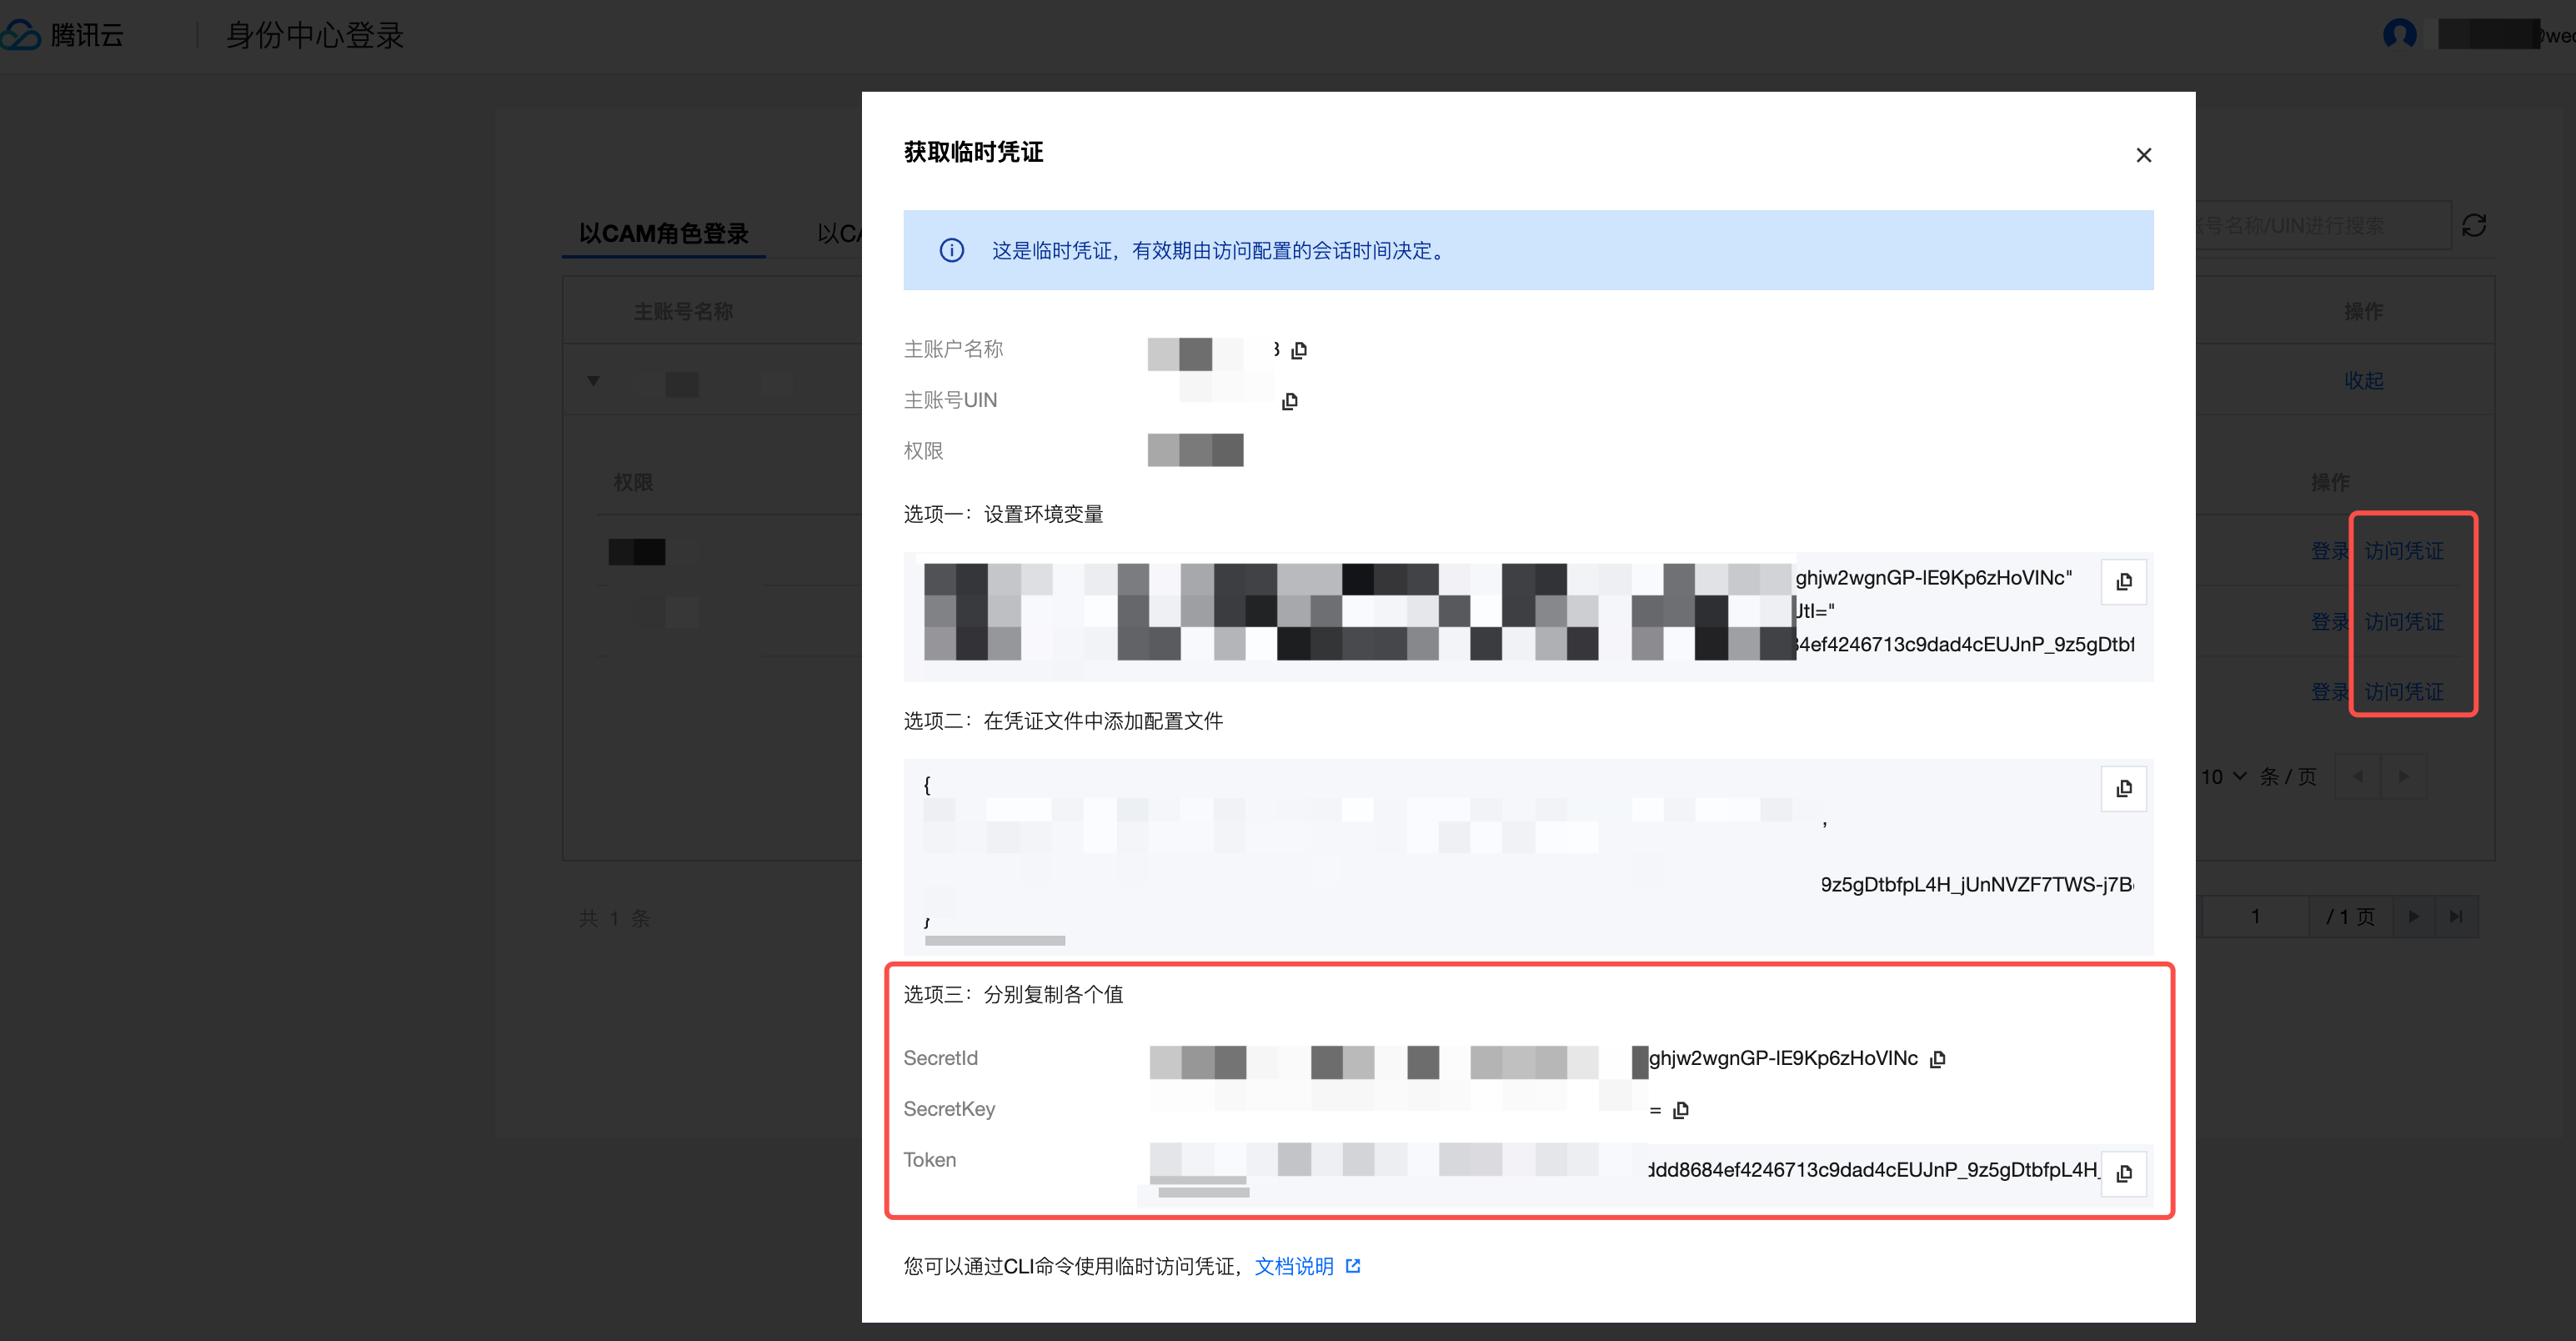
获取凭证:身份中心登录>找到对应的账号点击访问凭证>复制临时凭证。
第三步:设置 ExpireTime 为 0
在
wedata.json 文件中,将 ExpireTime 字段的值修改为 **0**:将
ExpireTime 设为 0 可以避免 CLI 工具因凭证过期检查而拒绝使用该 Token,确保 CI/CD 流程中凭证始终可用。{"Token": "<您的Token>","SecretId": "<您的SecretId>","SecretKey": "<您的SecretKey>","ExpireTime": 0,...}
第四步:使用 CI/CD 命令
以上登录配置已经完成,可正常使用客户端命令了。
第五步:配置会话持续时间
如需调整 EntraID 账号的会话有效时长,可在腾讯云集团账号管理控制台进行配置:
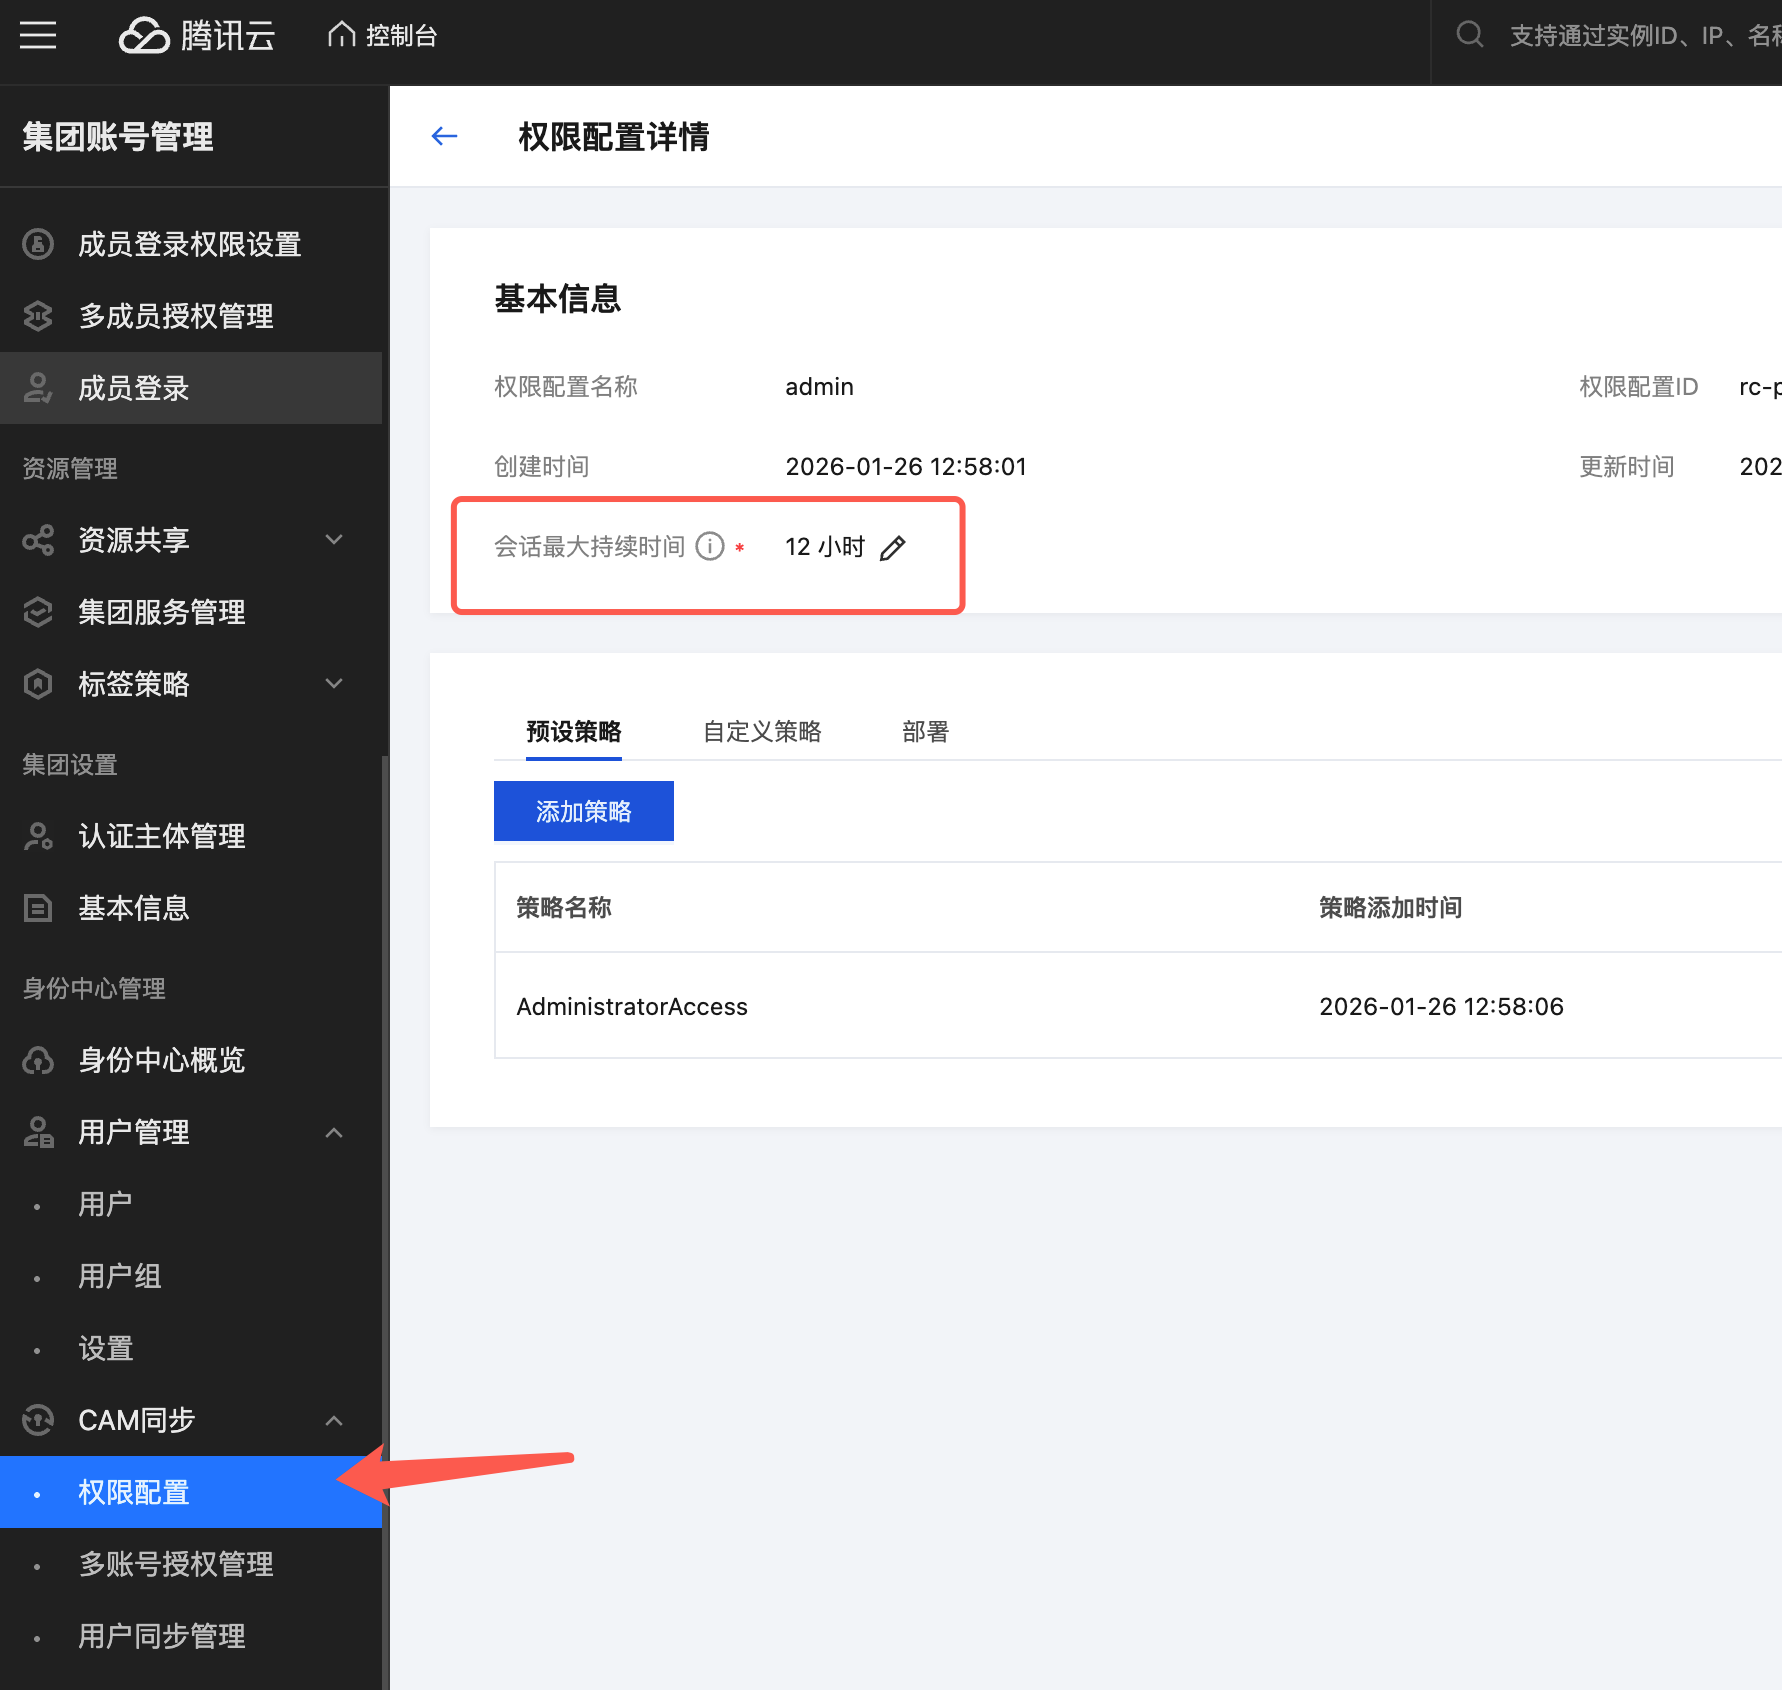
进入 集团账号管理 > CAM 同步 > 权限配置
在权限配置详情页面,找到 会话最大持续时间 字段
点击编辑按钮,设置合适的持续时间(如 12 小时),即12小时后,需重新修改 Wedata 配置文件中的 Token、SecretId、SecretKey。
说明:
使用跳转产品登录验证的方式,登录状态保留时间为12小时,超过12小时需重新登录。使用固定密钥方式,登录状态保留时间为永久。
3. 初始化
1. bundle init
功能:初始化一个 bundle 包,初始化的 bundle 包包含 wedata.yml 文件和资源文件。wedata.yml 文件包含 bundle 包的基础信息、target(用于定义不同环境对应项目)等信息。初始化资源可自行选择,可选工作流、任务、资源文件、项目参数、告警规则、事件,若选择则系统将默认初始化对应资源,您可按需修改资源配置。
在命令中:
配置 bundle 包名称
选择一个调度模式:workflow_trigger/task_trigger。若您的项目为工作流调度项目则选择 workflow_trigger ,若您的项目为任务调度项目则选择 task_trigger
选择需要的 resource demo 类型
命令:
#Initialize a bundlewedata bundle init -p ${profile_name}
2. bundle generate
功能:将项目中已经创建好的资源拉取到本地 bundle 包中。仅将资源拉取到本地,并不代表跟远端资源有绑定关系,若需有绑定关系则需执行绑定命令。
说明:若通过 git 绑定方式创建的任务,则 generate 时只获取配置,不获取代码内容,代码内容改动依赖客户指定的 git 路径。
-t:目标环境。
-p:指定执行命令的 profile。
#Bundle initialization related commandswedata bundle generate task --existing-task-id ${task_id} -t dev/prod -p ${profile_name}wedata bundle generate workflow --existing-workflow-id ${workflow_id} -t dev/prod -p ${profile_name}wedata bundle generate event --existing-event-id ${event_id} -t dev/prod -p ${profile_name}wedata bundle generate alarm --existing-alarm-id ${alarm_id} -t dev/prod -p ${profile_name}wedata bundle generate resourceFile --existing-resourceFile-id ${resourceFile_id} -t dev/prod -p ${profile_name}wedata bundle generate projectParam --existing-projectParam-name ${projectParam_name} -t dev/prod -p ${profile_name}
工作流调度模式中,任务和工作流命令如下:
#Bundle initialization related commandswedata bundle generate triggerTask --existing-triggerTask-id ${task_id} -t dev/prod -p ${profile_name}wedata bundle generate triggerWorkflow --existing-triggerWorkflow-id ${workflow_id} -t dev/prod -p ${profile_name}
4. 绑定与解绑
1. bundle deployment bind
功能:将 generate 的资源与当前 bundle 包绑定,绑定后,在本地修改的能力将同步到远端。
-t:目标环境。
-p:指定执行命令的 profile。
--cascade:工作流绑定支持配置级联绑定,即绑定工作流时指定该 flag 可同时绑定工作流下的任务(仅绑定本地存在的任务)
命令:
#Resources are bound to local bundleswedata bundle deployment bind task ${resource key} ${task_id} -t dev/prod -p ${profile_name}wedata bundle deployment bind workflow ${resource key} ${workflow_id} -t dev/prod -p ${profile_name}wedata bundle deployment bind event ${resource key} ${event_id} -t dev/prod -p ${profile_name}wedata bundle deployment bind alarm ${resource key} ${alarm_id} -t dev/prod -p ${profile_name}wedata bundle deployment bind resourceFile ${resource key} ${resourceFile_id} -t dev/prod -p ${profile_name}wedata bundle deployment bind projectParam ${resource key} ${projectParam_name} -t dev/prod -p ${profile_name}
工作流调度模式中,任务和工作流命令如下:
#Resources are bound to local bundleswedata bundle deployment bind triggerTask ${resource key} ${task_id} -t dev/prod -p ${profile_name}wedata bundle deployment bind triggerWorkflow ${resource key} ${workflow_id} -t dev/prod -p ${profile_name}
2. bundle deployment unbind
功能:解除资源与本地 bundle 包的绑定关系。
-t:目标环境。
-p:指定执行命令的 profile。
命令:
#Unbind resources from local bundlewedata bundle deployment unbind task ${resource key} -t dev/prod -p ${profile_name}wedata bundle deployment unbind workflow ${resource key} -t dev/prod -p ${profile_name}wedata bundle deployment unbind event ${resource key} -t dev/prod -p ${profile_name}wedata bundle deployment unbind alarm ${resource key} -t dev/prod -p ${profile_name}wedata bundle deployment unbind resourceFile ${resource key} -t dev/prod -p ${profile_name}wedata bundle deployment unbind wedataStudio ${resource key} -t dev/prod -p ${profile_name}wedata bundle deployment unbind projectParam ${resource key} -t dev/prod -p ${profile_name}
工作流调度模式中,任务和工作流命令如下:
#Unbind resources from local bundlewedata bundle deployment unbind triggerTask ${resource key} -t dev/prod -p ${profile_name}wedata bundle deployment unbind triggerWorkflow ${resource key} -t dev/prod -p ${profile_name}
5. 运行
功能:运行某个任务或某个工作流下的所有任务,运行情况和结果可在编排空间中查看。
-t:目标环境。
-p:指定执行命令的 profile。
--params:指定本次运行的参数值。
命令:
wedata bundle run task ${resource key} -t dev/prod -p ${profile_name} --params "${key1}=${value1}&${key2}=${value2}" #Run a specific taskwedata bundle run workflow ${resource key} -t dev/prod -p ${profile_name} --params "${key1}=${value1}&${key2}=${value2}" #Run a specific workflow
工作流调度模式中,任务和工作流命令如下:
wedata bundle run triggerTask ${resource key} -t dev/prod -p ${profile_name} --params "${key1}=${value1}&${key2}=${value2}" #Run a specific taskwedata bundle run triggerWorkflow ${resource key} -t dev/prod -p ${profile_name} --params "${key1}=${value1}&${key2}=${value2}" #Run a specific workflow
6. 验证
功能:验证 bundle 包及其资源配置是否存在问题。可在部署前提前验证,提前发现问题并处理问题。
-t:目标环境。
-p:指定执行命令的 profile。
wedata bundle validate -t dev/prod -p ${profile_name} #Verify bundle and resource configuration
7. 部署
功能:将 bundle包中的内容部署到目标环境。
-t:目标环境。
-p:指定执行命令的 profile。
-s:配置-s 表示变更提交到调度,不配置表示仅在编排空间生成保存版本。
--full:不做增量变更检测,所有 bundle 中定义的实体都强制参与部署(include 的规则还是遵循)。
命令:
wedata bundle deploy -t dev/prod -p ${profile_name} -s # Deploy the contents of the bundle to the corresponding environment
8. 销毁
功能:删除远端绑定的任务,并删除在远端存储的 bundle 包及资源信息。
-t:目标环境。
-p:指定执行命令的 profile。
命令:
wedata bundle destroy -t dev/prod -p ${profile_name} #Destroy the contents deployed via bundle in the corresponding environment.
9.获取身份信息
功能:描述 Databricks CLI 用于身份验证的配置,包括凭据及其来源。
-p:获取指定 profile 对应信息
--host:获取当前子账号对应 profile 信息
--sensitive:输出敏感信息(secret_id 和 secret_key),若未指定则 secret_id 和 key 展示为******
命令:
wedata auth describe #By default, it retrieves the information corresponding to the default profile.wedata auth describe -p ${profile_name} #Retrieve information corresponding to the specified profile.wedata auth describe --host sub_account #Retrieve the profile information corresponding to the current sub-account.wedata auth describe --sensitive #Outputs sensitive information (secret_id and secret_key). If not specified, secret_id and key will be displayed as ******
10. 总结
功能:获取当前 bundle 包中包含的资源信息。
-t:目标环境。
命令:
wedata bundle summary #Summary of the current package binding task status
11. 帮助
功能:获取帮助信息,即 bundle 命令的使用规则和帮助信息。
命令:
wedata bundle -help # Display command help information
常见问题
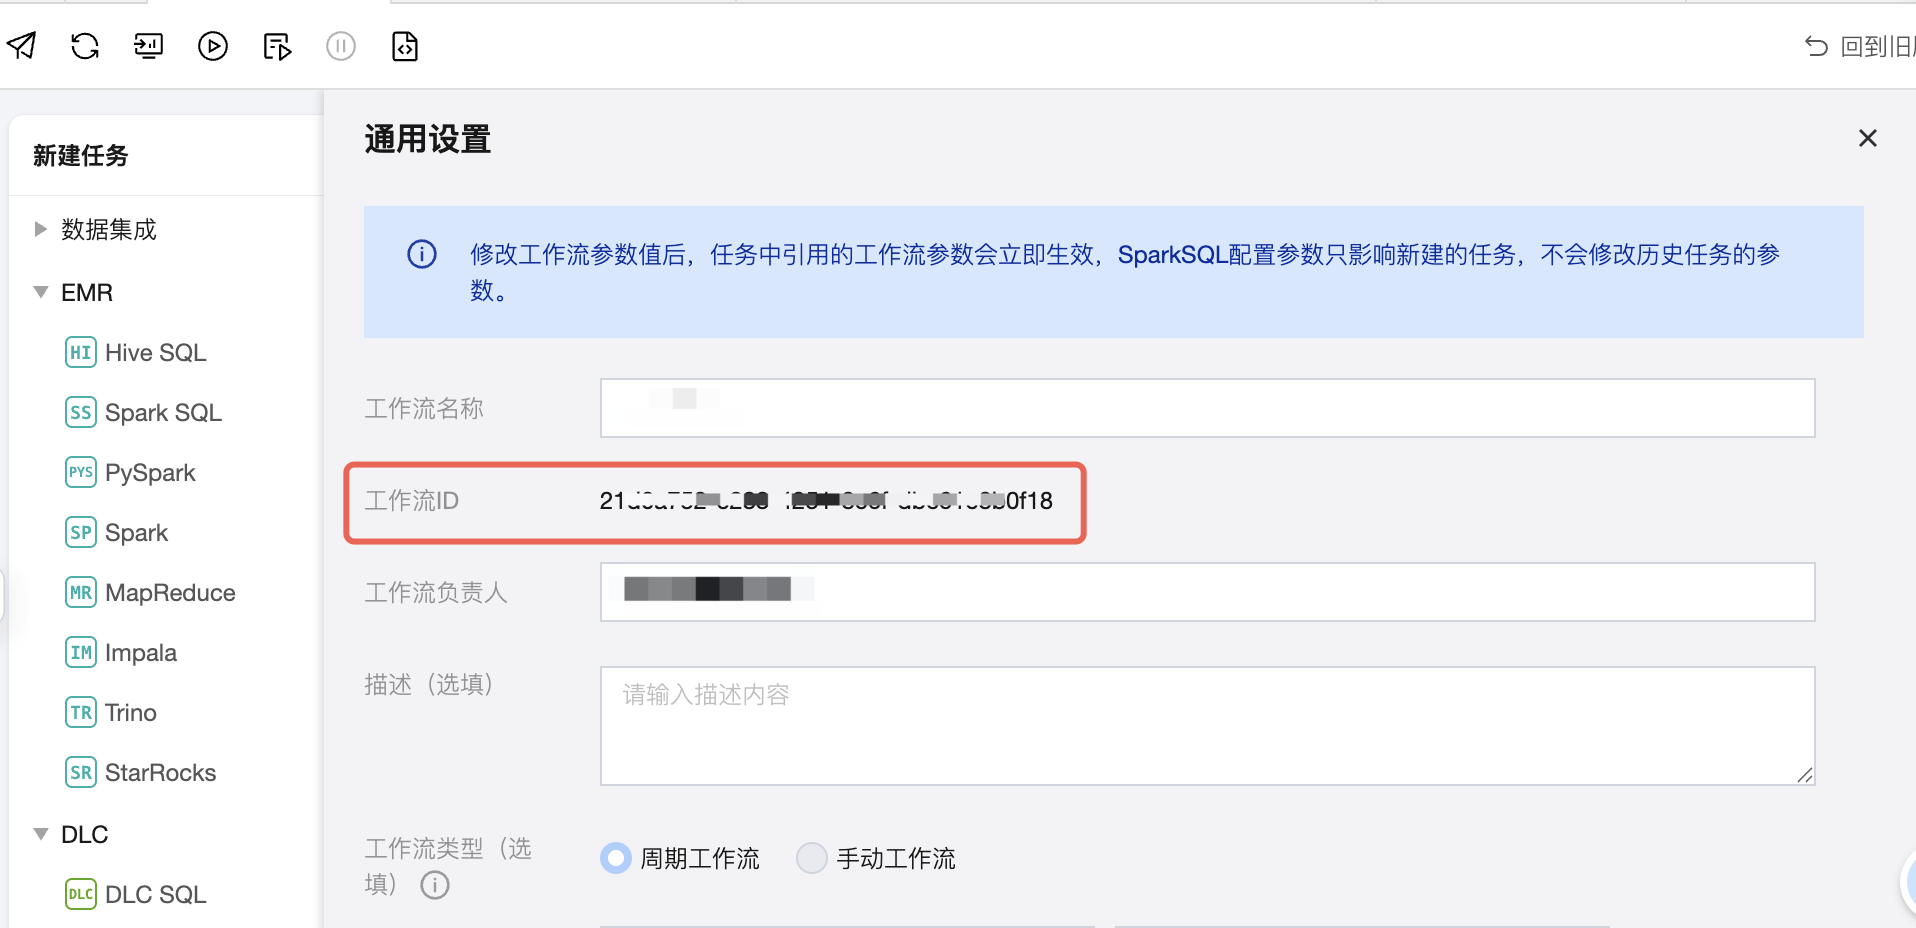
如何获取 taskId、workflowId?
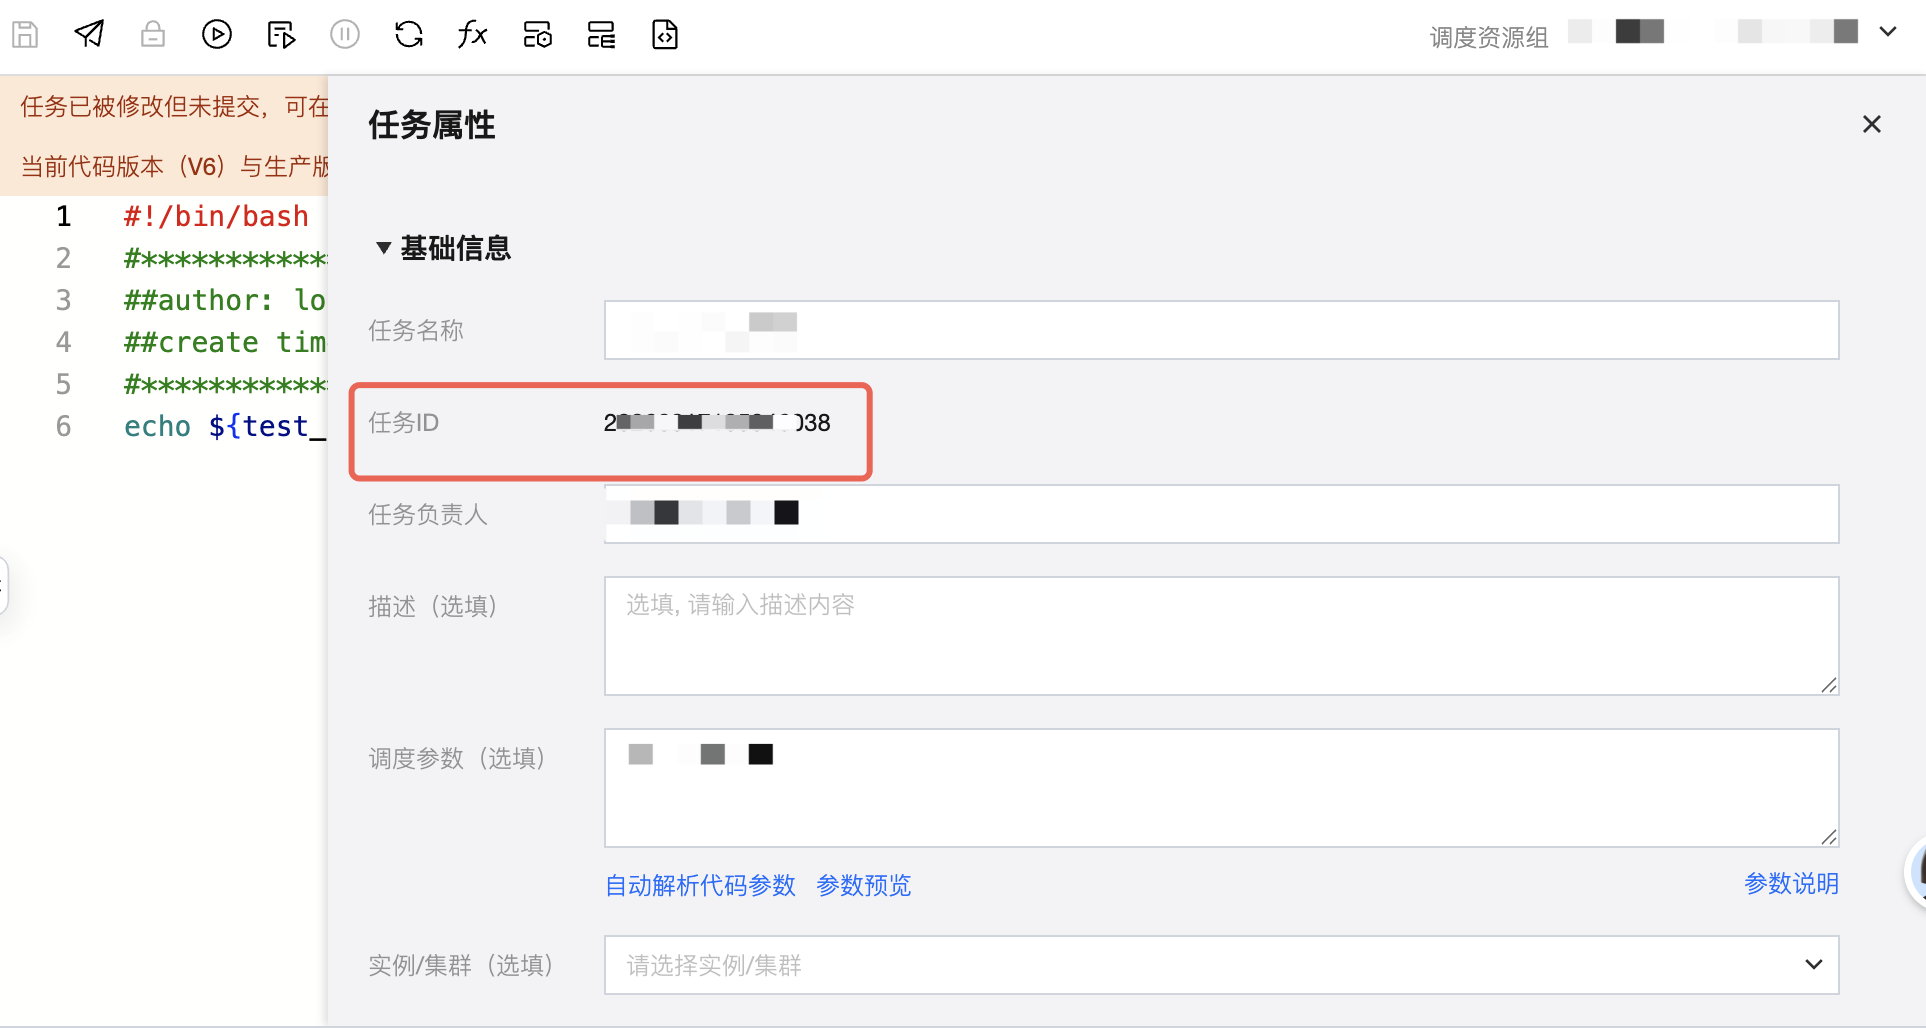
1. 打开任务 > 任务属性,可获取任务 ID。
2. 打开工作流 > 通用设置,可获取工作流 ID。
为什么我的 deploy 后,任务名称或工作流名称增加了 dev_用户名前缀?任务或工作流也放到了个人文件夹中?
因为您使用的 target 为 dev,即您在 deploy 语句中定义的-t 为 dev,若未配置-t,则默认为 dev。
CI/CD 支持两种 target:dev 和 prod,其中:
dev:个人开发环境,因为每次 deploy 时会在个人文件夹下创建一个个人前缀的任务,表示您仅开发自己的任务,不干扰别人的任务。
prod:正式开发环境,因此每次 deploy 修改的都是正式的任务。若您期望可以直接调整原始任务配置,则建议使用 prod 模式。
什么是工作流调度模式?什么是任务调度模式?
工作流调度是指调度信息是在工作流层面配置的,适合依赖关系和调度模式比较简单的项目。
任务调度是指调度信息是在任务层面配置的,适合依赖场景复杂的项目。
具体查看方式在项目管理 > 基础信息配置 > 调度模式。


