功能概述
自定义点击跳转功能允许您在推送消息中携带特定参数(如下发附加字段),客户端应用据此执行精准的业务逻辑跳转(例如直达指定页面、触发特定功能)。本文主要介绍各厂商通道对自定义点击跳转的支持情况以及如何实现该功能。
效果示例
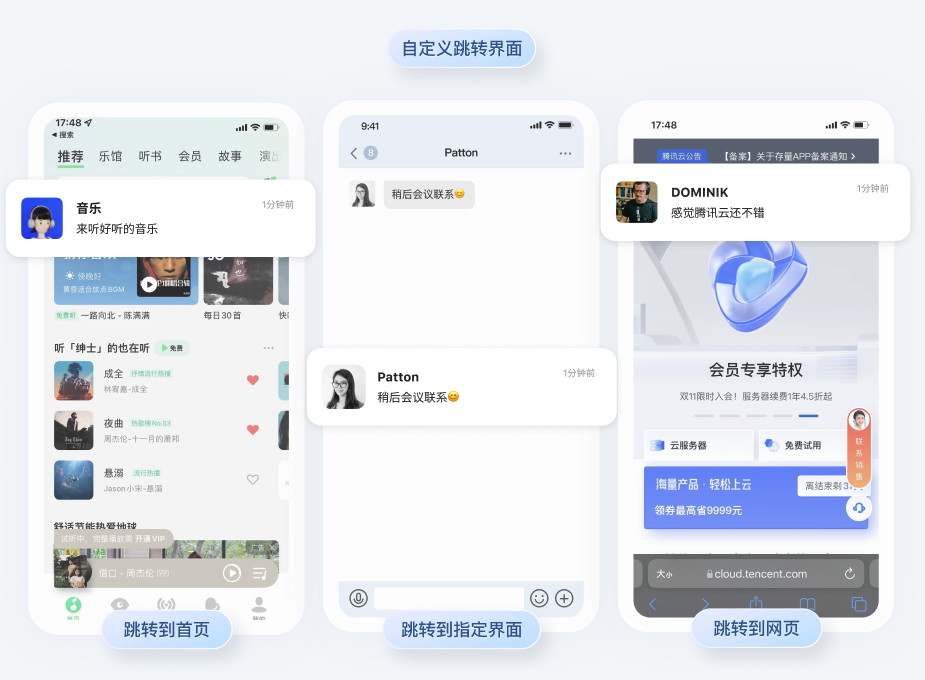
厂商通道支持说明
设备类型 | 是否支持自定义跳转 |
iOS | 支持 |
华为 | 支持 |
荣耀 | 支持 |
小米 | 支持 |
vivo | 支持 |
OPPO | 支持 |
魅族 | 支持 |
FCM | 支持 |
各端功能实现
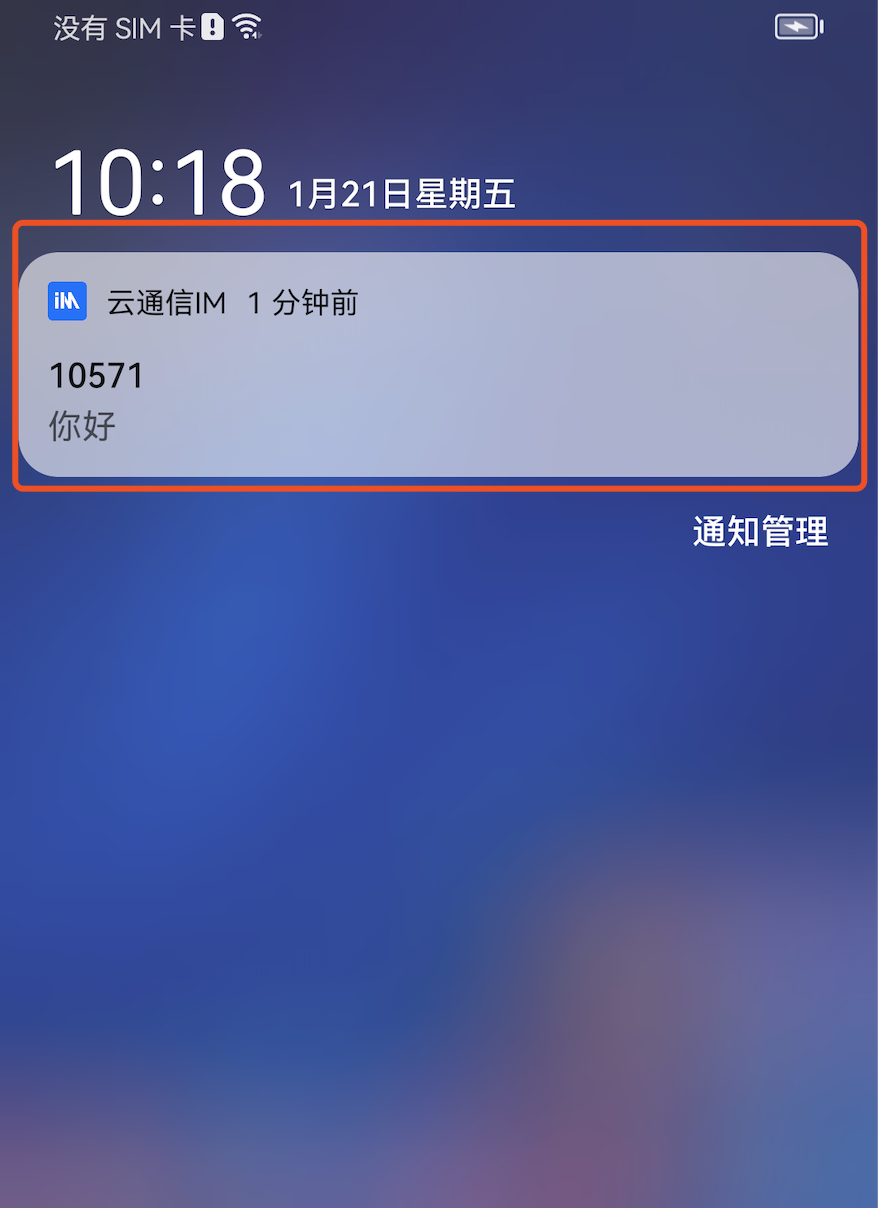
收到离线推送后,通知栏会显示推送信息如图所示,单击通知栏可以自定义打开应用的界面。
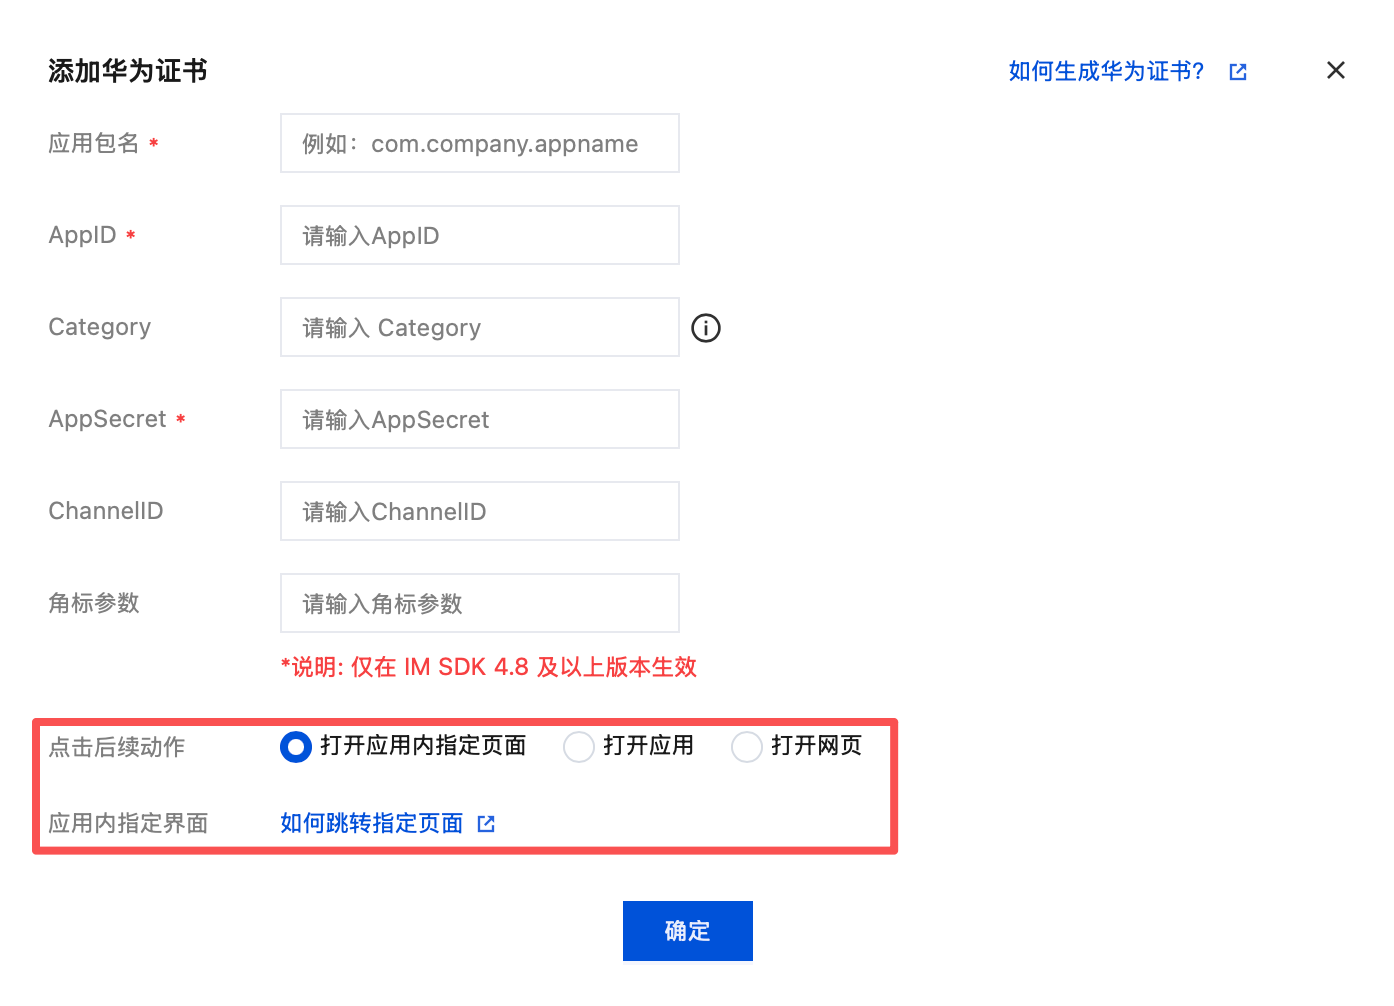
1. 控制台配置点击后续动作按如下配置,选择打开应用内指定界面,使用默认参数即可。

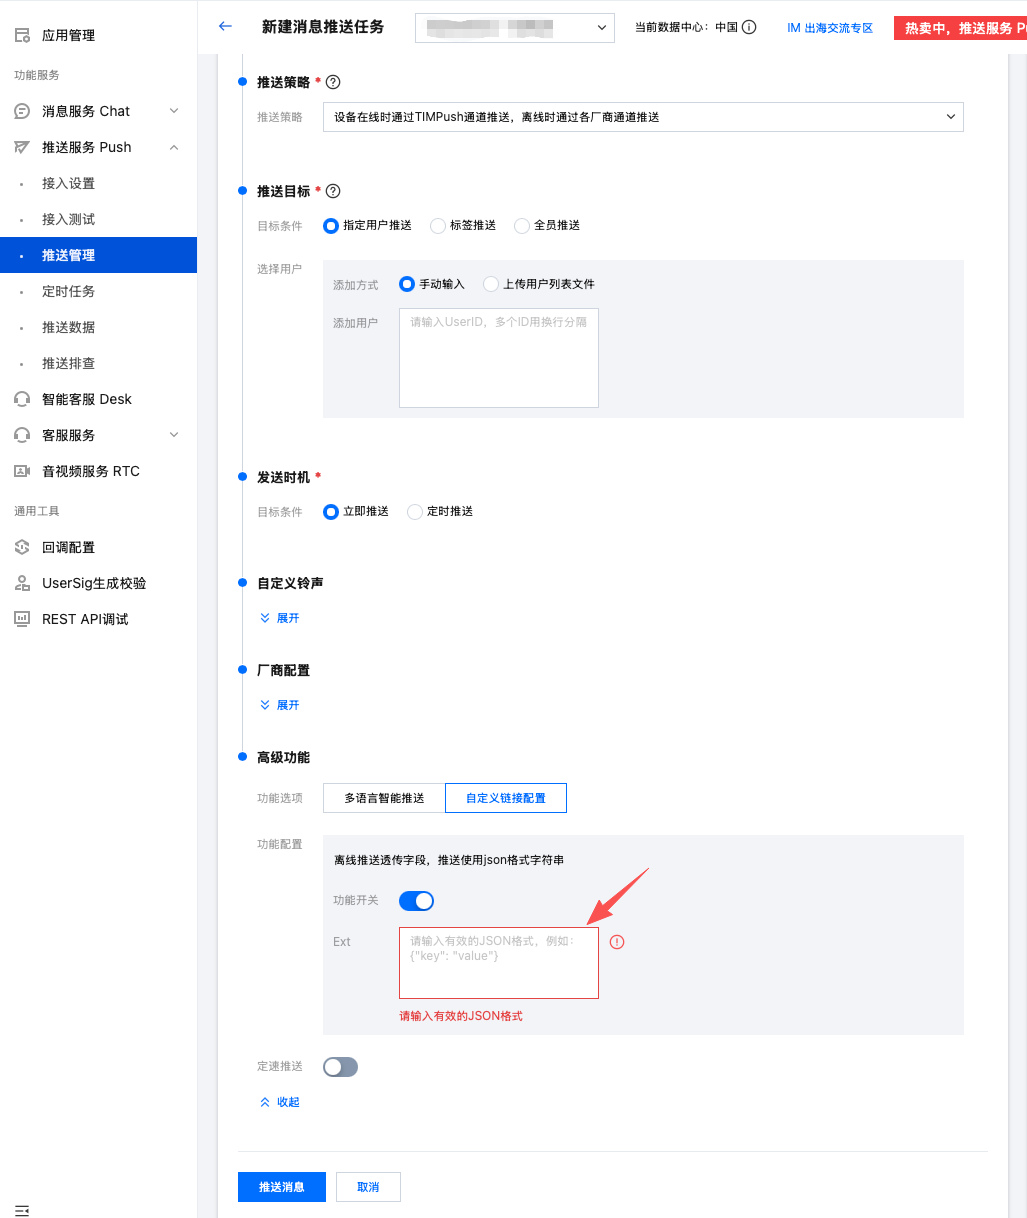
2. 发送消息填充透传参数。
{"MsgBody": [...] // 这里同 MsgBody 相关描述"OfflinePushInfo": {"PushFlag": 0,"Title":"离线推送标题","Desc": "离线推送内容","Ext": "{\\"entity\\":{\\"key1\\":\\"value1\\",\\"key2\\":\\"value2\\"}}" // 透传字段,推送使用json格式字符串}}
V2TIMOfflinePushInfo v2TIMOfflinePushInfo = new V2TIMOfflinePushInfo();v2TIMOfflinePushInfo.setTitle("推送标题");v2TIMOfflinePushInfo.setDesc("推送内容");OfflinePushExtInfo offlinePushExtInfo = new OfflinePushExtInfo();offlinePushExtInfo.getBusinessInfo().setSenderId("senderID");offlinePushExtInfo.getBusinessInfo().setSenderNickName("senderNickName");if (chatInfo.getType() == V2TIMConversation.V2TIM_GROUP) {offlinePushExtInfo.getBusinessInfo().setChatType(V2TIMConversation.V2TIM_GROUP);offlinePushExtInfo.getBusinessInfo().setSenderId("groupID");}// 透传字段填充v2TIMOfflinePushInfo.setExt(new Gson().toJson(offlinePushExtInfo).getBytes());final V2TIMMessage v2TIMMessage = message.getTimMessage();String msgID = V2TIMManager.getMessageManager().sendMessage(v2TIMMessage, isGroup ? null : userID, isGroup ? groupID : null,V2TIMMessage.V2TIM_PRIORITY_DEFAULT, false, v2TIMOfflinePushInfo, new V2TIMSendCallback<V2TIMMessage>() {@Overridepublic void onProgress(int progress) {}@Overridepublic void onError(int code, String desc) {TUIChatUtils.callbackOnError(callBack, TAG, code, desc);}@Overridepublic void onSuccess(V2TIMMessage v2TIMMessage) {TUIChatLog.v(TAG, "sendMessage onSuccess:" + v2TIMMessage.getMsgID());message.setMsgTime(v2TIMMessage.getTimestamp());TUIChatUtils.callbackOnSuccess(callBack, message);}});

3. 点击离线推送消息,组件会回调该点击事件和透传填充的参数。
注意:
注册回调时机必须放在应用 Application 的 oncreate() 函数中。
TIMPushManager.getInstance().addPushListener(new TIMPushListener() {@Overridepublic void onNotificationClicked(String ext) {Log.d(TAG, "onNotificationClicked =" + ext);// 获取 ext 自定义跳转// 示例:跳转到对应聊天界面OfflinePushExtInfo offlinePushExtInfo = null;try {offlinePushExtInfo = new Gson().fromJson(extString, OfflinePushExtInfo.class);if (offlinePushExtInfo.getBusinessInfo().getChatAction() == OfflinePushExtInfo.REDIRECT_ACTION_CHAT) {String senderId = offlinePushExtInfo.getBusinessInfo().getSenderId();if (TextUtils.isEmpty(senderId)) {return;}TUIUtils.startChat(senderId, offlinePushExtInfo.getBusinessInfo().getSenderNickName(), offlinePushExtInfo.getBusinessInfo().getChatType());}} catch (Exception e) {Log.e(TAG, "getOfflinePushExtInfo e: " + e);}}});
组件会以回调或者广播形式通知应用,应用在回调中配置 App 的跳转页面即可。
注意:
注册回调时机建议放在应用 Application 的 oncreate() 函数中。
1. 回调方式如下:
TUICore.registerEvent(TUIConstants.TIMPush.EVENT_NOTIFY, TUIConstants.TIMPush.EVENT_NOTIFY_NOTIFICATION, new ITUINotification() {@Overridepublic void onNotifyEvent(String key, String subKey, Map<String, Object> param) {Log.d(TAG, "onNotifyEvent key = " + key + "subKey = " + subKey);if (TUIConstants.TIMPush.EVENT_NOTIFY.equals(key)) {if (TUIConstants.TIMPush.EVENT_NOTIFY_NOTIFICATION.equals(subKey)) {if (param != null) {String extString = (String)param.get(TUIConstants.TIMPush.NOTIFICATION_EXT_KEY);// 获取 ext 自定义跳转}}}}});
2. 广播方式如下:
// 动态注册广播IntentFilter intentFilter = new IntentFilter();intentFilter.addAction(TUIConstants.TIMPush.NOTIFICATION_BROADCAST_ACTION);LocalBroadcastManager.getInstance(context).registerReceiver(localReceiver, intentFilter);//广播接收者public class OfflinePushLocalReceiver extends BroadcastReceiver {public static final String TAG = OfflinePushLocalReceiver.class.getSimpleName();@Overridepublic void onReceive(Context context, Intent intent) {DemoLog.d(TAG, "BROADCAST_PUSH_RECEIVER intent = " + intent);if (intent != null) {String ext = intent.getStringExtra(TUIConstants.TIMPush.NOTIFICATION_EXT_KEY);// 获取 ext 自定义跳转} else {Log.e(TAG, "onReceive ext is null");}}}
收到离线推送后,通知栏会显示推送信息如图所示,单击通知栏可以自定义打开应用的界面。
1. 发送消息填充透传参数。
{"MsgBody": [...] // 这里同 MsgBody 相关描述"OfflinePushInfo": {"PushFlag": 0,"Title":"离线推送标题","Desc": "离线推送内容","Ext": "{\\"entity\\":{\\"key1\\":\\"value1\\",\\"key2\\":\\"value2\\"}}" // 透传字段,推送使用json格式字符串}}
#import <TUICore/OfflinePushExtInfo.h>V2TIMOfflinePushInfo *pushInfo = [[V2TIMOfflinePushInfo alloc] init];pushInfo.title = @"推送标题";pushInfo.desc = @"推送内容";BOOL isGroup = groupID.length > 0;NSString *senderId = isGroup ? (groupID) : ([TUILogin getUserID]);NSString *nickName = isGroup ? (conversationData.title) : ([TUILogin getNickName] ?: [TUILogin getUserID]);OfflinePushExtInfo *extInfo = [[OfflinePushExtInfo alloc] init];OfflinePushExtBusinessInfo * entity = extInfo.entity;entity.action = 1;entity.content = @"推送内容";entity.sender = senderId;entity.nickname = nickName;entity.faceUrl = [TUILogin getFaceUrl] ?: @"";entity.chatType = [isGroup ? @(V2TIM_GROUP) : @(V2TIM_C2C) integerValue];entity.version = kOfflinePushVersion;// 透传字段pushInfo.ext = [extInfo toReportExtString];
2. 点击离线推送消息,组件会回调该点击事件和透传填充的参数。
注意:
注册回调时机建议放在应用 AppDelegate 的 didFinishLaunchingWithOptions 函数中。
- (BOOL)application:(UIApplication *)application didFinishLaunchingWithOptions:(NSDictionary *)launchOptions {[TIMPushManager addPushListener:self];return YES;}#pragma mark - TIMPushListener- (void)onNotificationClicked:(NSString *)ext {// 获取 ext 自定义跳转}
您需要在 AppDelegate.m 文件中实现
- onRemoteNotificationReceived 方法。#pragma mark - TIMPush- (BOOL)onRemoteNotificationReceived:(NSString *)notice {//- 如果返回 YES, TIMPush 将不在执行内置的 TUIKit 离线推送解析逻辑,完全交由您自行处理;//NSString *ext = notice;//OfflinePushExtInfo *info = [OfflinePushExtInfo createWithExtString:ext];//return YES;//- 如果返回 NO,TIMPush 将继续执行内置的 TUIKit 离线推送解析逻辑,继续回调 - navigateToBuiltInChatViewController:groupID: 方法。return NO;}
步骤1:厂商配置
说明:
应用内指定界面,请使用默认配置。

步骤2:客户端代码配置
步骤3:处理消息点击回调,并解析参数
如果您需要自定义解析收到的远程推送,您可按照如下方法实现:
注意:
注册回调时机建议放在程序入口 main() 函数中。
TIMPushListener timPushListener = TIMPushListener(onNotificationClicked: (String ext) {debugPrint("ext: $ext");// 获取 ext 自定义跳转});tencentCloudChatPush.addPushListener(listener: timPushListener);
1. 请定义一个函数,用于接收推送消息点击回调事件.
该函数请定义成
{required String ext, String? userID, String? groupID} 的入参形式。其中,ext 字段,为该消息所携带的完整 ext 信息,由发送方指定,如果未指定,则有默认值。您可解析该字段,跳转至对应页面。
userID 和 groupID 字段,为本插件,自动尝试解析 ext Json String, 获取里面携带的单聊对方 userID 和 群聊 groupID 信息。如果您未自定义 ext 字段,ext 字段由 SDK 或 UIKit 默认指定,则可使用此处的默认解析。如果尝试解析失败,则为 null 空。
您可定义一个函数来接收该回调,并据此跳转至对应会话页面或您的业务页面。
示例如下:
void _onNotificationClicked({required String ext, String? userID, String? groupID}) {print("_onNotificationClicked: $ext, userID: $userID, groupID: $groupID");if (userID != null || groupID != null) {// 根据 userID 或 groupID 跳转至对应 Message 页面.} else {// 根据 ext 字段, 自己写解析方式, 跳转至对应页面.}}
2. 请注意,不要在 Flutter 程序入口的 main 方法中调用。
调用
TencentCloudChatPush().registerPush 方法成功后,就可以收到离线推送通知了。TencentCloudChatPush().registerPush(onNotificationClicked: _onNotificationClicked,sdkAppId: 您的sdkAppId,appKey: "客户端密钥",apnsCertificateID: 您配置的证书 ID);
步骤1:厂商配置
说明:
应用内指定界面,请使用默认配置。

步骤2:获取离线推送扩展信息,进行自定义跳转。
export default {onLaunch: function() {},onShow: function() {console.log('App Show')Push.getNotificationExtInfo((extInfo) => {console.log('getNotificationExtInfo ok', extInfo);// 在此处进行自定义跳转。})},onHide: function() {console.log('App Hide')}}
步骤1: 厂商配置
说明:
应用内指定界面,请使用默认配置。

步骤2: 获取离线推送扩展信息,进行自定义跳转。
import Push from '@tencentcloud/react-native-push';if (Push) {// 监听通知栏点击事件,获取推送扩展信息Push.addPushListener(Push.EVENT.NOTIFICATION_CLICKED, (res) => {// res 为推送扩展信息console.log('notification clicked', res);});}
步骤1: 厂商配置
注意:
应用内指定界面配置项,请使用默认配置,否则会收不到点击通知事件。

步骤2: 注册点击通知事件监听,进行自定义跳转。
在小程序启动后,注册点击通知事件监听,用户点击通知后会收到点击通知事件,可根据扩展信息进行页面跳转。
const listener = (param) => {console.log('onEvent', JSON.stringify(param));}App({onLaunch: function () {console.log('App Show')Push.addPushListener(Push.EventName.NOTIFICATION_CLICKED, listener);}}
收到离线推送后,通知栏会显示推送信息,单击通知栏可以自定义打开应用的界面。
步骤1:厂商配置
说明:
应用内指定界面,请使用默认配置。
步骤2:获取离线推送扩展信息,进行自定义跳转。
注意:
注册回调时机建议放在应用
UIAbility 的 onCreate() 函数中。let pushListener: TIMPushListener = {onNotificationClicked: (data) => {const ext = data as string;console.info("onNotificationClicked: " + ext);// 获取 ext 自定义跳转}}TIMPushManager.getInstance().addPushListener(pushListener);


