TUIKit 是基于腾讯云 Chat SDK 的一款 Vue 3 UI 组件库,它提供了一些通用的 UI 组件,包含会话、聊天、群组等功能。本文介绍如何快速集成 TUIKit 并实现核心功能。
说明:
AI 助手使用说明
问卷调查
您好!我们正在开发一款即时通信产品 UIKit,它基于腾讯云 Chat SDK,是一款 Vue3 UI 组件库,能帮助您快速集成并实现核心功能。
您的反馈我们会高度重视,本问卷填写仅需要 30 秒!诚邀您的参与。
请根据您的技术栈和目标平台,选择对应的接入文档开始集成:
接入需求 | 桌面端 | 移动端 H5 |
全新 Web Vue3 项目 | 请参考本文 | |
全新 Web React 项目 | ||
Web Vue2 项目 |
关键概念
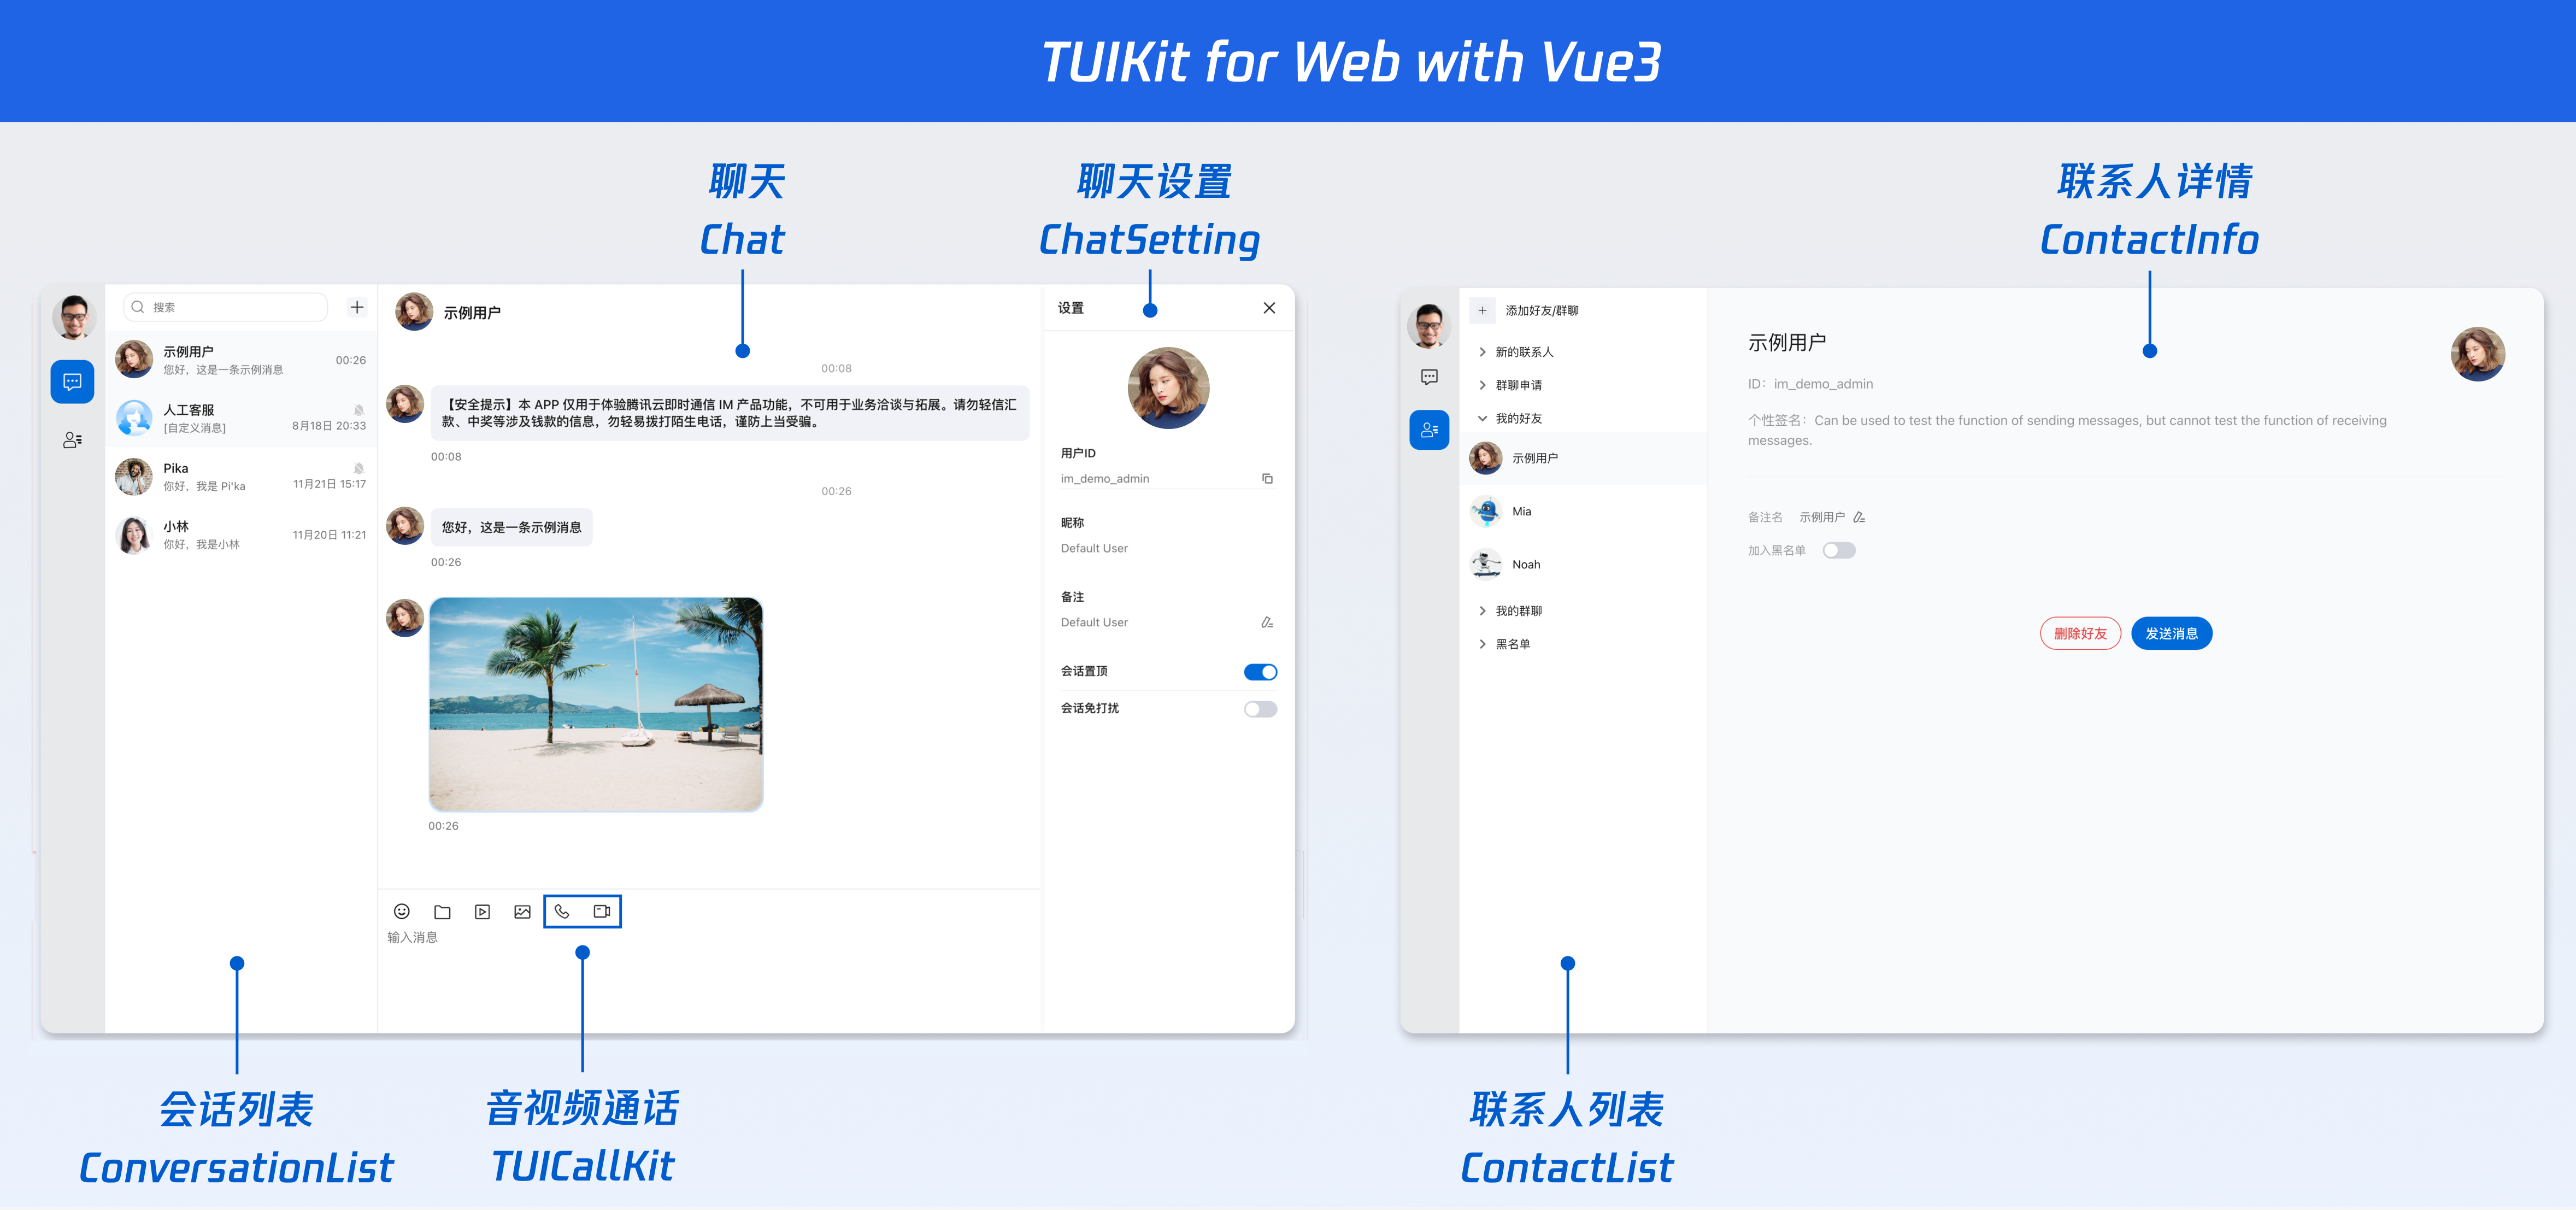
chat-uikit-vue3 主要分为 ConversationList、Chat、MessageList、ChatHeader、MessageInput、ChatSetting、Search、Contact 等核心 UI 组件,每个 UI 组件负责展示不同的内容。
ConversationList 提供会话列表组件。
Chat 提供会话的容器组件。
MessageList 提供会话的消息列表组件。
ChatHeader 提供会话的头部信息组件。
MessageInput 提供输入框组件。
ChatSetting 提供单聊和群聊的管理组件。
Search 提供云端搜索组件。
Contact 提供联系人组件。
前提条件
Vue.js@^3.0.0
TypeScript@^5.0.0
Node.js(Node.js ≥ 20.0.0,建议使用目前的 LTS v22 版本)
快速体验完整接入项目
您可以直接克隆我们已经完成接入的示例项目,以快速查看跑通完整效果,或在接入过程中对照最终代码结构。示例项目已完成 Chat UIKit 相关依赖安装、组件引入、初始化配置和基础页面接入,适合作为接入参考。
git clone https://gitee.com/tencent-cloud-uikit/rtc-chat-web.gitcd chat-desktop-vue3npm installnpm run dev
创建项目
使用 Vite 创建一个新的名称为 chat-integration-vue3 的 Vue3 项目。
注意:
1. 建议使用 npm 进行安装,npm 会主动下载所需的 peerDependencies 依赖。
2.
npm create vite@latest 会使用最新的 vite 版本,最新版本的 vite 可能会与低版本的 node.js 冲突,请检查您电脑上的相关环境配置。npm create vite@latest
脚手架选项可参考以下选择:
◇ Project name:│ chat-integration-vue3│◇ Select a framework:│ Vue│◇ Select a variant:│ TypeScript│◆ Install with npm and start now?│ ● Yes / ○ No└
下载并导入组件
创建项目完成后,切换到项目所在目录。
cd chat-integration-vue3
步骤1:安装依赖
说明:
建议使用 npm 进行安装,npm 会主动下载所需的 peerDependencies 依赖。
npm i @tencentcloud/chat-uikit-vue3@6 tuikit-atomicx-vue3@6 @trtc/calls-uikit-vue
步骤2:引入组件
注意:
2.1 搭建入口页面
例如:在
src/App.vue 页面中写入以下代码,保证登录成功后进入聊天页面,避免在登录前调用 api。<template><UIKitProvider language="zh-CN" theme="light"><TUICallKit class="call-kit" /><ChatLayout v-if="isLoggedIn" /></UIKitProvider></template><script setup lang="ts">import { ref } from 'vue';import { UIKitProvider, useLoginState } from '@tencentcloud/chat-uikit-vue3';import { TUICallKit } from '@trtc/calls-uikit-vue';import ChatLayout from './components/ChatLayout.vue';const { login } = useLoginState();const isLoggedIn = ref(false);login({sdkAppId: 0, // SDKAppID, number 类型userId: '', // UserID, string 类型userSig: '', // userSig, string 类型}).then(() => {isLoggedIn.value = true;});</script><style>body { margin: 0; padding: 0; font-family: Inter, Avenir, Helvetica, Arial, sans-serif; }#app { width: 100vw; height: 100vh; }#app > div { display: flex; align-items: center; justify-content: center; }div.call-kit {width: 950px;height: 650px;position: absolute !important;z-index: 100;transform: translate(-50%, -50%);top: 50%;left: 50%;}</style>
2.2 搭建聊天页面
在
src/components 文件夹中新建一个 ChatLayout.vue 的文件,并写入以下内容:<template><div class="chat-layout"><SideTab :active-tab="activeTab" @tab-change="(tab) => activeTab = tab" /><div class="list-panel"><ConversationList v-show="activeTab === 'conversations'" /><ContactList v-show="activeTab === 'contacts'" /></div><div v-show="activeTab === 'conversations'" class="chat-panel"><Chat :conversationID="defaultOpenConversationID" :PlaceholderEmpty="EmptyChatTpl"><ChatHeader><template #ChatHeaderRight><button class="icon-btn" @click="settingOpen = !settingOpen"><IconMenu size="20" /></button></template></ChatHeader><MessageList /><MessageInput><template #headerToolbar><div class="toolbar"><div class="toolbar-left"><EmojiPicker /><FilePicker /><VideoPicker /><ImagePicker /><AudioCallPicker /><VideoCallPicker /><QuickConferencePicker /></div><button class="icon-btn" @click="searchOpen = !searchOpen"><IconSearch size="20" /></button></div></template></MessageInput><div v-if="settingOpen" class="float-sidebar"><ChatSetting @close="settingOpen = false" /></div></Chat></div><div v-if="searchOpen && activeTab === 'conversations'" class="search-sidebar"><div class="search-sidebar-header"><span class="search-sidebar-title">搜索</span><button class="icon-btn" @click="searchOpen = false">✕</button></div><Search :variant="VariantType.EMBEDDED" /></div><div v-show="activeTab === 'contacts'" class="detail-panel"><ContactInfo@send-message="activeTab = 'conversations'"@enter-group="activeTab = 'conversations'"/></div></div></template><script setup lang="ts">import { ref, watch, onMounted } from 'vue';import {Chat, Search, ChatHeader, MessageList, MessageInput,ConversationList, ContactList, ContactInfo, ChatSetting,EmojiPicker, FilePicker, VideoPicker, ImagePicker,VariantType, useChatContext,AudioCallPicker, VideoCallPicker, QuickConferencePicker} from '@tencentcloud/chat-uikit-vue3';import { IconMenu, IconSearch } from '@tencentcloud/uikit-base-component-vue3';import SideTab from './SideTab.vue';const { activeConversation, sendMessage } = useChatContext();const activeTab = ref<'conversations' | 'contacts'>('conversations');const settingOpen = ref(false);const searchOpen = ref(false);const defaultOpenConversationID = ref('C2Cadministrator');onMounted(() => {setTimeout(() => {if (activeConversation.value?.conversationID === defaultOpenConversationID.value) {sendMessage({type: 'textMessage',text: `欢迎体验 Chat Vue3 桌面端WEB应用 Demo~您可以按照以下顺序体验 IM 的核心功能:1. 在输入框内发送一条文本消息。2. 输入框上的工具栏支持,语音通话、视频通话、快速会议、图片、视频、文件发送等扩展功能。3. 如果您想添加好友,可以前往联系人页面点击"添加好友/群聊"。`});}}, 1000);});watch(() => activeConversation.value?.conversationID, () => {settingOpen.value = false;searchOpen.value = false;});watch(activeTab, () => {settingOpen.value = false;searchOpen.value = false;});const EmptyChatTpl = { template: `<div class="empty-chat"><div style="font-size:48px;opacity:.3">💬</div><div style="font-size:15px;font-weight:600;color:#6c757d">暂无会话</div><div style="font-size:13px;color:#868e96">选择一个会话开始聊天</div></div>`};</script><style scoped>.chat-layout { height: 60vh; aspect-ratio: 16/9; display: flex; border-radius: 16px; box-shadow: 0 20px 60px rgba(0,0,0,.3), 0 0 0 1px rgba(255,255,255,.1); overflow: hidden; }@media (max-width: 1920px) { .chat-layout { height: 80vh; } }.list-panel { width: 300px; display: flex; flex-direction: column; border-right: 1px solid var(--stroke-color-primary); overflow: hidden; }.detail-panel { flex: 1; }.icon-btn { padding: 4px 6px; display: flex; align-items: center; justify-content: center; border: none; background: transparent; border-radius: 4px; font-size: 20px; color: var(--text-color-primary); cursor: pointer; outline: none; }.icon-btn:hover { background-color: var(--button-color-secondary-hover); }.toolbar { display: flex; justify-content: space-between; align-items: center; }.toolbar-left { display: flex; align-items: center; gap: 4px; }.search-sidebar { border-left: 1px solid var(--stroke-color-primary); display: flex; flex-direction: column; flex: 0 0 300px; }.search-sidebar-header { display: flex; align-items: center; justify-content: space-between; padding: 12px 16px; border-bottom: 1px solid var(--stroke-color-primary); }.search-sidebar-title { font-size: 16px; font-weight: 500; color: var(--text-color-primary); }.chat-panel { flex: 1; position: relative; display: flex; }.float-sidebar { position: absolute; right: 0; top: 0; bottom: 0; min-width: 300px; max-width: 400px; display: flex; flex-direction: column; background-color: var(--bg-color-operate); box-shadow: -2px 0 8px rgba(0,0,0,.04), -4px 0 16px rgba(0,0,0,.06); overflow: auto; z-index: 1000; }.empty-chat { flex: 1; display: flex; flex-direction: column; align-items: center; justify-content: center; gap: 8px; background-color: var(--bg-color-operate); border-left: 1px solid rgba(0,0,0,.08); }</style><style>#app { text-align: start; }</style>
2.3 引入侧边导航
在
src/components 文件夹中新建一个 SideTab.vue 的文件,并写入以下内容:<template><div class="side-tab" :class="{ dark: isDark }"><!-- 用户头像 --><div class="avatar-wrapper"><Avatar class="avatar" :src="loginUserInfo?.avatarUrl" /><div class="tooltip"><div class="tooltip-name">{{ loginUserInfo?.userName || '未命名' }}</div><div class="tooltip-id">ID: {{ loginUserInfo?.userId }}</div></div></div><!-- Tab 切换 --><div class="tabs"><divclass="tab-item":class="{ active: props.activeTab === 'conversations' }"@click="handleTabChange('conversations')"title="会话"><IconChatNew size="24" /></div><divclass="tab-item":class="{ active: props.activeTab === 'contacts' }"@click="handleTabChange('contacts')"title="联系人"><IconContacts size="24" /></div></div></div></template><script lang="ts" setup>import { computed } from 'vue';import { useLoginState, useUIKit, Avatar } from '@tencentcloud/chat-uikit-vue3';import { IconChatNew, IconContacts } from '@tencentcloud/uikit-base-component-vue3';const { theme } = useUIKit();const { loginUserInfo } = useLoginState();const isDark = computed(() => theme.value === 'dark' || theme.value === 'serious');interface Props {activeTab?: 'conversations' | 'contacts';}const props = withDefaults(defineProps<Props>(), {activeTab: 'conversations'});const emit = defineEmits<{tabChange: [tab: 'conversations' | 'contacts'];}>();const handleTabChange = (tab: 'conversations' | 'contacts') => {emit('tabChange', tab);};</script><style scoped>.side-tab{width:72px;height:100vh;background:var(--bg-color-function);display:flex;flex-direction:column;align-items:center;padding:20px 0;transition:background 0.3s;}.avatar-wrapper{position:relative;margin-bottom:24px;cursor:pointer;}.avatar-wrapper:hover:deep(.avatar){transform:scale(1.05);box-shadow:0 4px 12px rgba(0,0,0,0.15);}.tooltip{position:absolute;left:60px;top:50%;transform:translateY(-50%);padding:8px 12px;background:rgba(0,0,0,0.85);color:#fff;border-radius:6px;white-space:nowrap;opacity:0;visibility:hidden;pointer-events:none;transition:all 0.3s;z-index:1000;}.tooltip::before{content:'';position:absolute;left:-6px;top:50%;transform:translateY(-50%);border:6px solid transparent;border-right-color:rgba(0,0,0,0.85);}.avatar-wrapper:hover .tooltip{opacity:1;visibility:visible;}.tooltip-name{font-size:14px;font-weight:500;margin-bottom:4px;}.tooltip-id{font-size:12px;opacity:0.8;}.tabs{display:flex;flex-direction:column;gap:16px;}.tab-item{width:48px;height:48px;display:flex;align-items:center;justify-content:center;border-radius:12px;cursor:pointer;transition:all 0.3s;color:var(--text-color-primary);}.tab-item:hover{background:rgba(0,0,0,0.05);}.tab-item.active{background:var(--button-color-primary-default);color:var(--text-color-button);}.side-tab.dark{background:#1a1a1a;}.side-tab.dark .avatar-wrapper:hover:deep(.avatar){box-shadow:0 4px 12px rgba(255,255,255,0.2);}.side-tab.dark .tooltip{background:rgba(255,255,255,0.95);color:#1a1a1a;}.side-tab.dark .tooltip::before{border-right-color:rgba(255,255,255,0.95);}.side-tab.dark .tab-item:hover{background:rgba(255,255,255,0.1);}.side-tab.dark .tab-item.active{background:#1890ff;color:#fff;}</style>
步骤3:获取 SDKAppID、userID 和 userSig
在上一步的
src/App.vue 文件中的 login 函数,填入登录信息 SDKAppID、userID 和 userSig。// 登录login({sdkAppId: 0, // number 类型userId: '', // string 类型userSig: '', // string 类型});
参数 | 类型 | 说明 |
SDKAppID | Number | 说明: SDKAppID 是腾讯云 IM 客户应用的唯一标识。我们建议每一个独立的 App 都申请一个新的 SDKAppID。不同 SDKAppID 之间的消息是天然隔离的,不能互通。 |
userID | String | 用户的唯一标识符,由您定义,只能包含大小写字母(a-z,A-Z)、数字(0-9)、下划线和连字符。 |
userSig | String | 用户登录即时通信 IM 的密码,其本质是对 UserID 等信息加密后得到的密文。 说明: |
注意:
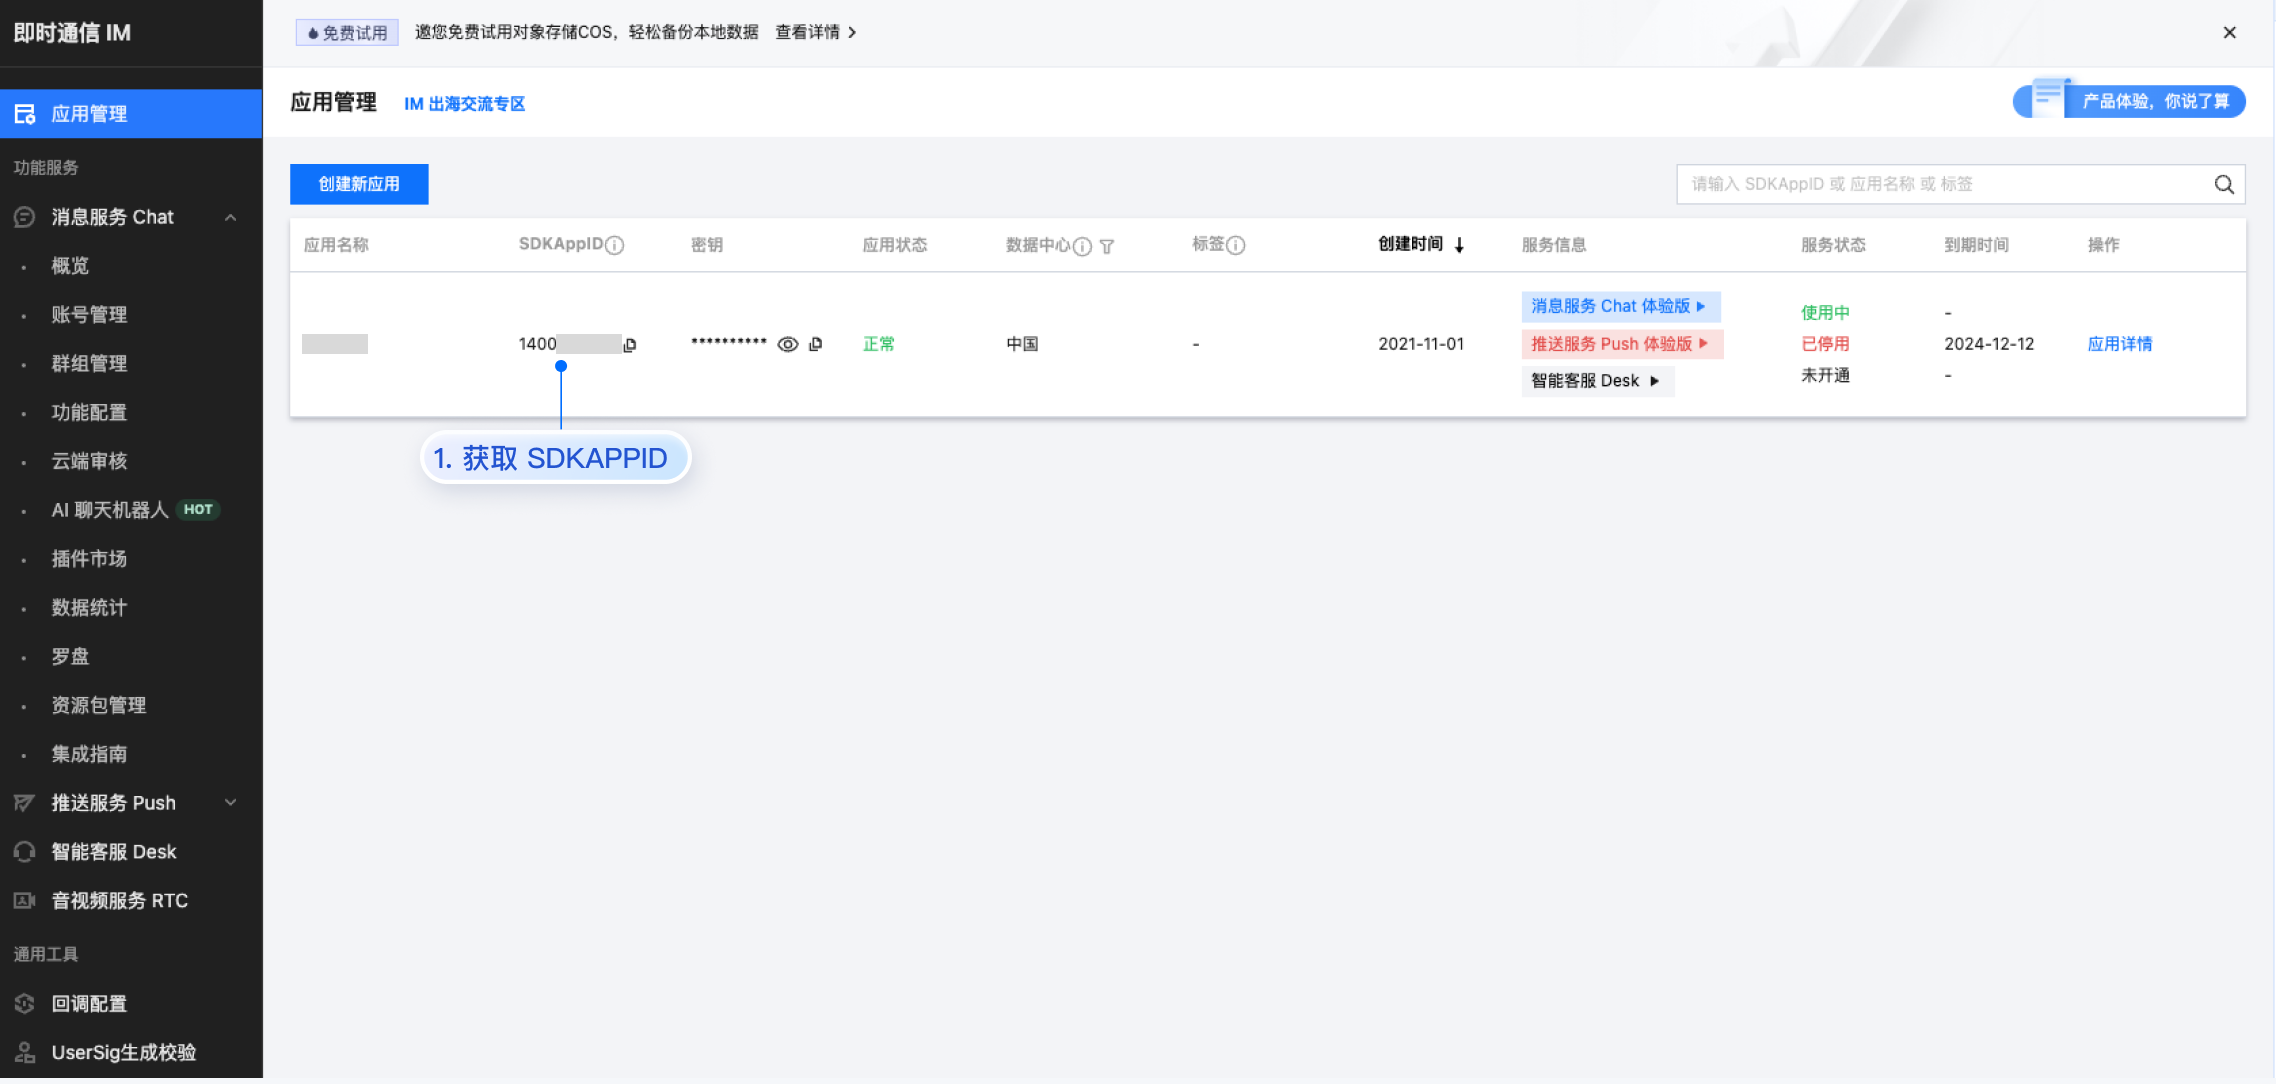
SDKAppID:在 即时通信 IM 控制台 > 应用管理 单击创建新应用,获取 SDKAppID。
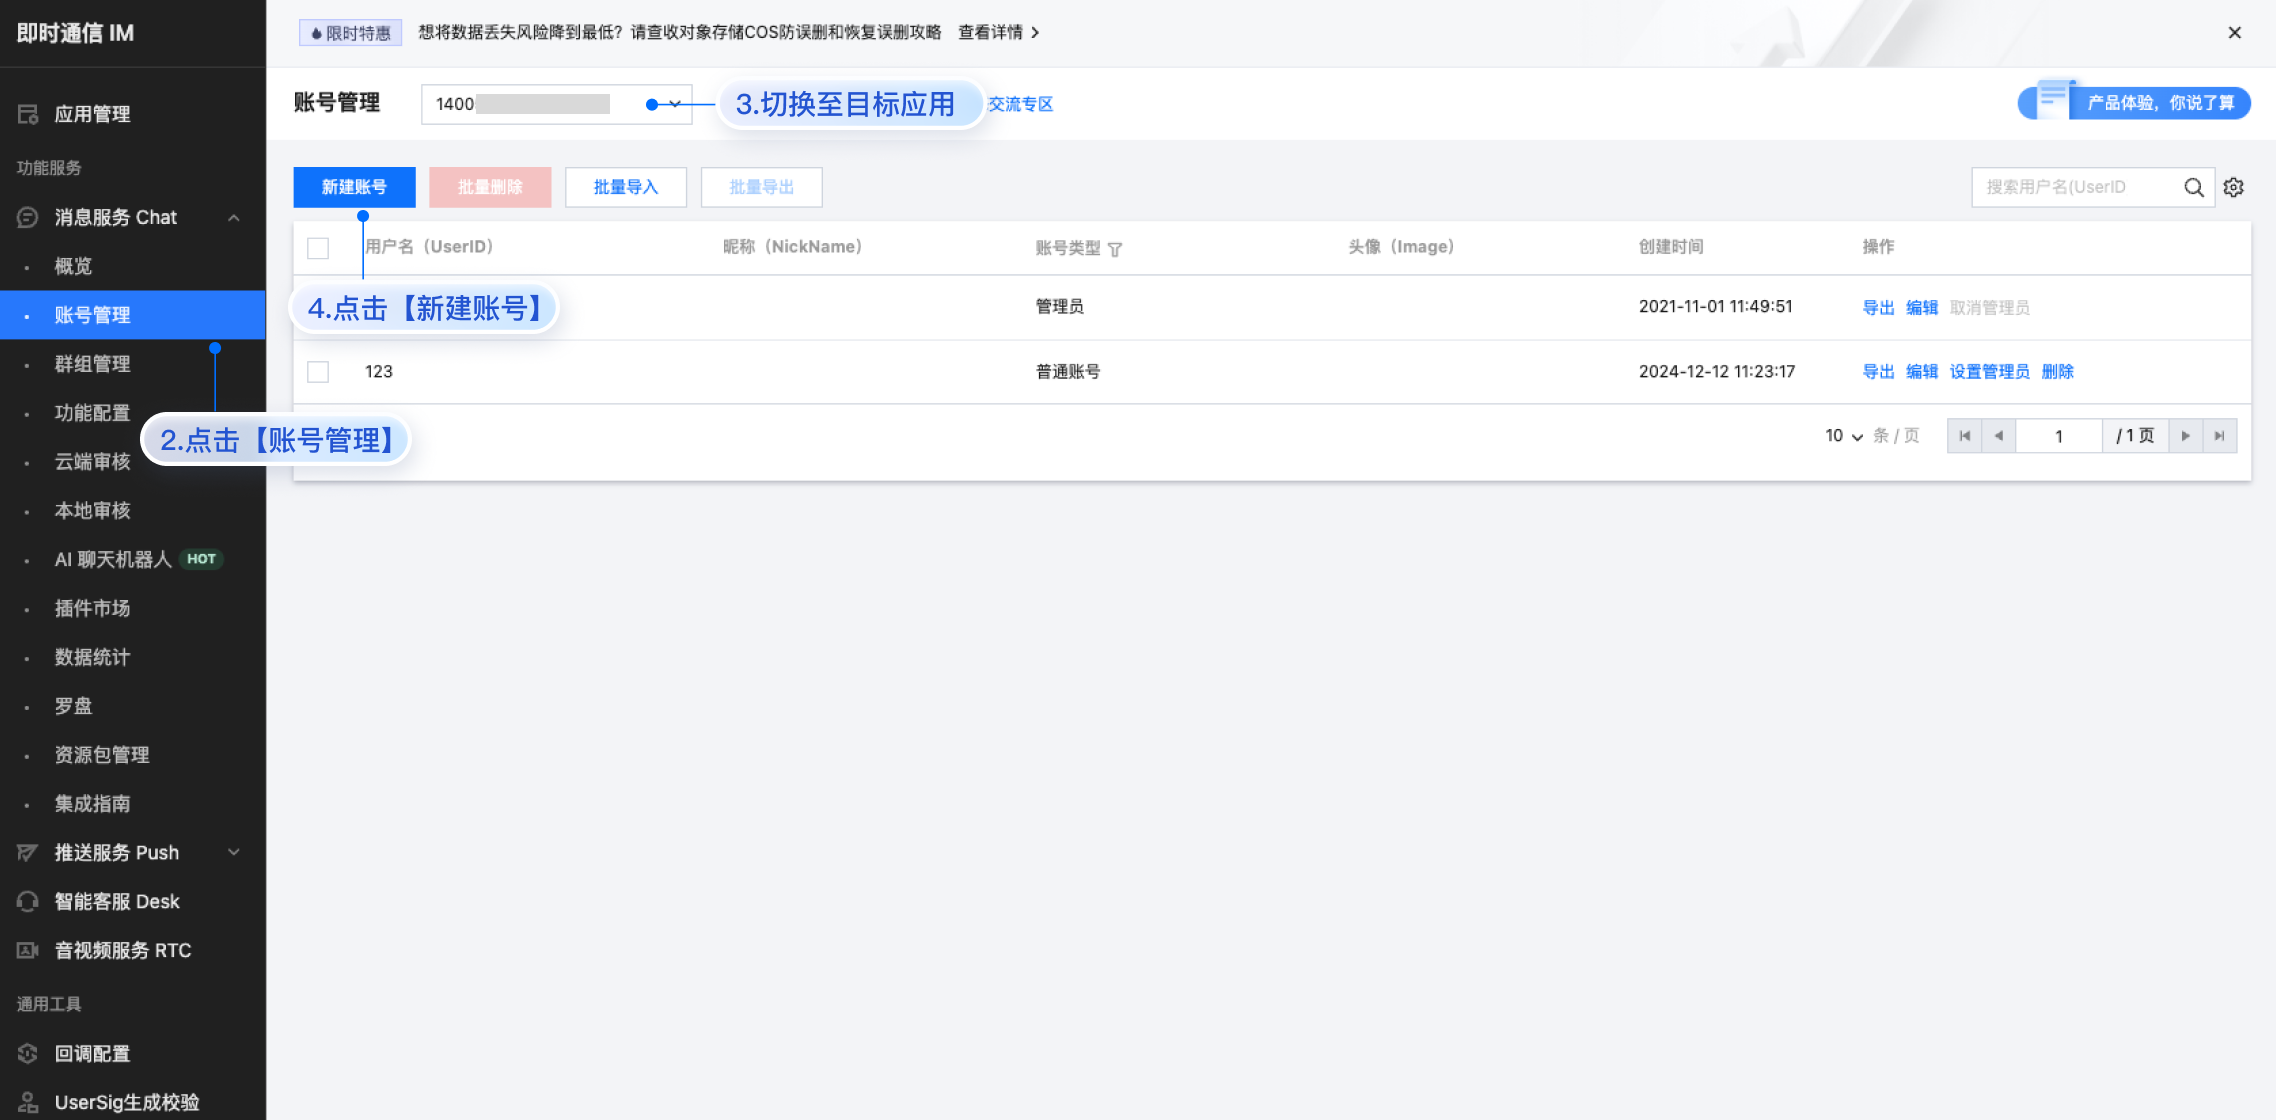
userID:单击 即时通信 IM 控制台 > 消息服务 Chat > 账号管理,切换至目标应用所在账号,您可以创建 2~3 个账号用于体验单聊、群聊的功能。
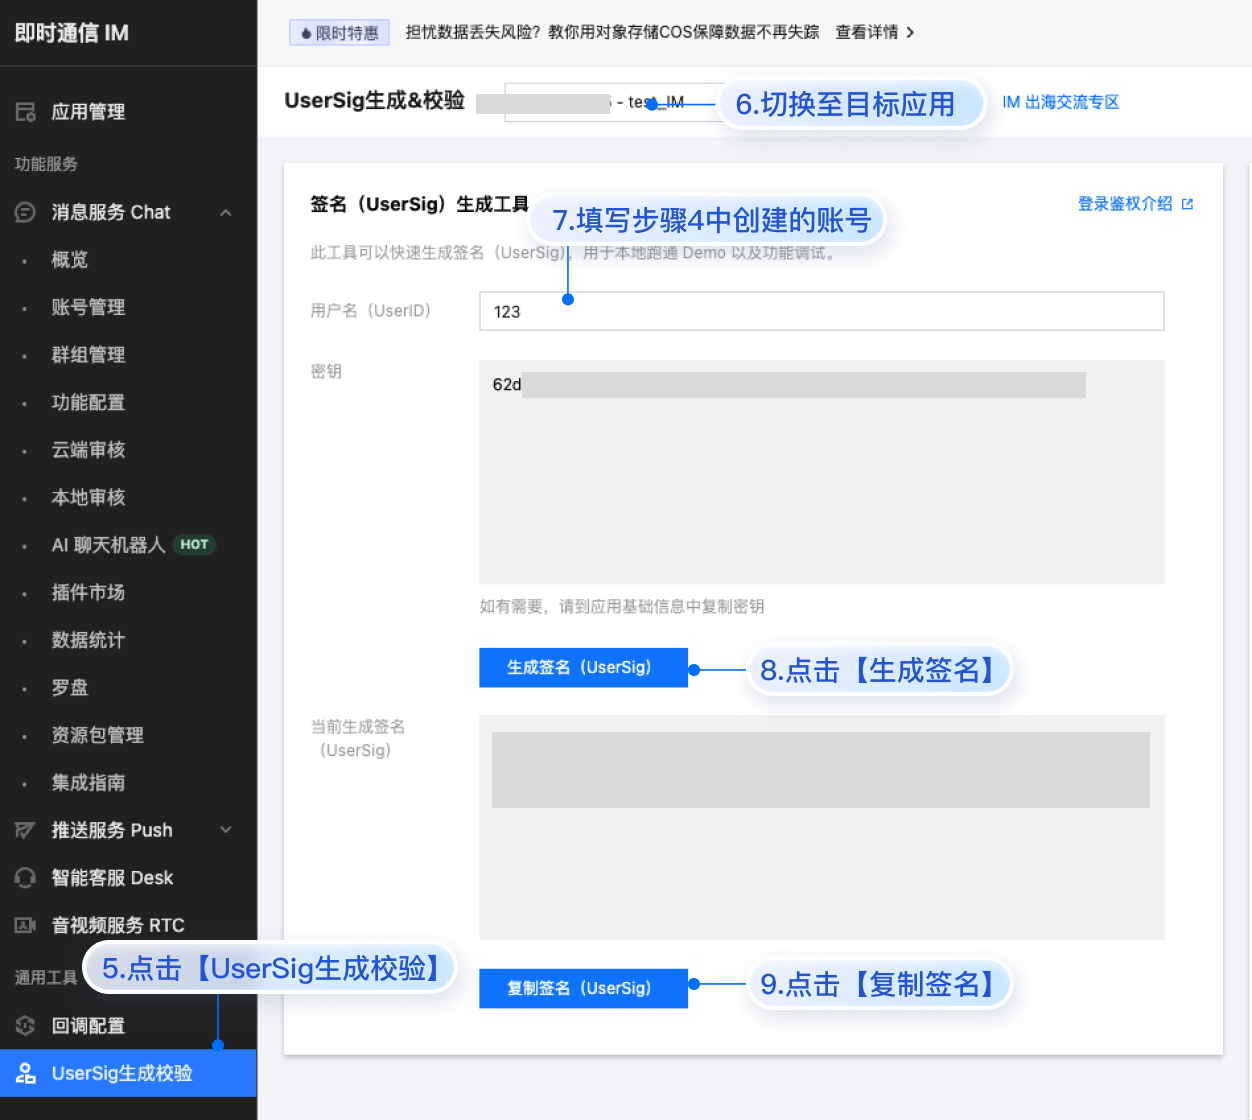
userSig:单击 即时通信 IM 控制台 > 开发工具 > UserSig 生成校验,切换至目标应用所在账号,填写创建的 UserID,即可生成 UserSig。
运行和测试
使用以下命令运行项目
npm run dev
注意:
请确保 步骤3 代码中 SDKAppID、userID 和 userSig 均已成功替换,如未替换将会导致项目表现异常。
userID 和 userSig 为一一对应关系。
如遇到项目启动失败,请检查 开发环境要求 是否满足。
集成更多高级特性
音视频通话
说明:
TUICallKit 是腾讯云推出一款音视频通话 UI 组件,通过集成该组件,您只需要编写几行代码就可以在聊天应用中体验音视频通话功能。
在上面的过程中已经集成了 TUICallKit,若不需要音视频通话功能,可参考以下过程移除集成代码。
1. 安装
@trtc/calls-uikit-vue 依赖。npm install @trtc/calls-uikit-vue
2. 从
@trtc/calls-uikit-vue 导出 TUICallKit,并挂载到 DOM 节点上。在
src/App.vue 文件中继续补充下面的代码:// src/App.vue<template><UIKitProvider language="zh-CN" theme="light"><!-- 挂载音视频通话核心组件 --><TUICallKit class="call-kit" />...</UIKitProvider><template><script setup lang="ts">// 导入音视频通话核心组件import { TUICallKit } from '@trtc/calls-uikit-vue';</script>
3. 在
<MessageInput /> 组件中,使用 #headerToolbar 插槽控制输入框工具栏。<MessageInput class="message-input-container"><template #headerToolbar><div class="message-toolbar"><div class="message-toolbar-actions"><EmojiPicker /><FilePicker /><VideoPicker /><ImagePicker /><AudioCallPicker /><VideoCallPicker /></div><button class="icon-button" @click="isSearchInChatShow = !isSearchInChatShow"><IconSearch size="20" /></button></div></template></MessageInput>
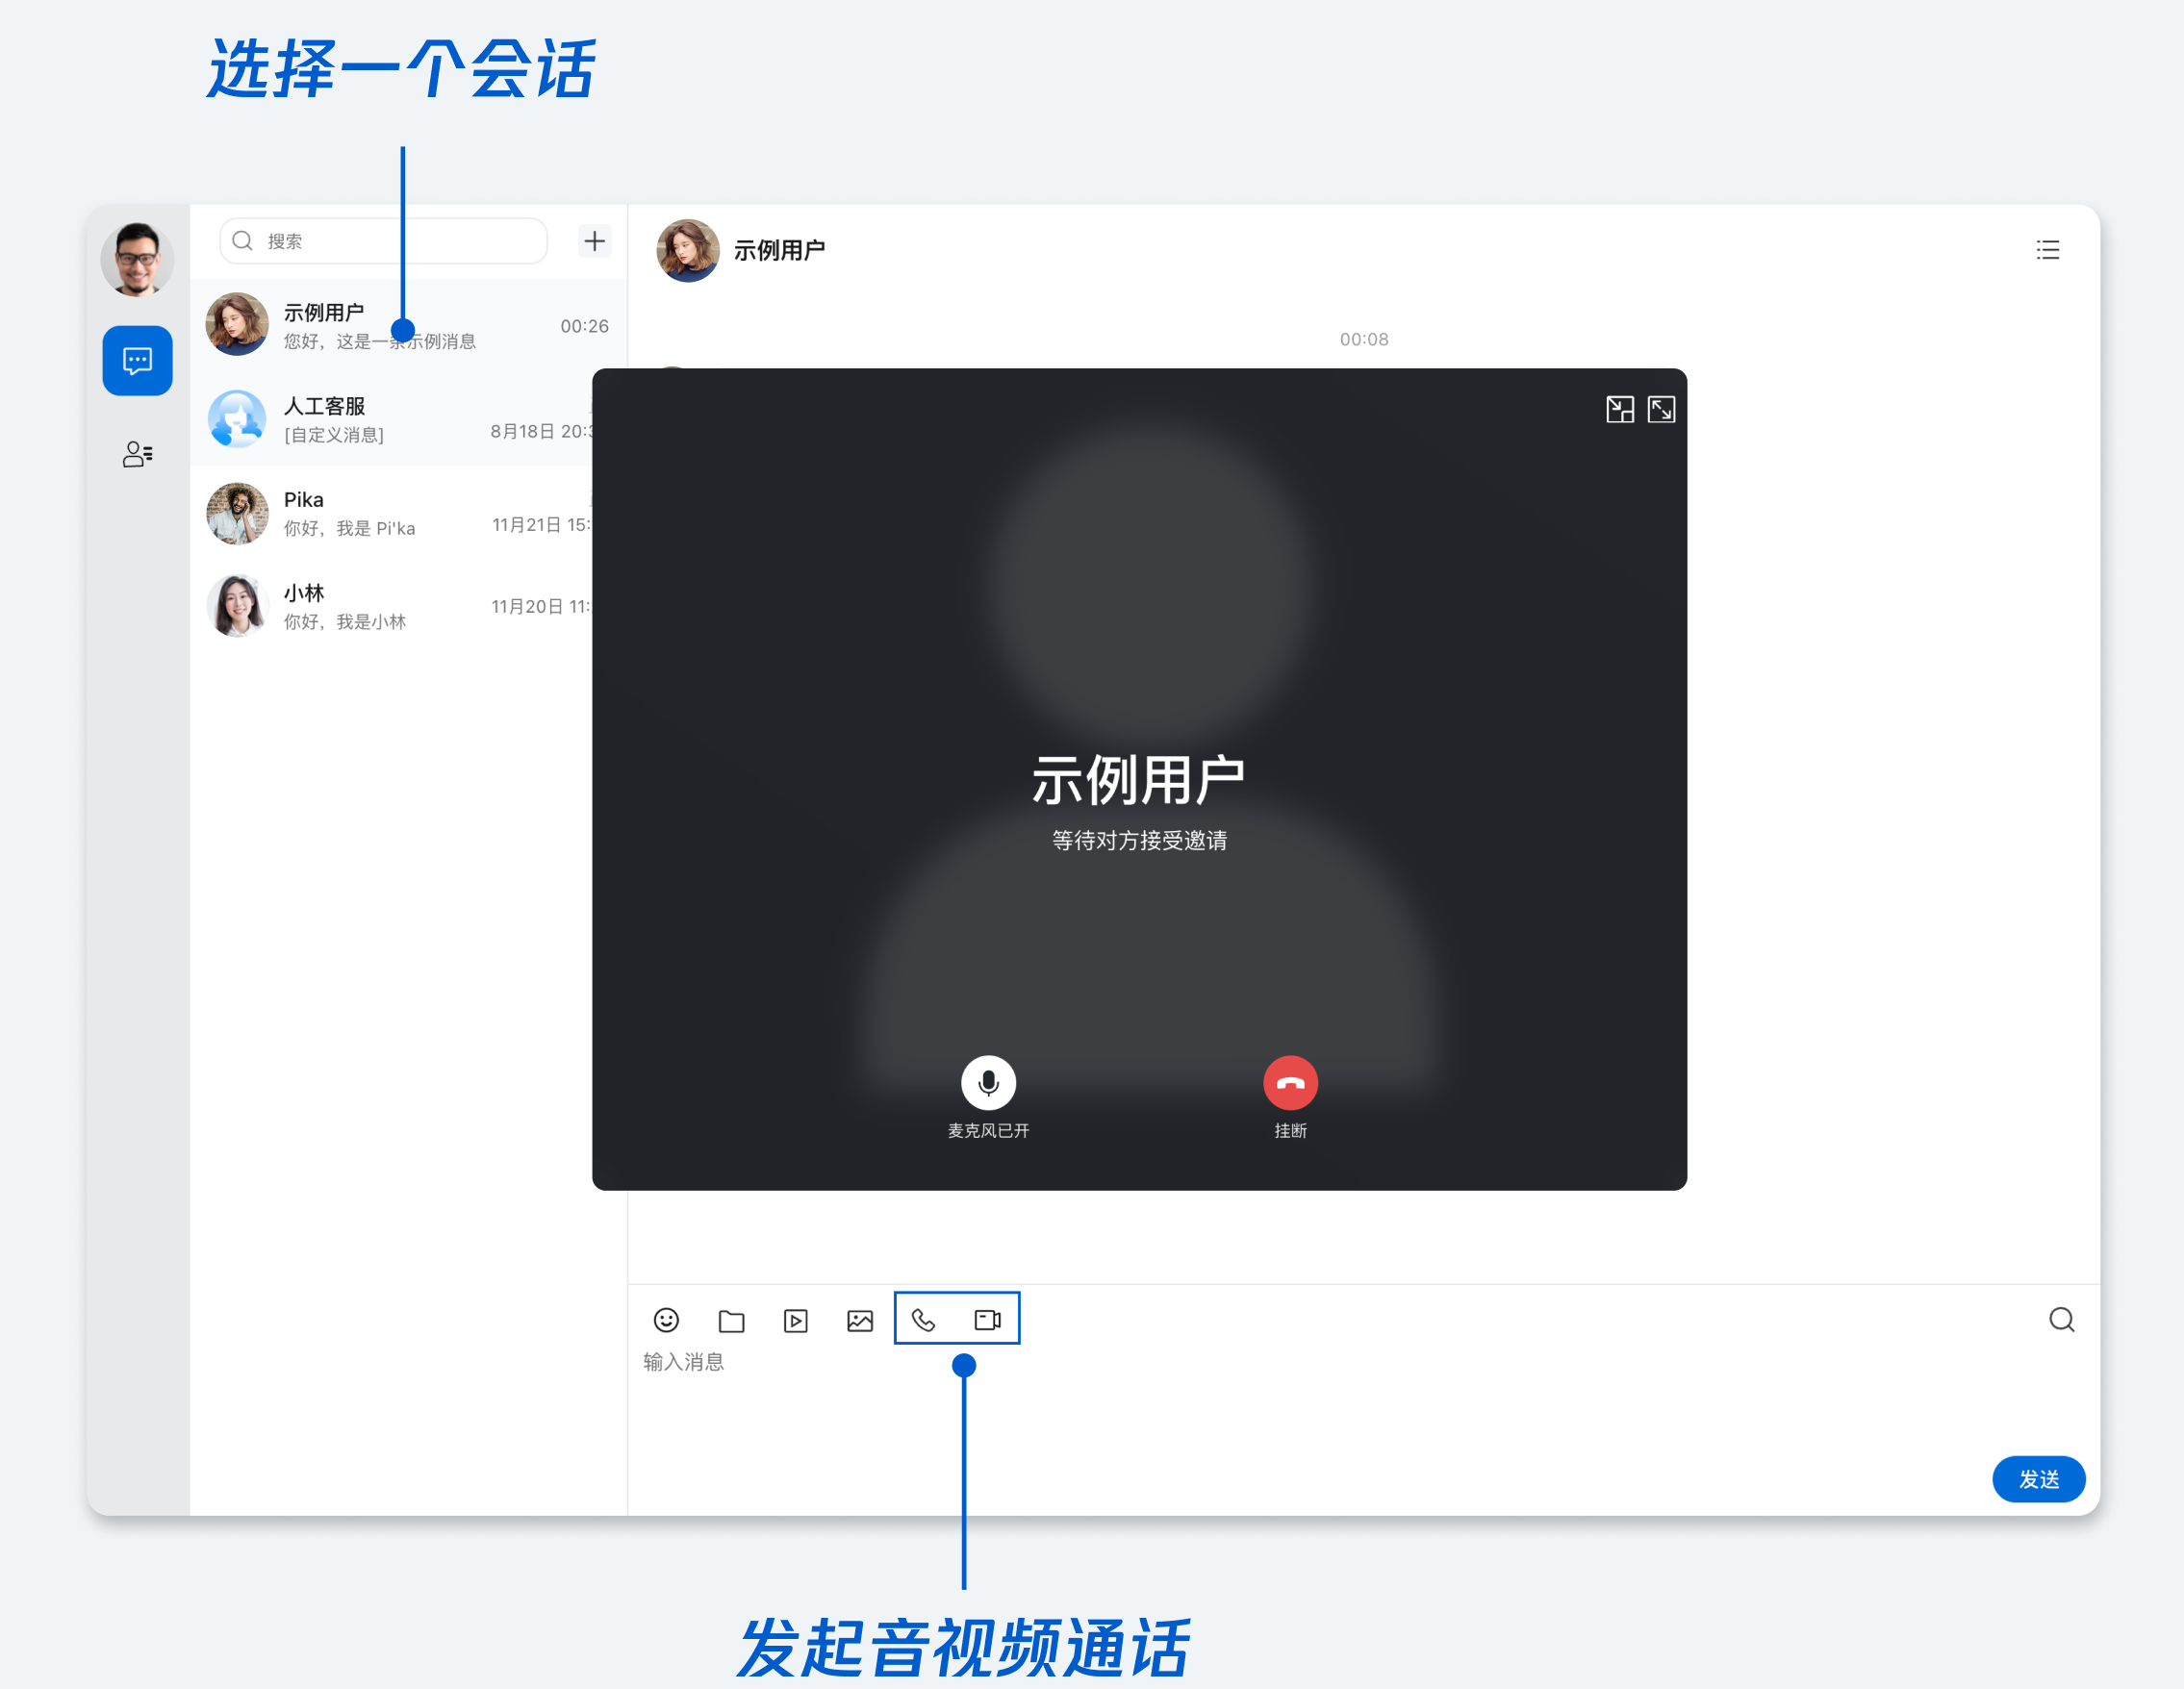
4. 拨打语音通话。
5. 如果不需要集成音视频通话,可以通过移除
<TUICallKit />、移除 MessageInput 组件的 #headerToolbar 插槽中的 VideoCallPicker 和 AudioCallPicker 组件,来移除音视频通话的能力。视频会议
TUIRoomKit 是一款定位企业会议、网络研讨会、在线教育等多人音视频会话场景的含 UI 低代码组件,提供房间管理、成员管理、屏幕分享等会控功能,支持标清、高清、超高清等多种画质。
上述接入过程默认集成视频会议功能,如果需要关闭视频会议功能,在
<MessageInput /> 组件中,使用 #headerToolbar 插槽控制输入框工具栏,注释掉视频会议的工具(QuickConferencePicker)即可。<MessageInput><template #headerToolbar><div class="toolbar"><div class="toolbar-left"><EmojiPicker /><FilePicker /><VideoPicker /><ImagePicker /><AudioCallPicker /><VideoCallPicker /><!-- <QuickConferencePicker /> --></div><button class="icon-btn" @click="searchOpen = !searchOpen"><IconSearch size="20" /></button></div></template></MessageInput>
云端搜索
说明:
搜索,在客服、社交、在线教育、在线医疗、OA 等场景下是刚需功能,可帮助用户快速查找群组、用户、消息,提升产品使用体验和用户粘性。
由于 Web 平台本地存储特殊性等原因,Vue 无法实现本地搜索,为了更好的满足对于搜索能力的需求,推出了云端搜索能力。云端搜索功能支持全局搜索和会话内搜索,同时支持搜索群组、用户和消息。
云端搜索在“步骤 2”中已经默认集成,如果需要关闭云端搜索功能,请参考以下代码:
1. 设置
ConversationList 的 enableSearch 属性为 false:<template><ConversationList v-show="activeTab === 'conversations'" :enable-search="false" /></template>
2. 注释会话内搜索侧边栏相关的代码:
<template><Chat><!-- <div v-show="isSearchInChatShow" class="chat-sidebar" :class="{ dark: theme === 'dark' }"><div class="chat-sidebar-header"><span class="chat-sidebar-title">搜索</span><button class="icon-button" @click="isSearchInChatShow = false">✕</button></div><Search :variant="VariantType.EMBEDDED" /></div> --></Chat></template>
常见问题
什么是 UserSig?如何生成 UserSig?
UserSig 是用户登录即时通信 IM 的密码,其本质是对 UserID 等信息加密后得到的密文。UserSig 签发方式是将 UserSig 的计算代码集成到您的服务端,并提供面向项目的接口,在需要 UserSig 时由您的项目向业务服务器发起请求获取动态 UserSig。更多详情请参见 服务端生成 UserSig。
注意:
我能不能使用第三方组件库,例如 Element-Plus?
核心组件之间的粘连代码可以使用其他组件库,这一点在示例代码中也可以看到,例如您可以将
<ChatSetting /> 封装成全屏抽屉组件。但是核心组件内部已经存在的组件暂时不支持修改。const isChatSettingShow = ref(false);<el-drawerv-model="isChatSettingShow"title="设置"><ChatSetting /></el-drawer>
表情包使用