本文将介绍如何快速完成 Objective-C 版本的 Mac TRTC SDK 的接入,实现一个基本的音视频通话。
环境准备
Xcode 13.0+。
Mac OS X10.10+ 的 Mac 真机。
项目已配置有效的开发者签名。
接入指引
步骤1:导入 SDK
1. 在终端窗口执行以下命令安装 CocoaPods ,如果您已经完成 CocoaPods 的安装,可以跳过该步。
sudo gem install cocoapods
2. 在终端窗口中进入项目根目录,执行以下命令为项目创建 Podfile 文件。
pod init
3. 编辑并保存 Podfile 内容如下。
platform :osx, '10.10'# 将 Your Target 修改为您项目的名称target 'Your Target' dopod 'TXLiteAVSDK_TRTC_Mac', :podspec => 'https://liteav.sdk.qcloud.com/pod/liteavsdkspec/TXLiteAVSDK_TRTC_Mac.podspec'end
4. 在终端窗口中执行以下命令更新本地库文件,完成对 TRTC SDK 的下载。
pod install
说明:
pod install 执行完成,会生成新的 .xcworkspace 工程文件,双击打开.xcworkspace 文件进行后续工作。1. 以 Xcode 26.4.1 为例,进入 File > Add Package Dependencies...,在搜索中粘贴如下 URL,等待结果出来后点击 Add Package。
// 13.3 及之后的版本git@github.com:Tencent-RTC/TRTC_Mac_SwiftPM.git
2. 在 Choose Package Options 中指定你想集成的 SDK 版本。你也可以参考 Apple 官方文档 进行设置。
注意:
Swift Package Manager 集成方式从 13.3 版本开始支持,若要使用之前的版本,可以使用 CocoaPods 方式集成。
步骤2:配置项目
1. 打开
.xcworkspace 工程文件后,在 Xcode 的导航栏中点击左侧的 Project Navigator,点击您的项目名称并确保在编辑区域选择正确的 TARGETS。2. 在
General 选项卡的 Frameworks, Libraries, and Embedded Content 部分添加 TXLiteAVSDK_TRTC_Mac.xcframework 和 ScreenCaptureKit.framework。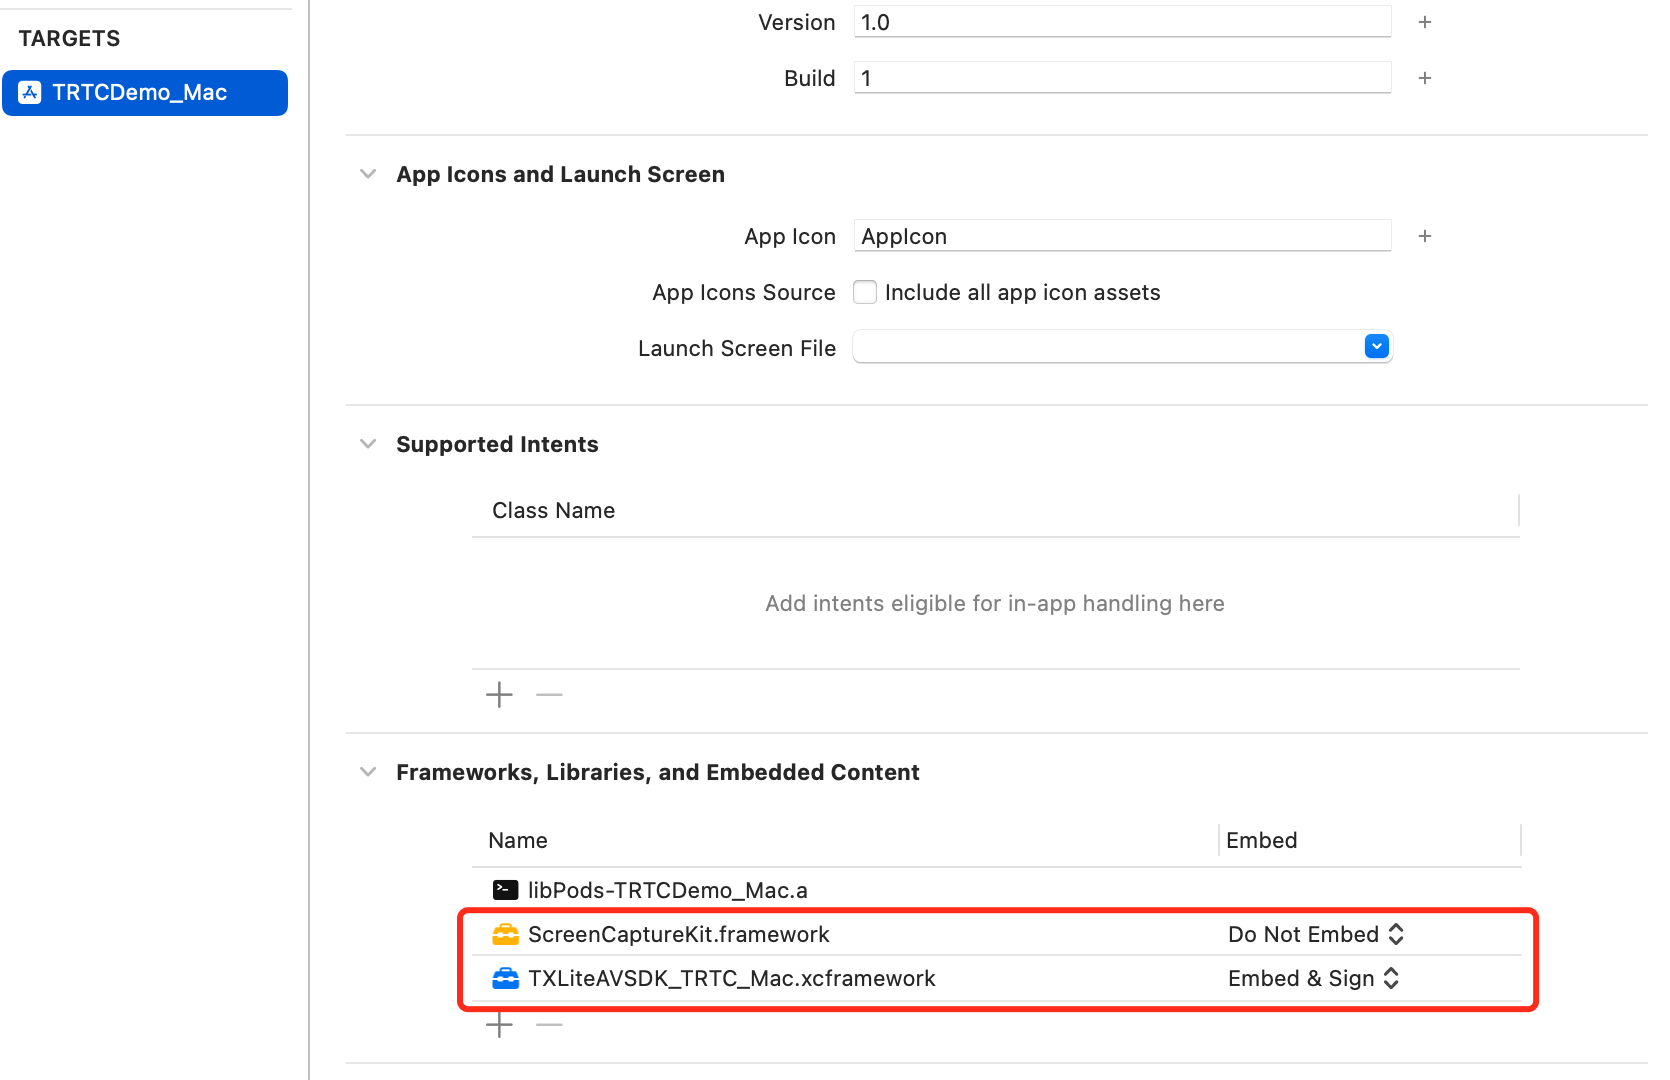
3. 在
Build Settings 选项卡中搜索 User Script Sandboxing,将其值置为 No,以允许用户脚本访问更广泛的系统资源和文件。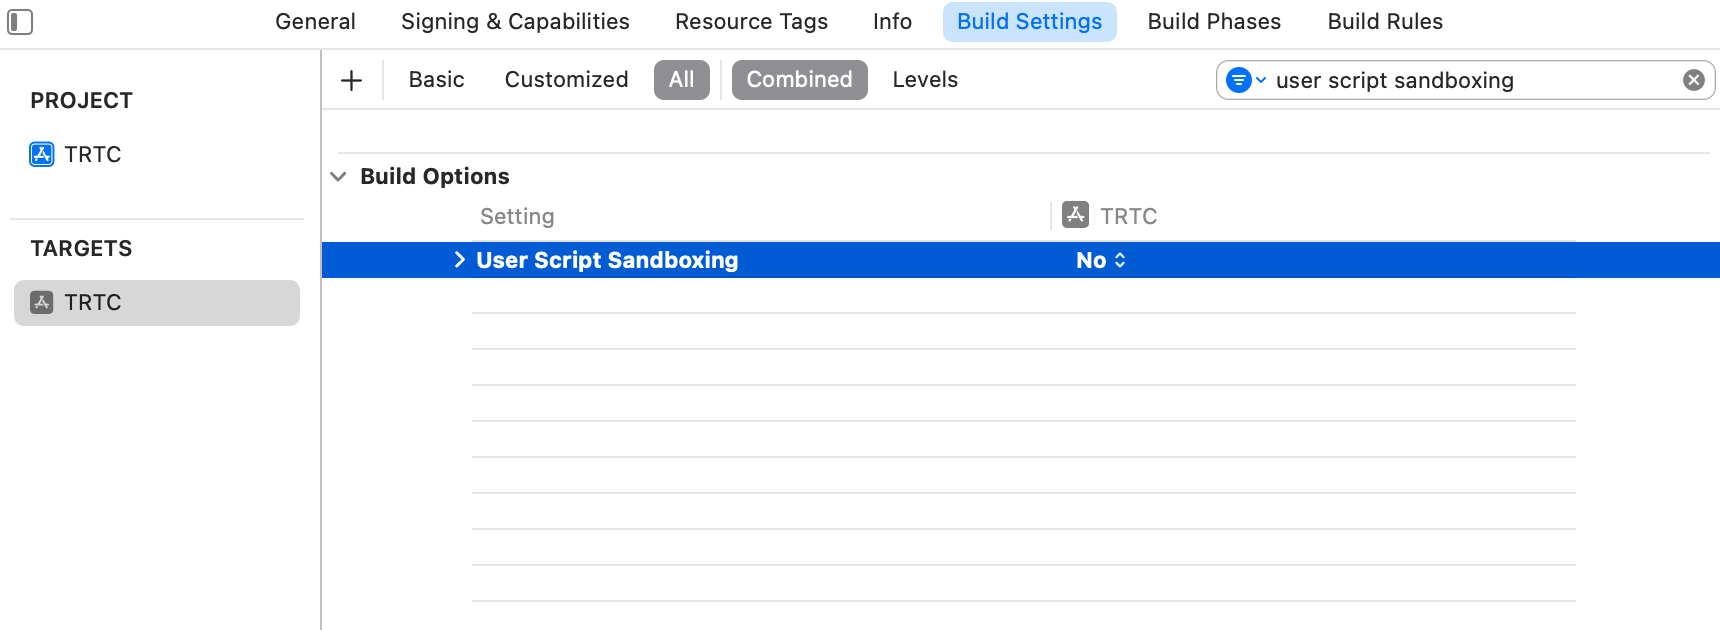
4. 在
Info.plist 选项卡中添加 Privacy-Microphone Usage Description 和 Privacy-Camera Usage Description,并填入 Microphone/Camera 使用的目标提示语,获取麦克风和摄像头的使用权限。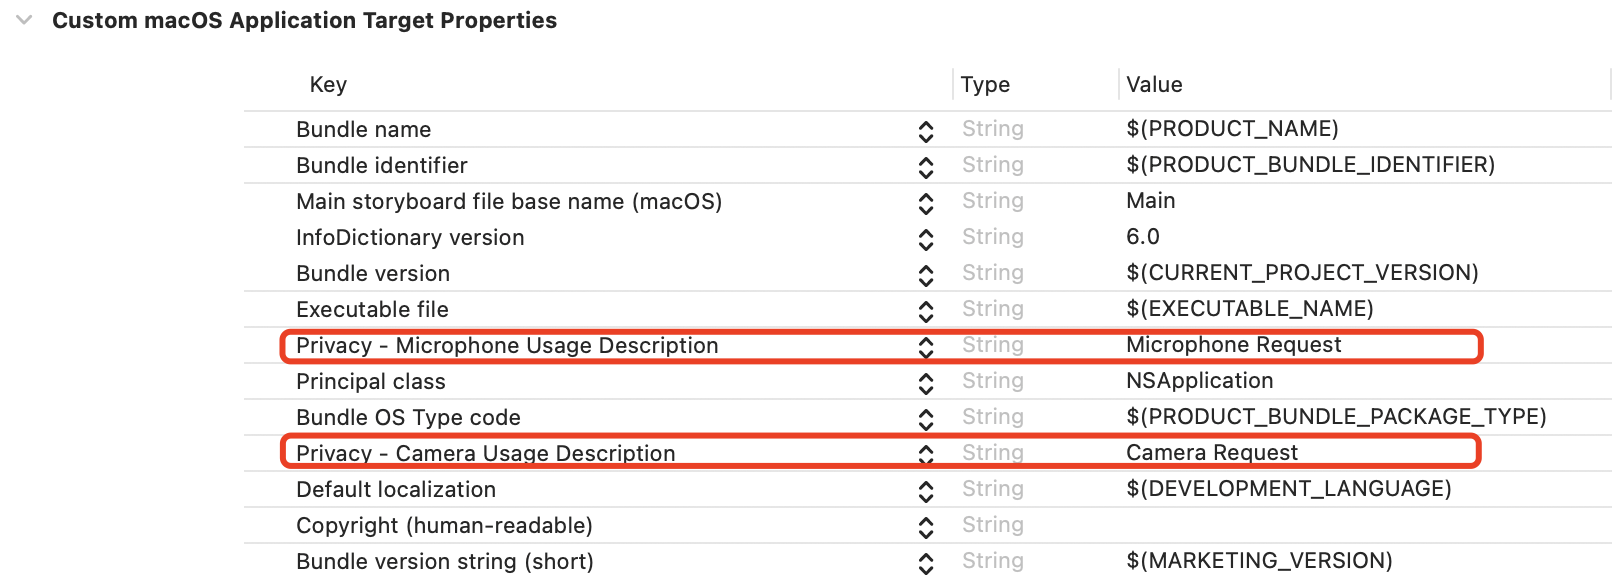
5. 在
Signing & Capabilities 选项卡中 App Sandbox 部分勾选以下内容。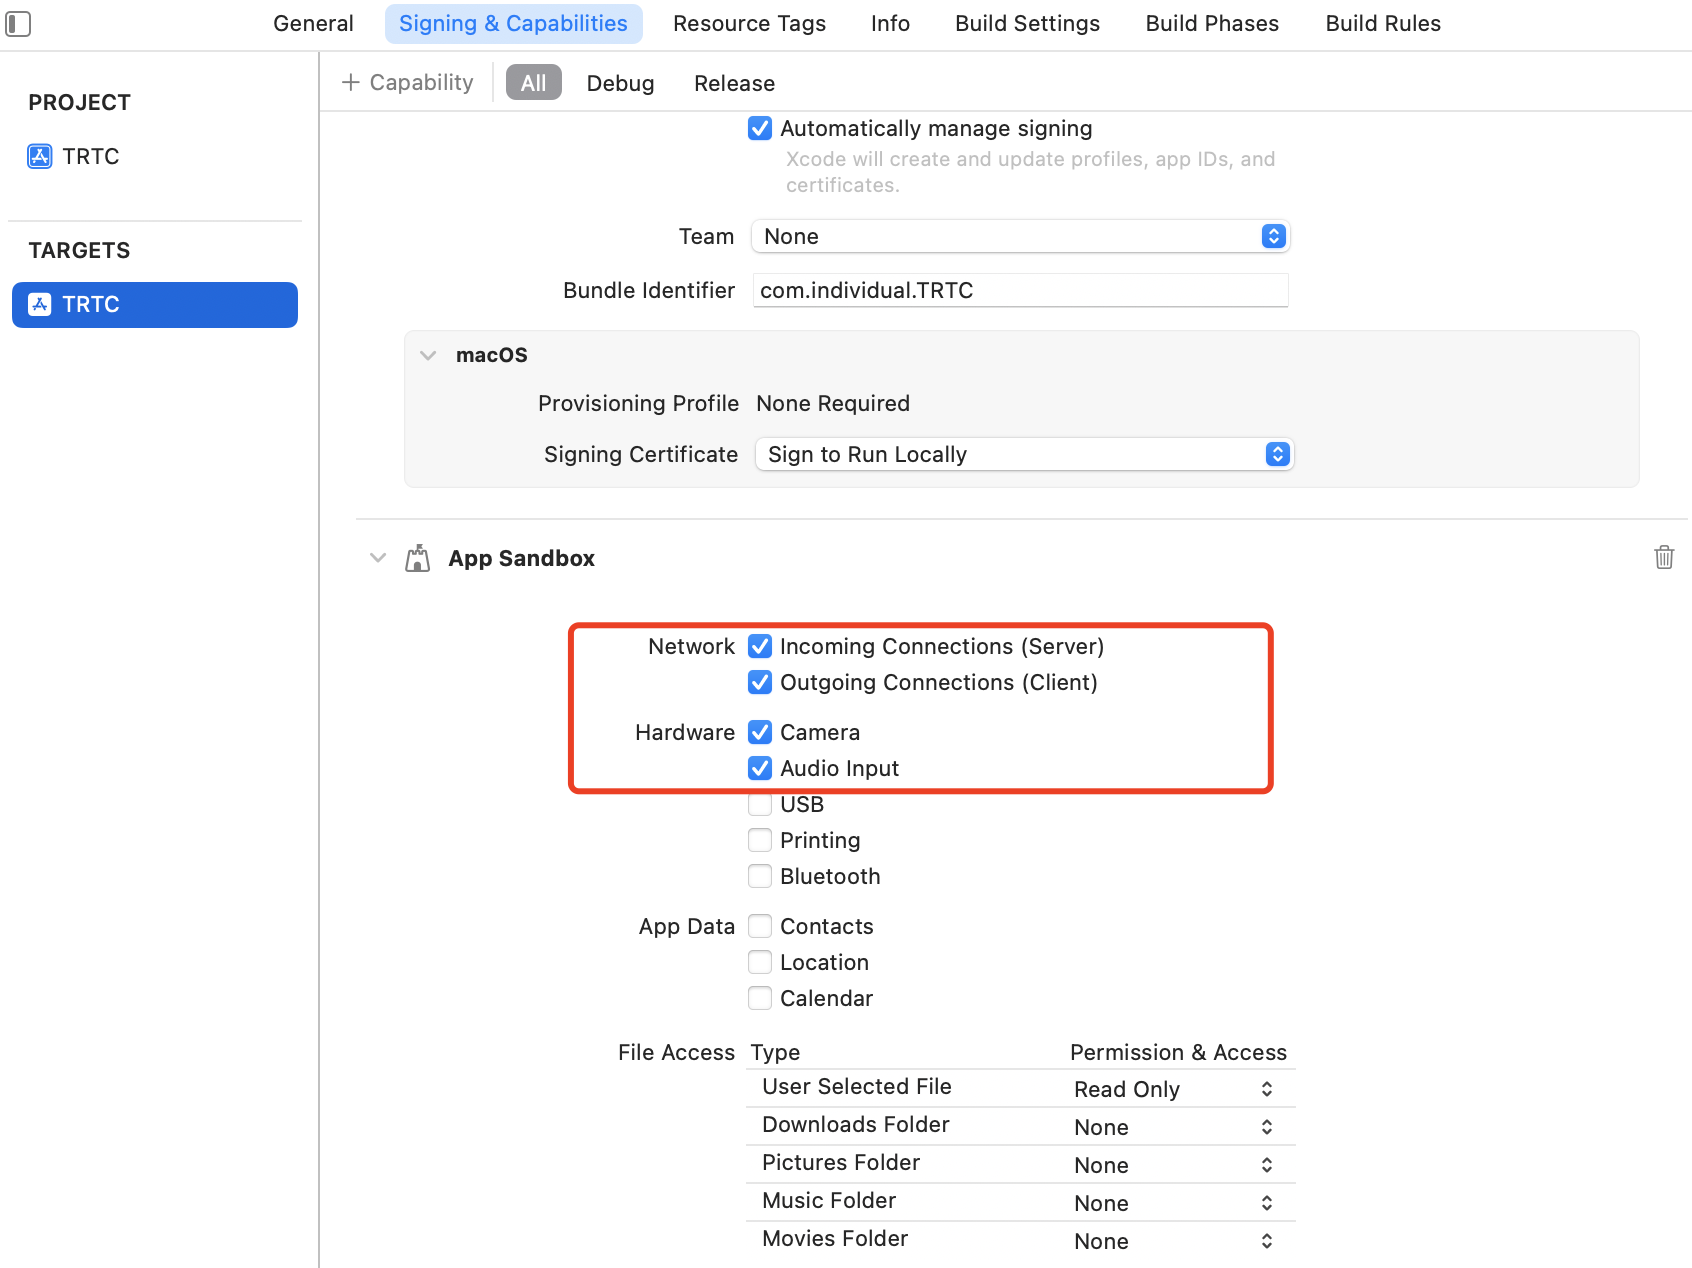
步骤3:创建 TRTC 实例
1. 在
AppDelegate.h 文件中引入 TRTC SDK。@import TXLiteAVSDK_TRTC_Mac; // 引入 TRTC SDK 模块
2. 在
AppDelegate.h 文件中声明 TRTCCloud 属性。@property (nonatomic, strong) TRTCCloud *trtcCloud; // 添加 TRTCCloud 属性
3. 进入
AppDelegate.m 文件后,在 applicationDidFinishLaunching 方法中调用 sharedInstance 创建 TRTC 实例,并设置事件监听。#import <UserNotifications/UserNotifications.h> // 导入 UserNotifications 框架- (void)applicationDidFinishLaunching:(NSNotification *)aNotification {// 创建 TRTC 实例并设置监听_trtcCloud = [TRTCCloud sharedInstance];_trtcCloud.delegate = self;}// 监听 `onError` 事件- (void)onError:(TXLiteAVError)errCodeerrMsg:(nullable NSString *)errMsgextInfo:(nullable NSDictionary *)extInfo{// 处理 `Error` 事件,建议对 OnError 的信息通过请求通知权限进行提示// 创建一个用户通知中心实例NSString *tip = [NSString stringWithFormat:@"Error Code: %ld, Message: %@", (long)errCode, errMsg];// 请求通知权限UNUserNotificationCenter *center = [UNUserNotificationCenter currentNotificationCenter];[center requestAuthorizationWithOptions:(UNAuthorizationOptionAlert | UNAuthorizationOptionSound)completionHandler:^(BOOL granted, NSError * _Nullable error) {if (granted) {// 创建通知内容UNMutableNotificationContent *content = [[UNMutableNotificationContent alloc] init];content.title = @"RTC Error";content.body = tip;// 创建通知触发器UNTimeIntervalNotificationTrigger *trigger = [UNTimeIntervalNotificationTrigger triggerWithTimeInterval:5 repeats:NO];// 创建通知请求UNNotificationRequest *request = [UNNotificationRequest requestWithIdentifier:@"RTCErrorNotification" content:content trigger:trigger];// 添加通知到通知中心[center addNotificationRequest:request withCompletionHandler:^(NSError * _Nullable error) {if (error != nil) {NSLog(@"Error adding notification: %@", error);}}];}}];}
步骤4:进入房间
设置进房参数
TRTCParams 并调用 enterRoom 即可成功进入房间,该方法通常在点击开始通话按钮后调用。#import "AppDelegate.h" // 导入 "AppDelegate.h" 文件- (void)enterRoom {// 将以下 trtcParams 参数修改为自己的参数TRTCParams *trtcParams = [[TRTCParams alloc] init];trtcParams.sdkAppId = 1400000123;trtcParams.userId = @"denny";trtcParams.userSig = @"";trtcParams.strRoomId = @"123abc";// 对于多人视频通话场景,推荐使用 TRTC_APP_SCENE_LIVEAppDelegate *appDelegate = (AppDelegate *)[[NSApplication sharedApplication] delegate];[appDelegate.trtcCloud enterRoom:trtcParams appScene:TRTCAppSceneLIVE];}// 监听 `onEnterRoom` 事件- (void)onEnterRoom:(NSInteger)result {// 处理 onEnterRoom 事件}
步骤5:打开/关闭摄像头
1. 在
ViewController.h 文件中声明 NSWindow 和 NSView 属性。@property (nonatomic, strong) NSWindow *window; // 添加 NSWindow 属性@property (nonatomic, strong) NSView *localCameraVideoView; // 添加 NSView 属性
2. 对 localCameraVideoView 进行初始化,设置本地预览的渲染参数
setLocalRenderParams,并调用 startLocalPreview 进行本地预览,成功调用 enterRoom 后开始推流。-(void) startLocalPreview {// 创建 windowself.window = [[NSWindow alloc] initWithContentRect:NSMakeRect(0, 0, 800, 600) styleMask:NSWindowStyleMaskTitled | NSWindowStyleMaskClosable | NSWindowStyleMaskMiniaturizable | NSWindowStyleMaskResizable backing:NSBackingStoreBuffered defer:NO];[self.window center];[self.window setTitle:@"TRTCDemo_Mac"];[self.window makeKeyAndOrderFront:nil];self.window.releasedWhenClosed = NO;// 初始化 localCameraVideoViewself.localCameraVideoView = [[NSView alloc] initWithFrame:NSMakeRect(0, 0, 300, 300)];[self.window.contentView addSubview:self.localCameraVideoView];// 调整 localCameraVideoView 大小self.localCameraVideoView.frame = self.window.contentView.bounds;// 设置本地预览渲染参数TRTCRenderParams *trtcRenderParams = [[TRTCRenderParams alloc] init];trtcRenderParams.fillMode = TRTCVideoFillMode_Fill;trtcRenderParams.mirrorType = TRTCVideoMirrorTypeAuto;AppDelegate *appDelegate = (AppDelegate *)[[NSApplication sharedApplication] delegate];[appDelegate.trtcCloud setLocalRenderParams:trtcRenderParams];// 对采集内容进行本地预览[appDelegate.trtcCloud startLocalPreview:self.localCameraVideoView];}
调用
stopLocalPreview 关闭摄像头预览并停止推送本地视频信息。AppDelegate *appDelegate = (AppDelegate *)[[NSApplication sharedApplication] delegate];[appDelegate.trtcCloud stopLocalPreview];
步骤6:打开/关闭麦克风
调用
startLocalAudio 开启麦克风采集,请根据您的需求选择以下其中一个声音质量参数 Quality。// 开启麦克风采集,设置当前场景为:语音模式// 具有高的噪声抑制能力,有强有弱的网络阻力AppDelegate *appDelegate = (AppDelegate *)[[NSApplication sharedApplication] delegate];[appDelegate.trtcCloud startLocalAudio:TRTCAudioQualitySpeech];
// 开启麦克风采集,设置当前场景为:音乐模式// 为获得高保真度,低音质损失,建议配合专业声卡使用AppDelegate *appDelegate = (AppDelegate *)[[NSApplication sharedApplication] delegate];[appDelegate.trtcCloud startLocalAudio:TRTCAudioQualityMusic];
调用
stopLocalAudio 关闭麦克风采集并停止推送本地音频信息。AppDelegate *appDelegate = (AppDelegate *)[[NSApplication sharedApplication] delegate];[appDelegate.trtcCloud stopLocalAudio];
步骤7:播放/停止视频流
1. 在进入房间之前对 onUserVideoAvailable 进行监听,当您收到
onUserVideoAvailable(userId, YES)通知时,表示该路画面已经有可播放的视频帧到达。2. 调用
startRemoteView 播放远端画面,成功调用 enterRoom 后开始推流。- (void)startRemoteView {// 播放远端画面AppDelegate *appDelegate = (AppDelegate *)[[NSApplication sharedApplication] delegate];[appDelegate.trtcCloud startRemoteView:@"denny" streamType:TRTCVideoStreamTypeBig view:self.localCameraVideoView];}
调用
stopRemoteView 停止播放远端画面。// 停止播放AppDelegate *appDelegate = (AppDelegate *)[[NSApplication sharedApplication] delegate];[appDelegate.trtcCloud stopRemoteView:@"denny"]; // 仅停止播放 denny 画面[appDelegate.trtcCloud stopAllRemoteView]; // 停止所有视频播放
步骤8:播放/停止音频流
观众端可以调用
muteRemoteAudio 选择播放或停止远端声音。// 静音AppDelegate *appDelegate = (AppDelegate *)[[NSApplication sharedApplication] delegate];[appDelegate.trtcCloud muteRemoteAudio:@"denny" mute:YES];// 仅静音 denny[appDelegate.trtcCloud muteAllRemoteAudio:YES]; // 静音所有远端用户
// 取消静音AppDelegate *appDelegate = (AppDelegate *)[[NSApplication sharedApplication] delegate];[appDelegate.trtcCloud muteRemoteAudio:@"denny" mute:NO]; // 仅取消静音 denny[appDelegate.trtcCloud muteAllRemoteAudio:NO]; // 取消静音所有远端用户
步骤9:退出房间
调用
exitRoom 退出当前的房间,TRTC SDK 会在退房结束后通过 onExitRoom 回调事件通知您。// 退出当前房间AppDelegate *appDelegate = (AppDelegate *)[[NSApplication sharedApplication] delegate];[appDelegate.trtcCloud exitRoom];// 监听 `onExitRoom` 回调- (void)onExitRoom:(NSInteger)reason {if (reason == 0) {NSLog(@"Exit current room by calling the 'exitRoom' api of sdk ...");} else if (reason == 1) {NSLog(@"Kicked out of the current room by server through the restful api...");} else if (reason == 2) {NSLog(@"Current room is dissolved by server through the restful api...");}}
常见问题
您可以在 API 概览 查看所有函数列表及其描述。
如果您的接入和使用中遇到问题,请参见 常见问题。


