AtomicXCore 提供了 CoGuestStore 模块,专门用于管理观众连麦的完整业务流程。开发者无需关心复杂的状态同步和信令交互,只需调用几个简单的方法,即可为您的直播添加强大的观众与主播音视频互动功能。
核心场景
CoGuestStore 支持以下两种最主流的连麦场景:观众申请上麦:观众主动发起连麦请求,主播在收到请求后进行同意或拒绝。
主播邀请上麦:主播可以主动向直播间内的任意一位观众发起连麦邀请。
实现步骤
步骤1:组件集成
完成集成后,开始实现连麦功能。
步骤2:实现观众申请上麦
观众端实现
作为观众,您的核心任务是发起申请、接收结果和主动下麦。
1. 发起连麦申请
当用户点击界面上的"申请连麦"按钮时,调用
applyForSeat 方法。import 'package:atomic_x_core/atomicxcore.dart';final String liveId = "房间ID";final CoGuestStore guestStore = CoGuestStore.create(liveId);// 用户点击"申请连麦"void requestToConnect() async {// seatIndex: 麦位索引,取值范围为 -1(自动选择空麦位) 和 [0,当前房间支持最大麦位数-1] ,timeout: 请求超时时间(秒)final result = await guestStore.applyForSeat(seatIndex: 0,timeout: 30,extraInfo: null,);if (result.isSuccess) {print("连麦申请已发送,等待主播处理...");} else {print("申请发送失败: ${result.errorMessage}");}}
2. 监听主播的响应
通过
addGuestListener 添加监听器,您可以接收到主播的处理结果。late GuestListener _guestListener;// 在您的 Widget 初始化时订阅事件void subscribeGuestEvents() {_guestListener = GuestListener(onApplicationAccepted: (hostUser) {print("主播 ${hostUser.userName} 同意了您的申请,准备上麦");// 1. 打开摄像头、麦克风DeviceStore.shared.openLocalCamera(isFront: true);DeviceStore.shared.openLocalMicrophone();// 2. 在此更新 UI,例如关闭申请按钮,显示连麦中的状态},onApplicationRejected: (hostUser) {print("主播 ${hostUser.userName} 拒绝了您的申请");// 弹窗提示用户申请被拒绝},onInvitationReceived: (hostUser) {print("收到主播 ${hostUser.userName} 的连麦邀请");// 在此弹出一个对话框,让用户选择"接受"或"拒绝"_showInvitationDialog(hostUser);},onKickedOffSeat: () {print("您已被主播踢下麦位");// 更新 UI,关闭摄像头和麦克风},);guestStore.addGuestListener(_guestListener);}@overridevoid dispose() {guestStore.removeGuestListener(_guestListener);super.dispose();}
3. 主动下麦
当连麦观众想结束互动时,调用
disconnect 方法即可返回普通观众状态。// 用户点击"下麦"按钮void leaveSeat() async {final result = await guestStore.disconnect();if (result.isSuccess) {print("已成功下麦");} else {print("下麦失败: ${result.errorMessage}");}}
4. (可选) 取消申请
如果观众在主播处理前想撤回申请,可以调用
cancelApplication。// 用户在等待时,点击"取消申请"void cancelRequest() async {final result = await guestStore.cancelApplication();if (result.isSuccess) {print("申请已取消");} else {print("申请取消失败: ${result.errorMessage}");}}
主播端实现
作为主播,您的核心任务是接收申请、展示申请列表和处理申请。
1. 监听新的连麦申请
通过
addHostListener 添加监听器,您可以在有新观众申请时立即收到通知,并给出提示。import 'package:atomic_x_core/atomicxcore.dart';final String liveId = "房间ID";final CoGuestStore guestStore = CoGuestStore.create(liveId);late HostListener _hostListener;late final VoidCallback _applicantsChangedListener = _onApplicantsChanged;// 订阅主播事件void subscribeHostEvents() {_hostListener = HostListener(onApplicationReceived: (guestUser) {print("收到观众 ${guestUser.userName} 的连麦申请");// 在此更新 UI,例如在"申请列表"按钮上显示红点},onInvitationAccepted: (guestUser) {print("观众 ${guestUser.userName} 接受了您的邀请");},onInvitationRejected: (guestUser) {print("观众 ${guestUser.userName} 拒绝了您的邀请");},);guestStore.addHostListener(_hostListener);}@overridevoid dispose() {guestStore.removeHostListener(_hostListener);super.dispose();}
2. 展示申请列表
CoGuestStore 的 coGuestState 会实时维护当前的申请者列表,您可以监听它来刷新您的 UI。// 订阅状态变更void subscribeApplicants() {guestStore.coGuestState.applicants.addListener(_applicantsChangedListener);}void _onApplicantsChanged() {final applicants = guestStore.coGuestState.applicants.value;print("当前申请人数: ${applicants.length}");// 在此刷新您的"申请者列表"UIsetState(() {_applicantList = applicants;});}@overridevoid dispose() {guestStore.coGuestState.applicants.removeListener(_applicantsChangedListener);super.dispose();}
3. 处理连麦申请
当您在列表中选择一位观众并点击"同意"或"拒绝"时,调用相应的方法。
// 主播点击"同意"按钮,传入申请者的 userIDvoid accept(String userId) async {final result = await guestStore.acceptApplication(userId);if (result.isSuccess) {print("已同意 $userId 的申请,对方正在上麦");}}// 主播点击"拒绝"按钮void reject(String userId) async {final result = await guestStore.rejectApplication(userId);if (result.isSuccess) {print("已拒绝 $userId 的申请");}}
步骤3:实现主播邀请上麦
主播端实现
1. 向观众发起邀请
当主播在观众列表中选择某人并点击"邀请连麦"时,调用
inviteToSeat 方法。// 主播选择观众并发起邀请void invite(String userId) async {// inviteeID: 被邀请者ID,seatIndex: 麦位索引,取值范围为 -1(自动选择空麦位) 和 [0,当前房间支持最大麦位数-1]// timeout: 邀请超时时间final result = await guestStore.inviteToSeat(inviteeID: userId,seatIndex: 0,timeout: 30,extraInfo: null,);if (result.isSuccess) {print("已向 $userId 发出邀请,等待对方回应...");}}
2. 监听观众的回应
通过
HostListener 监听邀请响应事件。// 在 HostListener 中已配置回调_hostListener = HostListener(onInvitationAccepted: (guestUser) {print("观众 ${guestUser.userName} 接受了您的邀请");},onInvitationRejected: (guestUser) {print("观众 ${guestUser.userName} 拒绝了您的邀请");},);
观众端实现
1. 接收主播的邀请
通过
GuestListener 监听邀请事件。// 在 GuestListener 中已配置回调_guestListener = GuestListener(onInvitationReceived: (hostUser) {print("收到主播 ${hostUser.userName} 的连麦邀请");// 在此弹出一个对话框,让用户选择"接受"或"拒绝"_showInvitationDialog(hostUser);},);
2. 响应邀请
当用户在弹出的对话框中做出选择后,调用相应的方法。
String inviterId = "发起邀请的主播ID"; // 从 onInvitationReceived 回调中获取// 用户点击"接受"void acceptInvitation() async {final result = await guestStore.acceptInvitation(inviterId);if (result.isSuccess) {// 打开摄像头、麦克风DeviceStore.shared.openLocalCamera(isFront: true);DeviceStore.shared.openLocalMicrophone();}}// 用户点击"拒绝"void rejectInvitation() async {await guestStore.rejectInvitation(inviterId);}
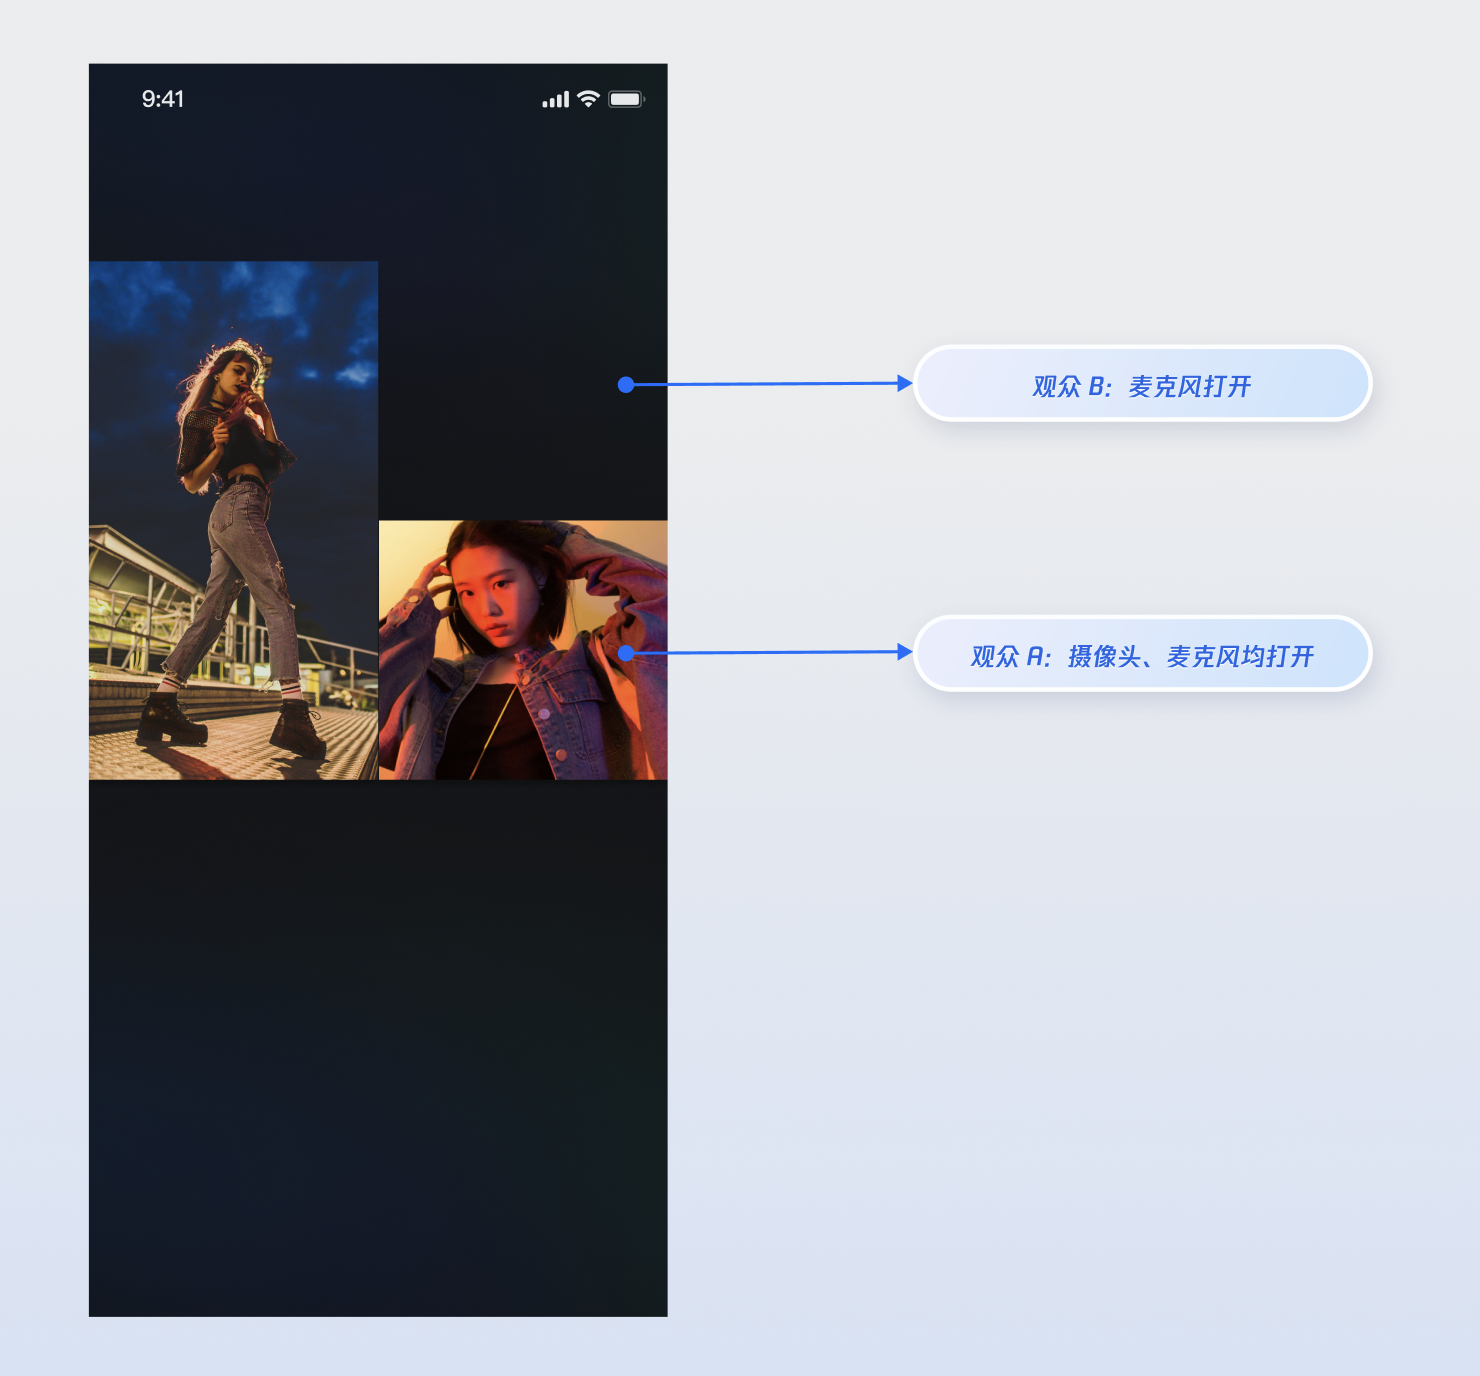
运行效果
当您集成以上功能实现后,请分别使用两个观众与主播进行连麦操作,观众 A 同时打开摄像头和麦克风,观众 B 只打开麦克风,运行效果如下,您可以参考下一章节 完善 UI 细节 来定制您想要的 UI 逻辑。
完善 UI 细节
您可以通过
LiveCoreWidget 的 VideoWidgetBuilder 参数提供的"插槽"能力,在观众连麦的视频流画面上添加自定义视图,用于显示昵称、头像等信息,或在他们关闭摄像头时提供占位图,以优化视觉体验。实现视频流画面的昵称显示
实现效果
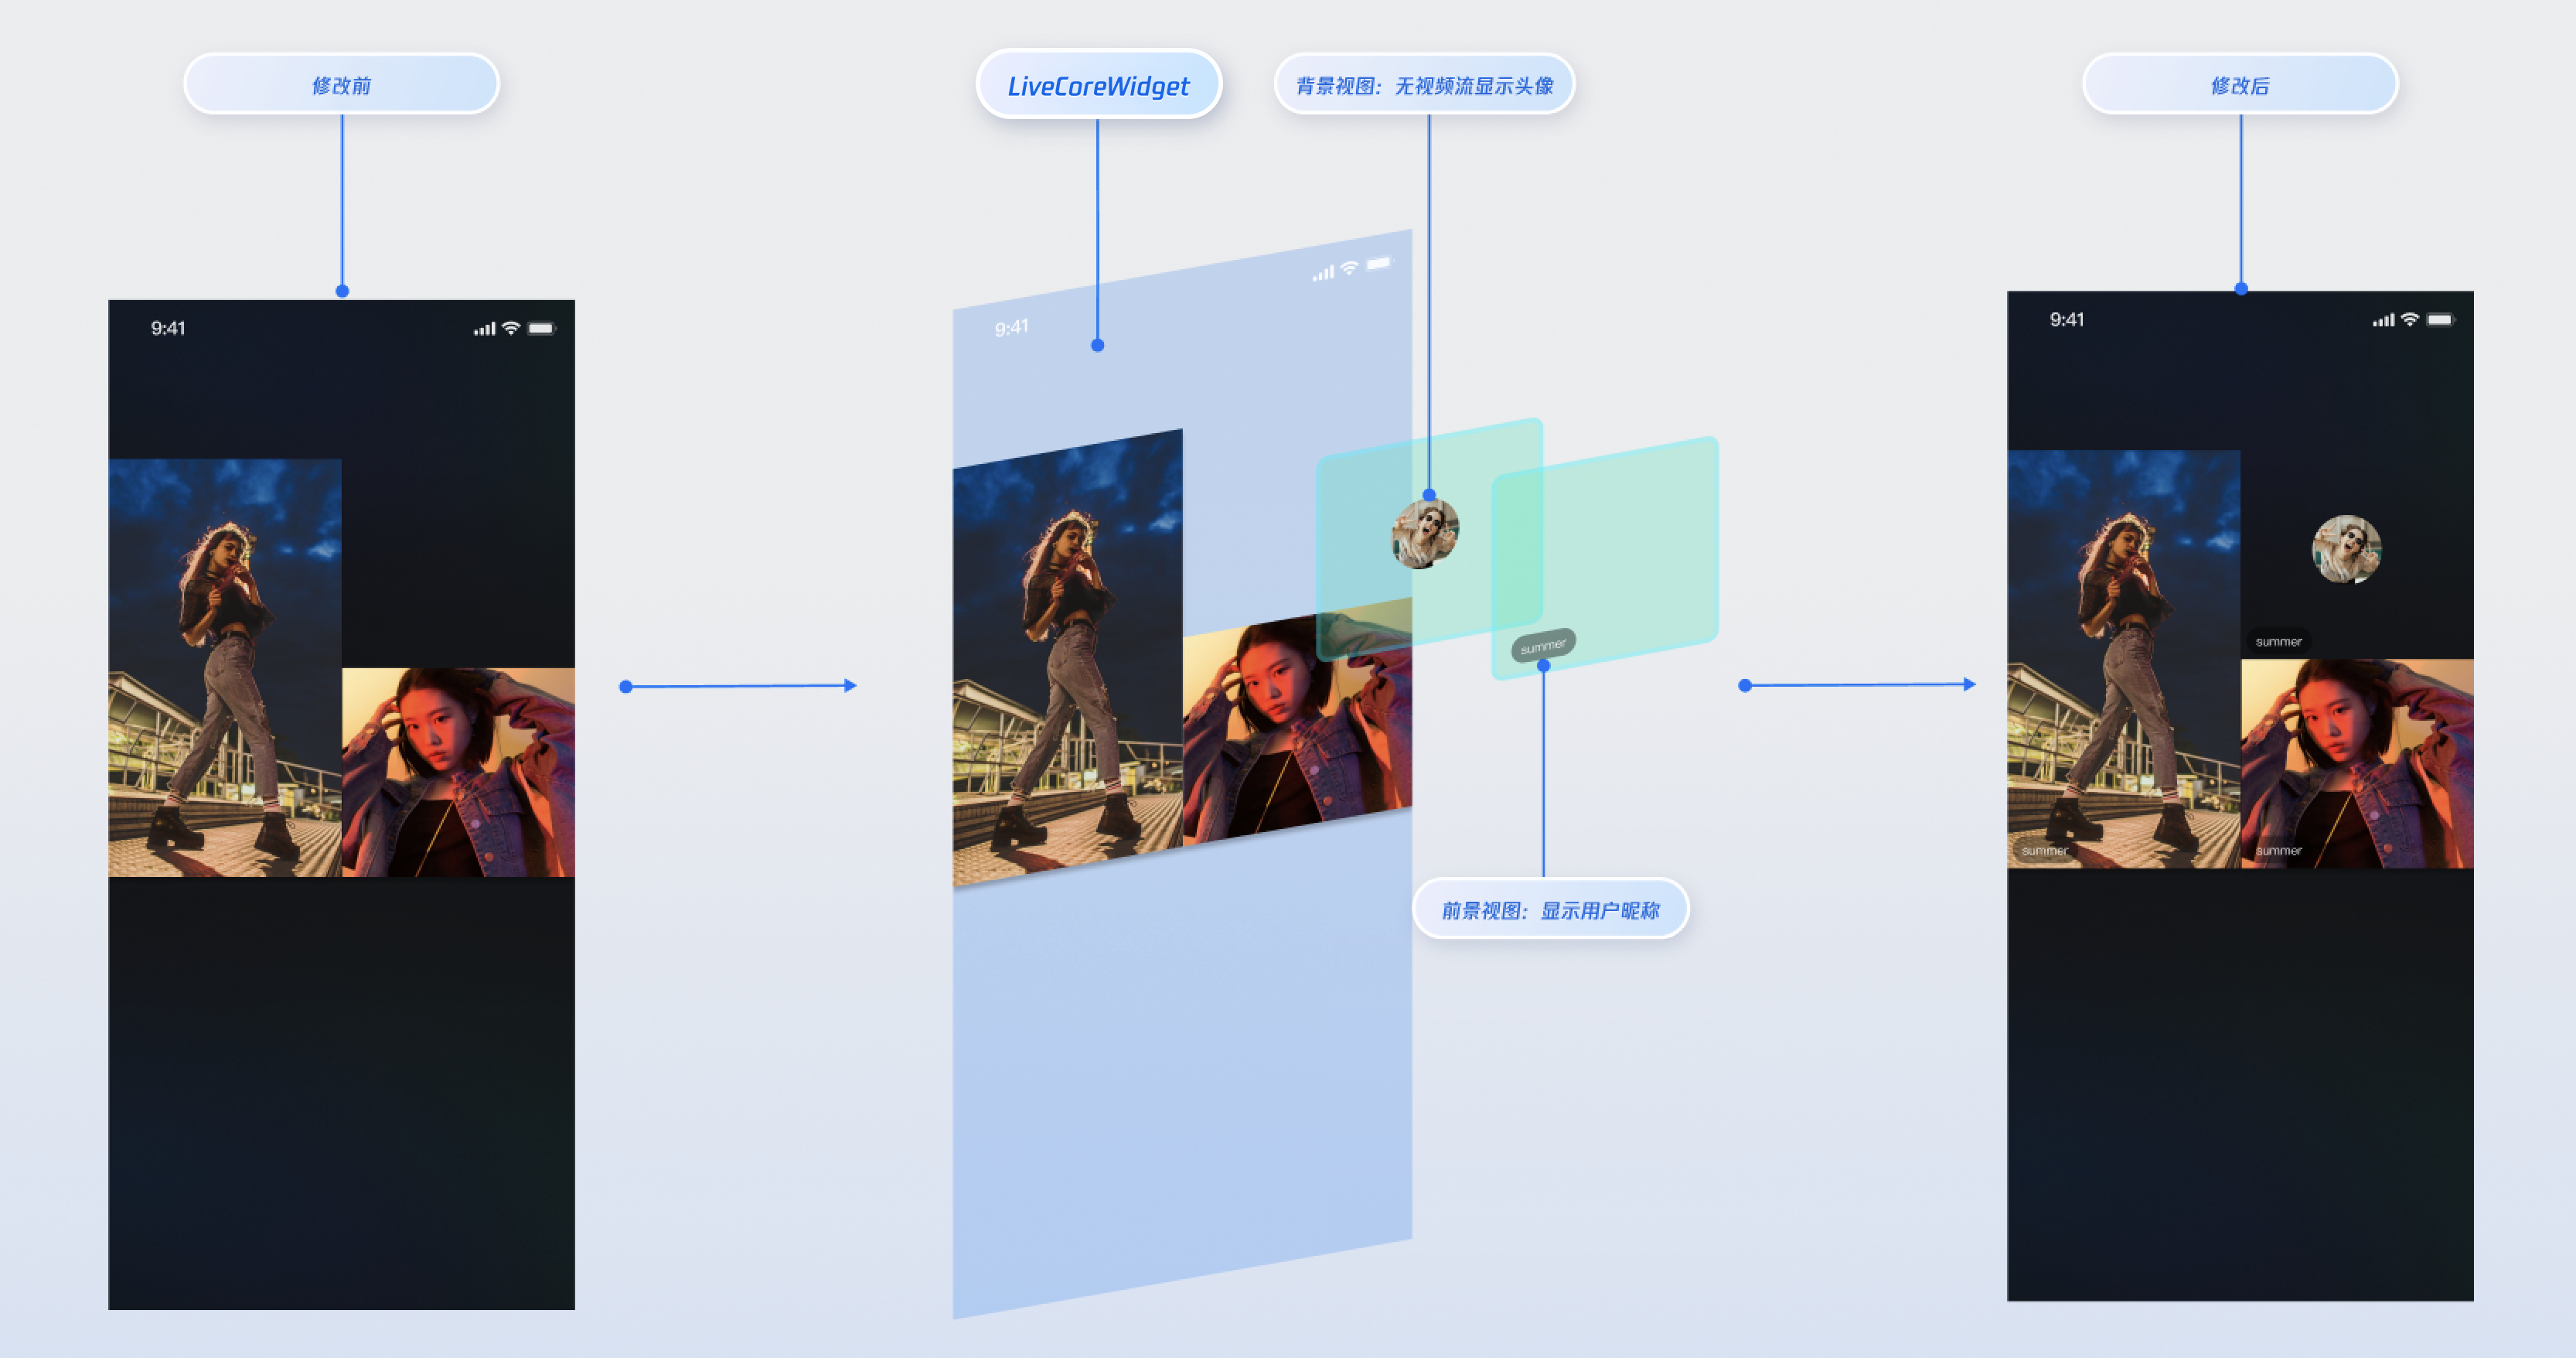
实现方式
步骤 1:创建前景视图 (CustomSeatForegroundView),该视图用于在视频流上方显示用户信息。
import 'package:flutter/material.dart';import 'package:rtc_room_engine/rtc_room_engine.dart';/// 自定义的用户信息悬浮视图(前景)class CustomSeatForegroundView extends StatelessWidget {final SeatFullInfo seatInfo;const CustomSeatForegroundView({Key? key,required this.seatInfo,}) : super(key: key);@overrideWidget build(BuildContext context) {return Container(color: Colors.transparent,child: Align(alignment: Alignment.bottomLeft,child: Container(margin: const EdgeInsets.all(5),padding: const EdgeInsets.symmetric(horizontal: 8, vertical: 4),decoration: BoxDecoration(color: Colors.black.withOpacity(0.5),borderRadius: BorderRadius.circular(12),),child: Text(seatInfo.userInfo.userName,style: const TextStyle(color: Colors.white,fontSize: 14,),),),),);}}
步骤 2:创建背景视图 (CustomSeatBackgroundView),该视图用于在用户无视频流时作为占位图显示。
import 'package:flutter/material.dart';import 'package:rtc_room_engine/rtc_room_engine.dart';/// 自定义的头像占位视图(背景)class CustomSeatBackgroundView extends StatelessWidget {final SeatFullInfo seatInfo;const CustomSeatBackgroundView({Key? key,required this.seatInfo,}) : super(key: key);@overrideWidget build(BuildContext context) {final avatarUrl = seatInfo.userInfo.avatarUrl;return Container(decoration: BoxDecoration(color: Colors.grey[800],),child: Center(child: Column(mainAxisSize: MainAxisSize.min,children: [ClipOval(child: avatarUrl.isNotEmpty? Image.network(avatarUrl,width: 60,height: 60,fit: BoxFit.cover,errorBuilder: (context, error, stackTrace) {return _buildDefaultAvatar();},): _buildDefaultAvatar(),),const SizedBox(height: 8),Text(seatInfo.userInfo.userName,style: const TextStyle(color: Colors.white,fontSize: 12,),),],),),);}Widget _buildDefaultAvatar() {return Container(width: 60,height: 60,color: Colors.grey,child: const Icon(Icons.person, size: 40, color: Colors.white),);}}
步骤 3:通过
VideoWidgetBuilder 的 coGuestWidgetBuilder 回调构建自定义视图,根据 viewLayer 的值返回对应的视图。import 'package:flutter/material.dart';import 'package:atomic_x_core/atomicxcore.dart';import 'package:rtc_room_engine/rtc_room_engine.dart';/// 带有自定义连麦视图的直播页面class CustomCoGuestLiveWidget extends StatefulWidget {final String liveId;const CustomCoGuestLiveWidget({Key? key,required this.liveId,}) : super(key: key);@overrideState<CustomCoGuestLiveWidget> createState() => _CustomCoGuestLiveWidgetState();}class _CustomCoGuestLiveWidgetState extends State<CustomCoGuestLiveWidget> {late LiveCoreController _controller;@overridevoid initState() {super.initState();_controller = LiveCoreController.create();_controller.setLiveID(widget.liveId);}@overridevoid dispose() {_controller.dispose();super.dispose();}/// 构建连麦观众的自定义视图Widget _buildCoGuestWidget(BuildContext context,SeatFullInfo seatFullInfo,ViewLayer viewLayer,) {if (viewLayer == ViewLayer.foreground) {// 前景层:始终显示在视频画面的最上层,用于显示昵称等信息return CustomSeatForegroundView(seatInfo: seatFullInfo);} else {// 背景层:仅在对应用户没有视频流时显示,用于显示头像占位图return CustomSeatBackgroundView(seatInfo: seatFullInfo);}}@overrideWidget build(BuildContext context) {return Scaffold(body: LiveCoreWidget(controller: _controller,videoWidgetBuilder: VideoWidgetBuilder(coGuestWidgetBuilder: _buildCoGuestWidget,),),);}}
参数说明:
参数 | 类型 | 说明 |
seatFullInfo | SeatFullInfo | 麦位信息对象,包含麦上用户的详细信息。 |
seatFullInfo.userInfo.userId | String | 麦上用户的 ID。 |
seatFullInfo.userInfo.userName | String | 麦上用户的昵称。 |
seatFullInfo.userInfo.avatarUrl | String | 麦上用户的头像 URL。 |
viewLayer | ViewLayer | 视图层级枚举。 ViewLayer.foreground 表示前景挂件视图,始终显示在视频画面的最上层。ViewLayer.background 表示背景挂件视图,位于前景视图下层,仅在对应用户没有视频流(例如未开摄像头)的情况下显示,通常用于展示用户的默认头像或占位图。 |
API 文档
Store/Component | 功能描述 | API 文档 |
LiveCoreWidget | 直播视频流展示与交互的核心视图组件:负责视频流渲染和视图挂件处理,支持主播直播、观众连麦、主播连线等场景。 | |
LiveCoreController | LiveCoreWidget 的控制器:用于设置直播 ID、控制预览等操作。 | |
VideoWidgetBuilder | 视频视图适配器:用于自定义连麦观众、主播连线、PK 等场景的视频流挂件视图。 | |
DeviceStore | 音视频设备控制:麦克风(开关 / 音量)、摄像头(开关 / 切换 / 画质)、屏幕共享,设备状态实时监听。 | |
CoGuestStore | 观众连麦管理:连麦申请 / 邀请 / 同意 / 拒绝,连麦成员权限控制(麦克风 / 摄像头),状态同步。 |
常见问题
如何管理通过 VideoWidgetBuilder 添加的自定义视图的生命周期和事件?
LiveCoreWidget 会自动管理您通过
coGuestWidgetBuilder 回调返回的视图的添加和移除,您无需手动处理。如果需要在自定义视图中处理用户交互(例如点击事件),请在创建视图时为其添加相应的事件处理即可。ViewLayer 参数有什么作用?
ViewLayer 用于区分前景和背景挂件:ViewLayer.foreground:前景层,始终显示在视频画面的最上层。ViewLayer.background:背景层,仅在对应用户没有视频流(例如未开摄像头)的情况下显示,通常用于展示用户的默认头像或占位图。我的自定义视图为什么没有显示?
检查 VideoWidgetBuilder 设置:请确认已正确设置
LiveCoreWidget 的 videoWidgetBuilder 参数。检查回调实现:请检查是否正确实现了
coGuestWidgetBuilder 回调函数。检查返回值:确保您的回调函数返回了一个有效的
Widget 实例。


