功能概述
本文将介绍如何定制 TUICallKit 的用户界面,可根据项目需求进行 UI 调整。
前提条件
定制 UI
替换图标
TUICallKit 用到的所有图标都存放于
tuikit-atomic-x/static/icon 目录下,部分示例如下,您可以根据您的诉求来替换目录下的图标。图标路径 | 详细描述 |
/static/icon/accept.png | 接听通话图标 |
/static/icon/hangup.png | 挂断通话图标 |
/static/icon/camera-on.png | 摄像头开启状态图标 |
/static/icon/camera-off.png | 摄像头关闭状态图标 |
/static/icon/mic-on.png | 麦克风开启状态图标 |
/static/icon/mic-off.png | 麦克风关闭状态图标 |
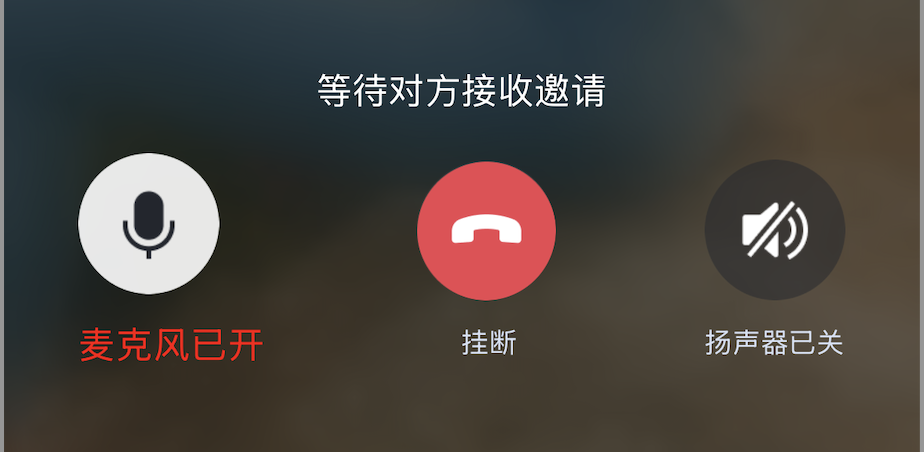
设置字体的大小/颜色
uni-app 官方对 nvue 页面限制字体的大小和颜色只能在
text 标签上设置,对于您想修改的文案,直接修改其 CSS 样式即可,示例如下以“麦克风已开” 文案为例
<template>// 其他代码<text class="btn-text">麦克风已开</text>// 其他代码</template>// 其他代码<style scoped>.btn-text {font-size: 12px;color: #d5e0f2;font-weight: 400;text-align: center;margin-top: 10px;}</style>
修改其 CSS 样式:
<template>// 其他代码<text class="btn-text">麦克风已开</text>// 其他代码</template>// 其他代码<style scoped>.btn-text {font-size: 24px;color: #d5e0f2;font-weight: 400;text-align: center;margin-top: 10px;}</style>
最终效果:
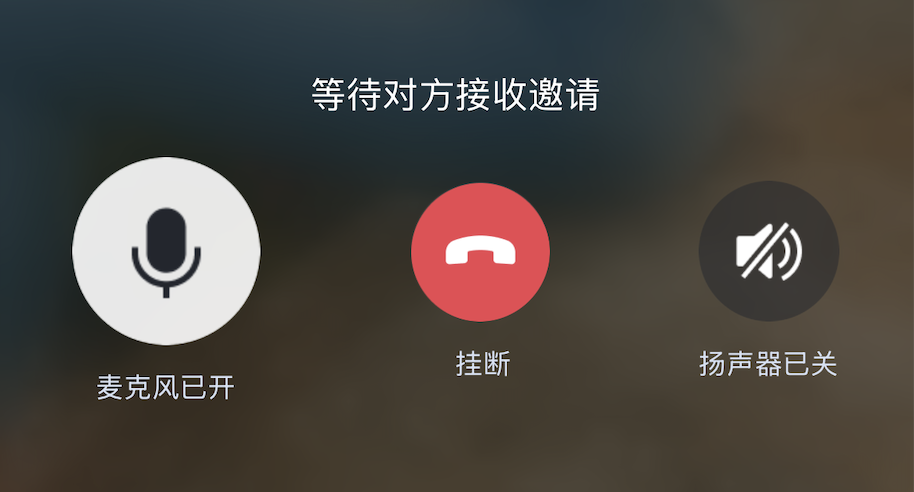
设置按钮的大小
设置按钮的大小,也可以直接通过修改
CSS 属性来进行设置,示例如下以 “麦克风” 按钮为例:
<template>// 其他代码<image class="btn-img" :src="MIC_ON_SRC"></image>// 其他代码</template><script setup lang="ts">import MIC_ON_SRC from "../../../static/icon/mic-on.png";// 其他代码</script><style scoped>.btn-img {width: 60px;height: 60px;border-radius: 140px;}</style>
设置对应的 CSS 属性:
<template>// 其他代码<image class="btn-img" :src="MIC_ON_SRC"></image>// 其他代码</template><script setup lang="ts">import MIC_ON_SRC from "../../../static/icon/mic-on.png";// 其他代码</script><style scoped>.btn-img {width: 80px;height: 80px;border-radius: 140px;}</style>
最终效果:
隐藏按钮
隐藏按钮可以通过注释代码的方式来进行直接隐藏,示例如下
以“麦克风” 按钮为例
<template><!-- <view class="btn" @tap="handleMic"><image class="btn-img" :src="MIC_ON_SRC"></image><text class="btn-text"> 麦克风已开 </text></view> --></template>
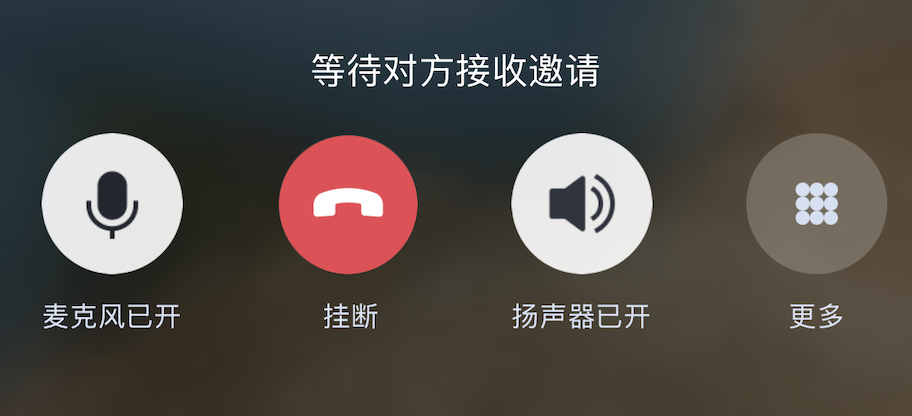
新增按钮
在您需要新增的位置,插入对应的按钮实现
以语音通话主叫端新增“更多”按钮为例:
<template>// 其他代码<view class="call-bottom-button" :style="{ width: systemInfo?.safeArea?.width + 'px'}"><!-- 单人音频通话 - 主叫方呼叫中 --><view class="button-group-row">.......<More/> // 新增的按钮组件</view></view></template><script setup lang="ts">import More from 'xxxx'; // 您项目路径下需要自实现的按钮组件</script>
最终效果:
常见问题
iOS 端 UI 调整后为什么没有生效?
iOS 在 HBuilderX 上编译可能存在缓存,若是碰到没有生效的情况,可以将原来的安装包卸载后重新编译。


