TUIKit 是基于腾讯云 Chat SDK 的一款 Vue 3 UI 组件库,它提供了一些通用的 UI 组件,包含会话、聊天、群组等功能。本文介绍如何快速集成 TUIKit 并实现核心功能。
说明:
AI 助手使用说明
问卷调查
您好!我们正在开发一款即时通信产品 UIKit,它基于腾讯云 Chat SDK,是一款 Vue3 UI 组件库,能帮助您快速集成并实现核心功能。
您的反馈我们会高度重视,本问卷填写仅需要 30 秒!诚邀您的参与。
请根据您的技术栈和目标平台,选择对应的接入文档开始集成:
接入需求 | 桌面端 | 移动端 H5 |
全新 Web Vue3 项目 | 请参考本文 | |
全新 Web React 项目 | ||
Web Vue2 项目 |
关键概念
chat-uikit-vue3 主要分为 ConversationListH5、Chat、MessageListH5、ChatHeaderH5、MessageInputH5、ChatSettingH5、SearchH5、ContactH5 等核心 UI 组件,每个 UI 组件负责展示不同的内容。
ConversationListH5 提供会话列表组件。
Chat 提供会话的容器组件。
MessageListH5 提供会话的消息列表组件。
ChatHeaderH5 提供会话的头部信息组件。
MessageInputH5 提供输入框组件。
ChatSettingH5 提供单聊和群聊的管理组件。
SearchH5 提供云端搜索组件。
ContactH5 提供联系人组件。
前提条件
Vue.js@^3.0.0
TypeScript@^5.0.0
Node.js(Node.js ≥ 20.0.0,建议使用目前的 LTS 版本)
快速体验完整示例项目
如果您希望先快速跑通完整效果,或在接入过程中对照最终代码结构,可以直接克隆我们已经完成接入的示例项目。示例项目已完成 Chat UIKit 相关依赖安装、组件引入、初始化配置和基础页面接入,适合作为接入参考。
git clone https://gitee.com/tencent-cloud-uikit/rtc-chat-web.gitcd chat-mobile-vue3npm installnpm run dev
创建项目
使用 Vite 创建一个新的名为 chat-integration-vue3-h5 的 Vue3 项目,并按照脚手架的步骤提示完成项目的初始化。初始项目启动成功后,可以删掉脚手架自带的示例文件和默认样式(src/style.css 里的默认样式、src/assets、public 里的图标等),保留 src/main.ts 与 index.html 即可。
注意:
1. 建议使用 npm 进行安装,npm 会主动下载所需的 peerDependencies 依赖。
2.
npm create vite@latest 会使用最新的 vite 版本,最新版本的 vite 可能会与低版本的 node.js 冲突,请检查您电脑上的相关环境配置。npm create vite@latest◇ Project name:│ chat-integration-vue3-h5│◇ Select a framework:│ Vue│◇ Select a variant:│ TypeScript│◆ Install with npm and start now?│ ● Yes / ○ No└
下载并导入组件
步骤1:安装依赖
npm install @tencentcloud/chat-uikit-vue3 @tencentcloud/uikit-base-component-vue3 @trtc/calls-uikit-vue
步骤2:引入组件
1. 配置移动端 viewport。
良好的移动端体验的第一步:在项目根目录里把 index.html 中默认 viewport 设置为:覆盖全屏、锁定缩放,让页面更像原生 App。
<!DOCTYPE html><html lang="zh-CN"><head><meta charset="UTF-8" /><!-- H5 viewport: 覆盖刘海屏区域,锁定缩放,营造类原生应用的体验 --><metaname="viewport"content="width=device-width, initial-scale=1, maximum-scale=1, user-scalable=no, viewport-fit=cover"/><title>Chat UIKit H5 Quickstart</title></head><body><div id="app"></div><script type="module" src="/src/main.ts"></script></body></html>
2. 配置全局入口和全局基础样式。
将以下内容写入 src/main.ts。
import { createApp } from 'vue';import App from './App.vue';import './styles.css';createApp(App).mount('#app');
新建 src/styles.css,设置全局基础样式。
/* ------- 移动端基础布局 ------- */* {box-sizing: border-box;}html,body,#app {width: 100%;height: 100%;margin: 0;}body {/* 使用 dvh 来处理 iOS Safari 地址栏. */min-height: 100vh;min-height: 100dvh;font-family: -apple-system, BlinkMacSystemFont, 'Segoe UI', Roboto, sans-serif;color: #1f2329;background: #f5f6f8;/* 移除移动版 WebKit 上的点击亮块。 */-webkit-tap-highlight-color: transparent;}button {font: inherit;cursor: pointer;}/* 16px 可防止 iOS 在输入框获得焦点时自动放大屏幕。 */input {font-size: 16px;}
3. 配置应用首页。
把以下内容写入 src/App.vue,用于路由登录页和聊天页面。
<script setup lang="ts">import { ref, watch } from 'vue';import { UIKitProvider, useLoginState } from '@tencentcloud/chat-uikit-vue3';import { TUICallKit } from '@trtc/calls-uikit-vue';import LoginView from './LoginView.vue';import ChatLayout from './ChatLayout.vue';import { languageResources } from './i18n';enum LoginStatus {UNKNOWN = 0,LOGINED = 1,}// 语言在此处进行维护,并通过 UIKitProvider 的 `language` 属性进行配置。// 这是控制语言的推荐方式// 更新这个单一数据源,它驱动整个 UIKit。const language = ref('zh-CN');const { loginStatus } = useLoginState();</script><template><UIKitProvider theme="light" :language="language" :language-resources="languageResources"><LoginView v-if="loginStatus !== LoginStatus.LOGINED" /><ChatLayout v-else /><TUICallKit class="call-kit" /></UIKitProvider></template><style scoped>.call-kit {position: fixed !important;inset: 0 !important;z-index: 9999 !important;}</style>
4. 配置登录页和聊天页面。
新建 src/LoginView.vue 并写入以下代码,用于构造登录页。
<script setup lang="ts">import { ref } from 'vue';import { useLoginState, useUIKit } from '@tencentcloud/chat-uikit-vue3';const { login } = useLoginState();const { t, language, setLanguage } = useUIKit();// 语言切换器中显示的语言。标签使用本来的语言,确保用户// 不受当前 UI 语言影响,始终能识别自己的选项。const LANGUAGES = [{ value: 'zh-CN', label: '中文' },{ value: 'en-US', label: 'English' },];const sdkAppId = ref<number>();const userId = ref('');const userSig = ref('');const loading = ref(false);const error = ref('');async function handleSubmit() {error.value = '';if (!sdkAppId.value || !userId.value || !userSig.value) {error.value = t('demo.error.required');return;}loading.value = true;try {await login({sdkAppId: Number(sdkAppId.value),userId: userId.value,userSig: userSig.value,});} catch (e) {error.value = e instanceof Error ? e.message : t('demo.error.loginFailed');} finally {loading.value = false;}}</script><template><div class="login"><div class="login__lang" role="group" aria-label="Language"><buttonv-for="item in LANGUAGES":key="item.value"type="button":class="['login__lang-btn', { 'login__lang-btn--active': item.value === language }]"@click="setLanguage(item.value)">{{ item.label }}</button></div><form class="login__card" @submit.prevent="handleSubmit"><h1 class="login__title">{{ t('demo.appTitle') }}</h1><label class="login__field"><span>{{ t('demo.field.sdkAppId') }}</span><input v-model.number="sdkAppId" type="number" :placeholder="t('demo.placeholder.sdkAppId')" /></label><label class="login__field"><span>{{ t('demo.field.userId') }}</span><input v-model="userId" type="text" :placeholder="t('demo.placeholder.userId')" /></label><label class="login__field"><span>{{ t('demo.field.userSig') }}</span><input v-model="userSig" type="text" :placeholder="t('demo.placeholder.userSig')" /></label><p v-if="error" class="login__error">{{ error }}</p><button class="login__submit" type="submit" :disabled="loading">{{ loading ? t('demo.loggingIn') : t('demo.login') }}</button></form></div></template><style scoped>.login { position: relative; display: flex; width: 100%; height: 100dvh; align-items: center; justify-content: center; padding: max(20px, env(safe-area-inset-top)) 20px max(20px, env(safe-area-inset-bottom)); /* Soft natural-white backdrop with a subtle top-down gradient for depth. */ background: linear-gradient(180deg, #ffffff 0%, #f3f5f8 100%); }.login__lang { position: absolute; top: calc(16px + env(safe-area-inset-top)); right: 16px; display: inline-flex; padding: 3px; border-radius: 999px; background: #eef0f3; }.login__lang-btn { min-width: 56px; padding: 6px 12px; border: 0; border-radius: 999px; background: transparent; color: #6b7280; font-size: 13px; font-weight: 500; transition: background 0.2s, color 0.2s; }.login__lang-btn--active { background: #fff; color: #1f2329; box-shadow: 0 1px 2px rgb(16 24 40 / 10%); }.login__card { display: flex; width: 100%; max-width: 360px; flex-direction: column; gap: 16px; padding: 28px 24px; border-radius: 16px; background: #fff; /* Layered, low-opacity shadow for a soft, natural lift off the white bg. */ border: 1px solid rgb(16 24 40 / 4%); box-shadow: 0 1px 2px rgb(16 24 40 / 4%), 0 12px 32px rgb(16 24 40 / 8%); }.login__title { margin: 0 0 4px; font-size: 20px; font-weight: 600; text-align: center; }.login__field { display: flex; flex-direction: column; gap: 6px; font-size: 13px; color: #6b7280; }.login__field input { padding: 12px 14px; border: 1px solid #e8eaed; border-radius: 10px; outline: none; appearance: none; }.login__field input:focus { border-color: #1464ff; }.login__error { margin: 0; color: #e34d59; font-size: 13px; }.login__submit { padding: 13px; border: 0; border-radius: 10px; background: #1464ff; color: #fff; font-size: 16px; font-weight: 600; }.login__submit:disabled { opacity: 0.6; }</style>
新建 src/ChatLayout.vue 并写入以下代码,用于构建主要的聊天布局
<script setup lang="ts">import { ref, watch, onMounted } from 'vue';import {Chat,ChatHeaderH5,ChatSettingH5,ContactInfoH5,ContactListH5,ConversationListH5,MessageInputH5,MessageListH5,SearchH5,VariantType,useChatContext,useLoginState,useUIKit,} from '@tencentcloud/chat-uikit-vue3';import { IconMenu, IconSearch } from '@tencentcloud/uikit-base-component-vue3';import type { ContactGroupItem } from '@tencentcloud/chat-uikit-vue3';type MobileView = 'conversations' | 'chat' | 'contacts' | 'contactInfo' | 'search' | 'setting';const { activeConversation, activeConversationID, sendMessage, setActiveConversation } = useChatContext();const { loginUserInfo, logout } = useLoginState();const { t, language, setLanguage } = useUIKit();const defaultOpenConversationID = ref('C2Cadministrator');function toggleLanguage() {setLanguage(language.value === 'zh-CN' ? 'en-US' : 'zh-CN');}const activeView = ref<MobileView>('conversations');// 记住搜索是从哪里打开的,使其返回按钮能回到原处。const previousView = ref<MobileView>('chat');const selectedContact = ref<ContactGroupItem>();function openFromChat(view: 'search' | 'setting') {previousView.value = activeView.value;activeView.value = view;}function handleConversationSelect() {activeView.value = 'chat';}function handleContactSelect(contact: ContactGroupItem) {selectedContact.value = contact;activeView.value = 'contactInfo';}function handleSendMessage(contact) {setActiveConversation(`C2C${contact.userID}`);activeView.value = 'chat';}function handleEnterGroup(group) {setActiveConversation(`GROUP${group.groupID}`);activeView.value = 'chat';}function handleChatBack() {setActiveConversation(undefined);activeView.value = 'conversations';}function handleSearchResultClick(_item: unknown, type: string) {if (type === 'chat_message') {activeView.value = 'chat';}}watch(activeConversationID, (id, prevId) => {if (id && id !== prevId && activeView.value === 'conversations') {activeView.value = 'chat';}});onMounted(() => {setTimeout(() => {if (activeConversation.value?.conversationID === defaultOpenConversationID.value) {sendMessage({type: 'textMessage',text: `欢迎体验 Chat Vue3 移动端WEB应用 Demo~您可以按照以下顺序体验 IM 的核心功能:1. 在输入框内发送一条文本消息。2. 输入框上的工具栏支持,语音通话、视频通话、快速会议、图片、视频、文件发送等扩展功能。3. 如果您想添加好友,可以前往联系人页面点击"添加好友/群聊"。`});}}, 1000);});</script><template><div class="app-shell"><!-- View: conversation list --><section v-show="activeView === 'conversations'" class="screen"><header class="topbar"><span class="topbar__title">{{ t('demo.chats') }}{{ loginUserInfo?.userId ? ` · ${loginUserInfo.userId}` : '' }}</span><div class="chat-pane__actions"><button class="topbar__text-btn" type="button" @click="toggleLanguage">{{ language === 'zh-CN' ? 'EN' : '中' }}</button><button class="topbar__text-btn" type="button" @click="logout">{{ t('demo.logout') }}</button></div></header><div class="screen__body"><ConversationListH5style="height: 100%"@select-conversation="handleConversationSelect"@before-create-conversation="handleConversationSelect"/></div><nav class="tabbar"><button class="tabbar__item tabbar__item--active" type="button">{{ t('demo.chats') }}</button><button class="tabbar__item" type="button" @click="activeView = 'contacts'">{{ t('demo.contacts') }}</button></nav></section><!-- View: contacts --><section v-show="activeView === 'contacts'" class="screen"><header class="topbar"><span class="topbar__title">{{ t('demo.contacts') }}</span></header><div class="screen__body"><ContactListH5 @contact-item-click="handleContactSelect" /></div><nav class="tabbar"><button class="tabbar__item" type="button" @click="activeView = 'conversations'">{{ t('demo.chats') }}</button><button class="tabbar__item tabbar__item--active" type="button">{{ t('demo.contacts') }}</button></nav></section><!-- View: contact detail --><section v-show="activeView === 'contactInfo'" class="screen"><div class="screen__body screen__body--surface"><ContactInfoH5:contact-item="selectedContact"@close="activeView = 'contacts'"@send-message="handleSendMessage"@enter-group="handleEnterGroup"/></div></section><!-- View: chat (kept alive to avoid re-rendering the message list) --><section v-show="activeView === 'chat'" class="screen"><Chat><header class="chat-pane__header"><ChatHeaderH5 :enable-user-status="true" :on-back="handleChatBack"><template #ChatHeaderRight><div class="chat-pane__actions"><button class="icon-btn" type="button" :aria-label="t('demo.search')" @click="openFromChat('search')"><IconSearch :size="20" /></button><button class="icon-btn" type="button" :aria-label="t('demo.setting')" @click="openFromChat('setting')"><IconMenu :size="20" /></button></div></template></ChatHeaderH5></header><MessageListH5 class="chat-pane__list" /><MessageInputH5class="chat-pane__input":actions="['EmojiPicker', 'ImagePicker', 'VideoPicker', 'FilePicker', 'AudioCallPicker', 'VideoCallPicker', 'QuickConferencePicker']"/></Chat></section><!-- View: search --><section v-show="activeView === 'search'" class="screen"><div class="screen__body"><SearchH5:variant="VariantType.EMBEDDED":on-back="() => (activeView = previousView)":on-result-item-click="handleSearchResultClick"/></div></section><!-- View: chat setting --><section v-show="activeView === 'setting'" class="screen"><div class="screen__body screen__body--surface"><ChatSettingH5 :on-back="() => (activeView = 'chat')" /></div></section></div></template><style scoped>.app-shell { display: flex; width: 100vw; height: 100vh; height: 100dvh; overflow: hidden; flex-direction: column; background: #fff; }.screen { display: flex; width: 100%; height: 100%; min-height: 0; flex-direction: column; }.screen__body { flex: 1; min-height: 0; overflow: hidden; }.screen__body--surface { overflow: auto; background: #f5f6f8; }.topbar { display: flex; flex: 0 0 auto; min-height: 52px; align-items: center; justify-content: space-between; padding: calc(8px + env(safe-area-inset-top)) 16px 8px; border-bottom: 1px solid #e8eaed; }.topbar__title { overflow: hidden; font-size: 17px; font-weight: 600; text-overflow: ellipsis; white-space: nowrap; }.topbar__text-btn { border: 0; background: transparent; color: #1464ff; font-size: 14px; font-weight: 500; }.tabbar { display: flex; flex: 0 0 auto; gap: 8px; padding: 6px 12px calc(6px + env(safe-area-inset-bottom)); border-top: 1px solid #e8eaed; }.tabbar__item { flex: 1; min-height: 40px; border: 0; border-radius: 12px; background: transparent; color: #6b7280; font-size: 14px; font-weight: 600; }.tabbar__item--active { background: #eef4ff; color: #1464ff; }.chat-pane__header { flex: 0 0 auto; padding-top: env(safe-area-inset-top); border-bottom: 1px solid #e8eaed; }.chat-pane__list { min-height: 0; }.chat-pane__input { flex: 0 0 auto; padding-bottom: env(safe-area-inset-bottom); border-top: 1px solid #e8eaed; }.chat-pane__actions { display: flex; align-items: center; gap: 4px; }.icon-btn { display: inline-flex; width: 36px; height: 36px; align-items: center; justify-content: center; border: 0; border-radius: 10px; background: transparent; color: #1f2329; }.icon-btn:active { background: #eef0f3; }</style>
5. 配置国际化内容。
新建 src/i18n.ts 并写入以下内容,用于配置本文档中提及到的多语言内容。
// 本 demo 自身字符串的翻译(聊天组件的翻译由 UIKit 自身// 通过 `language` prop 处理)。键名以 `demo.` 作为命名空间,// 确保不会与库的 i18next 资源发生冲突。//// `languageResources` 传递给 <UIKitProvider>;可在任意位置// 通过 `const { t } = useUIKit()` 和 `t('demo.chats')` 读取字符串。type TranslationTree = { [key: string]: string | TranslationTree };interface LanguageResource {lng: string;translation: TranslationTree;}const en = {demo: {appTitle: 'Chat UIKit H5',field: { sdkAppId: 'SDKAppID', userId: 'UserID', userSig: 'UserSig' },placeholder: {sdkAppId: 'Your SDKAppID',userId: 'e.g. user_001',userSig: 'Test UserSig from IM console',},error: {required: 'Please fill in SDKAppID, UserID and UserSig.',loginFailed: 'Login failed, please check your credentials.',},login: 'Login',loggingIn: 'Logging in…',chats: 'Chats',contacts: 'Contacts',logout: 'Logout',search: 'Search',setting: 'Setting',},};const zh = {demo: {appTitle: 'Chat UIKit H5',field: { sdkAppId: 'SDKAppID', userId: '用户 ID', userSig: '用户签名' },placeholder: {sdkAppId: '请输入 SDKAppID',userId: '例如 user_001',userSig: '控制台获取的测试 UserSig',},error: {required: '请填写 SDKAppID、用户 ID 和用户签名。',loginFailed: '登录失败,请检查登录凭据。',},login: '登录',loggingIn: '登录中…',chats: '会话',contacts: '通讯录',logout: '退出登录',search: '搜索',setting: '设置',},};export const languageResources: LanguageResource[] = [{ lng: 'en-US', translation: en },{ lng: 'zh-CN', translation: zh },];
步骤3:获取 SDKAppID、userID 和 userSig
参数 | 类型 | 说明 |
SDKAppID | Number | 说明: SDKAppID 是腾讯云 IM 客户应用的唯一标识。我们建议每一个独立的 App 都申请一个新的 SDKAppID。不同 SDKAppID 之间的消息是天然隔离的,不能互通。 |
userID | String | 用户的唯一标识符,由您定义,只能包含大小写字母(a-z,A-Z)、数字(0-9)、下划线和连字符。 |
userSig | String | 用户登录即时通信 IM 的密码,其本质是对 UserID 等信息加密后得到的密文。 说明: 开发环境:快速跑通 Demo,可以通过 即时通信 IM 控制台 获取 UserSig。 生产环境:将 UserSig 的计算代码集成到您的服务端,并提供面向项目的接口, 正确的 UserSig 签发方式请参见 服务端生成 UserSig。 |
注意:
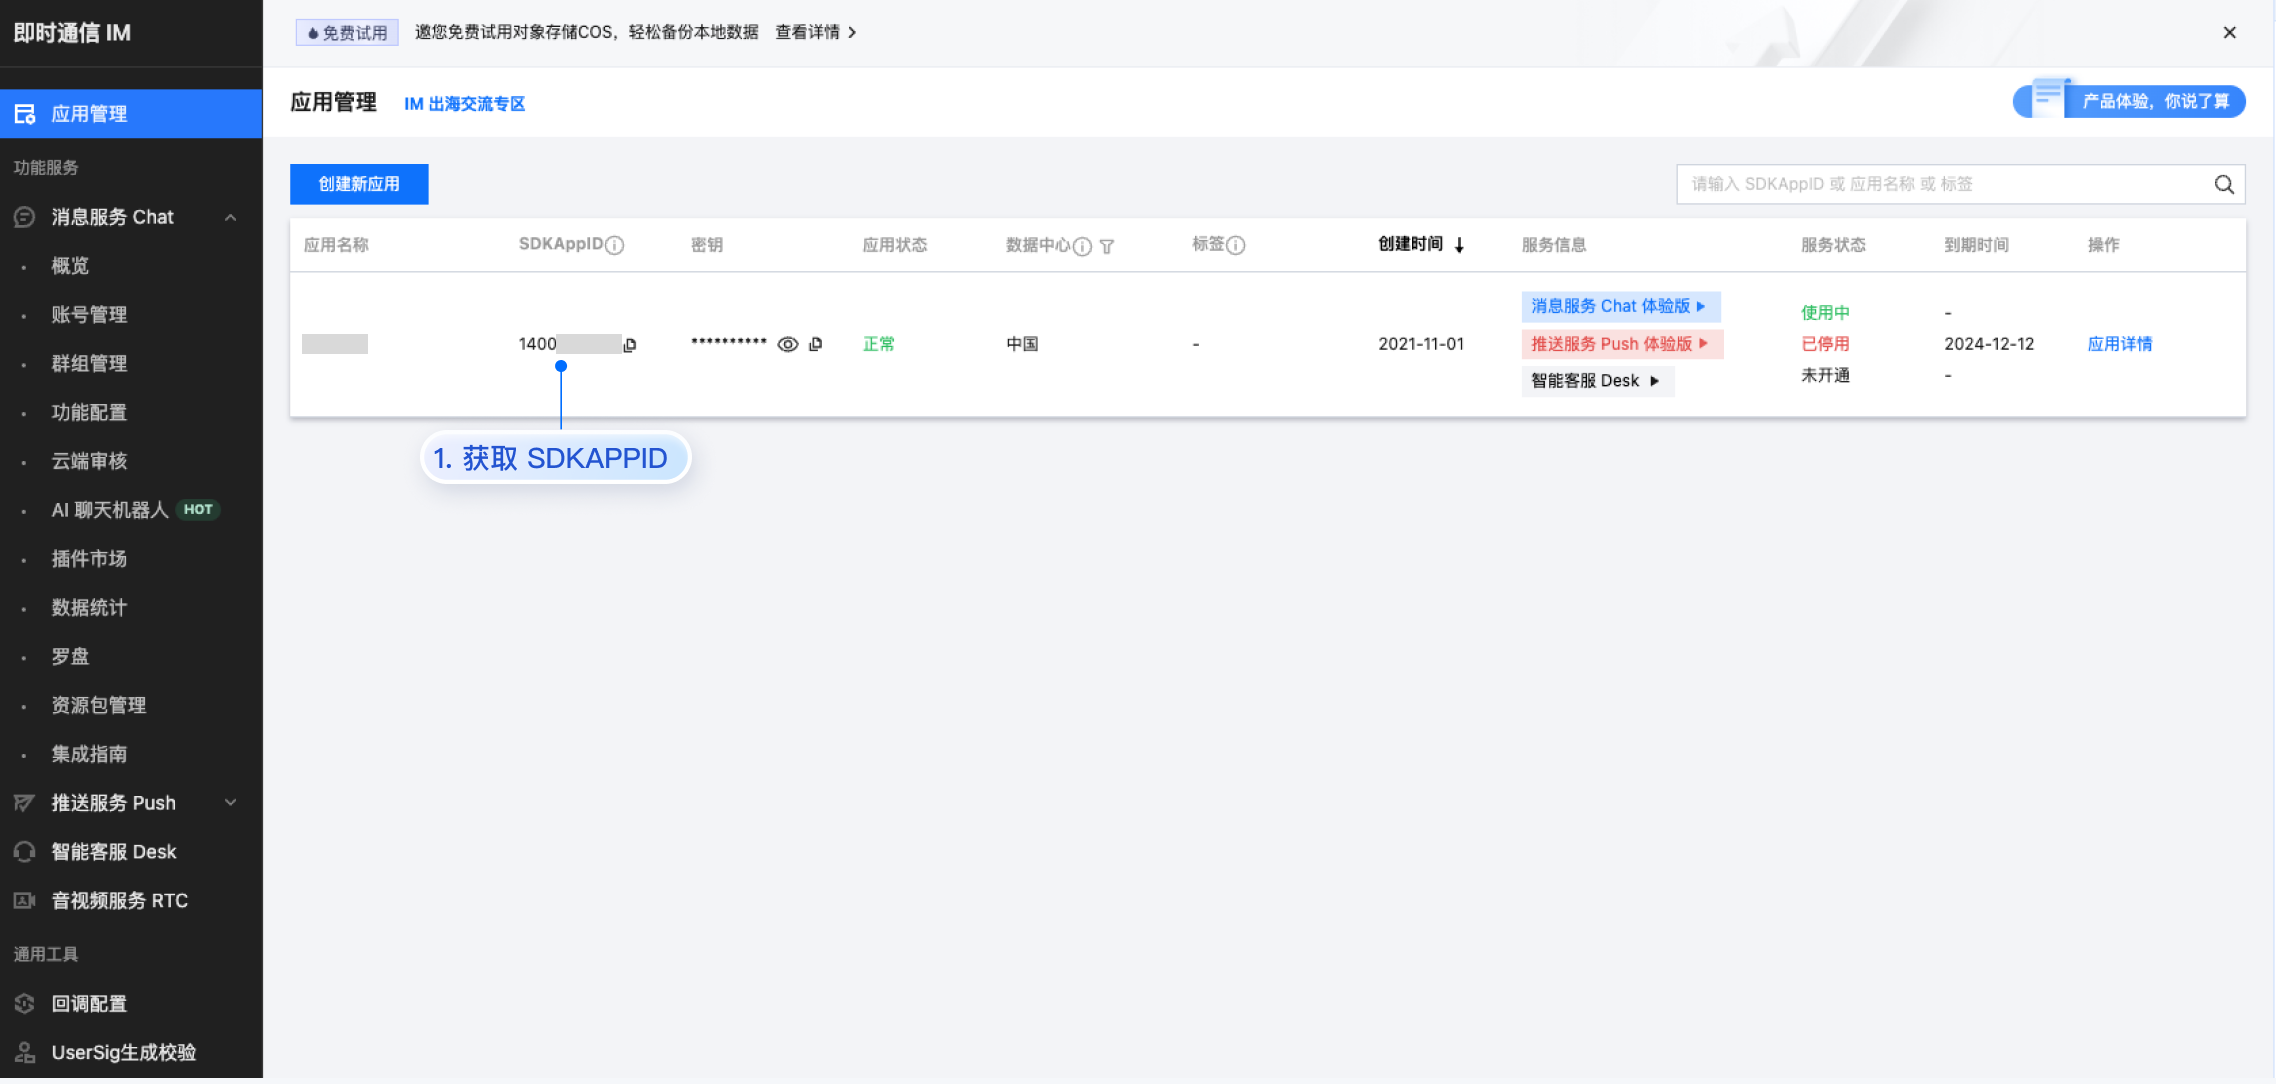
SDKAppID:在 即时通信 IM 控制台 > 应用管理 单击创建新应用,获取 SDKAppID。
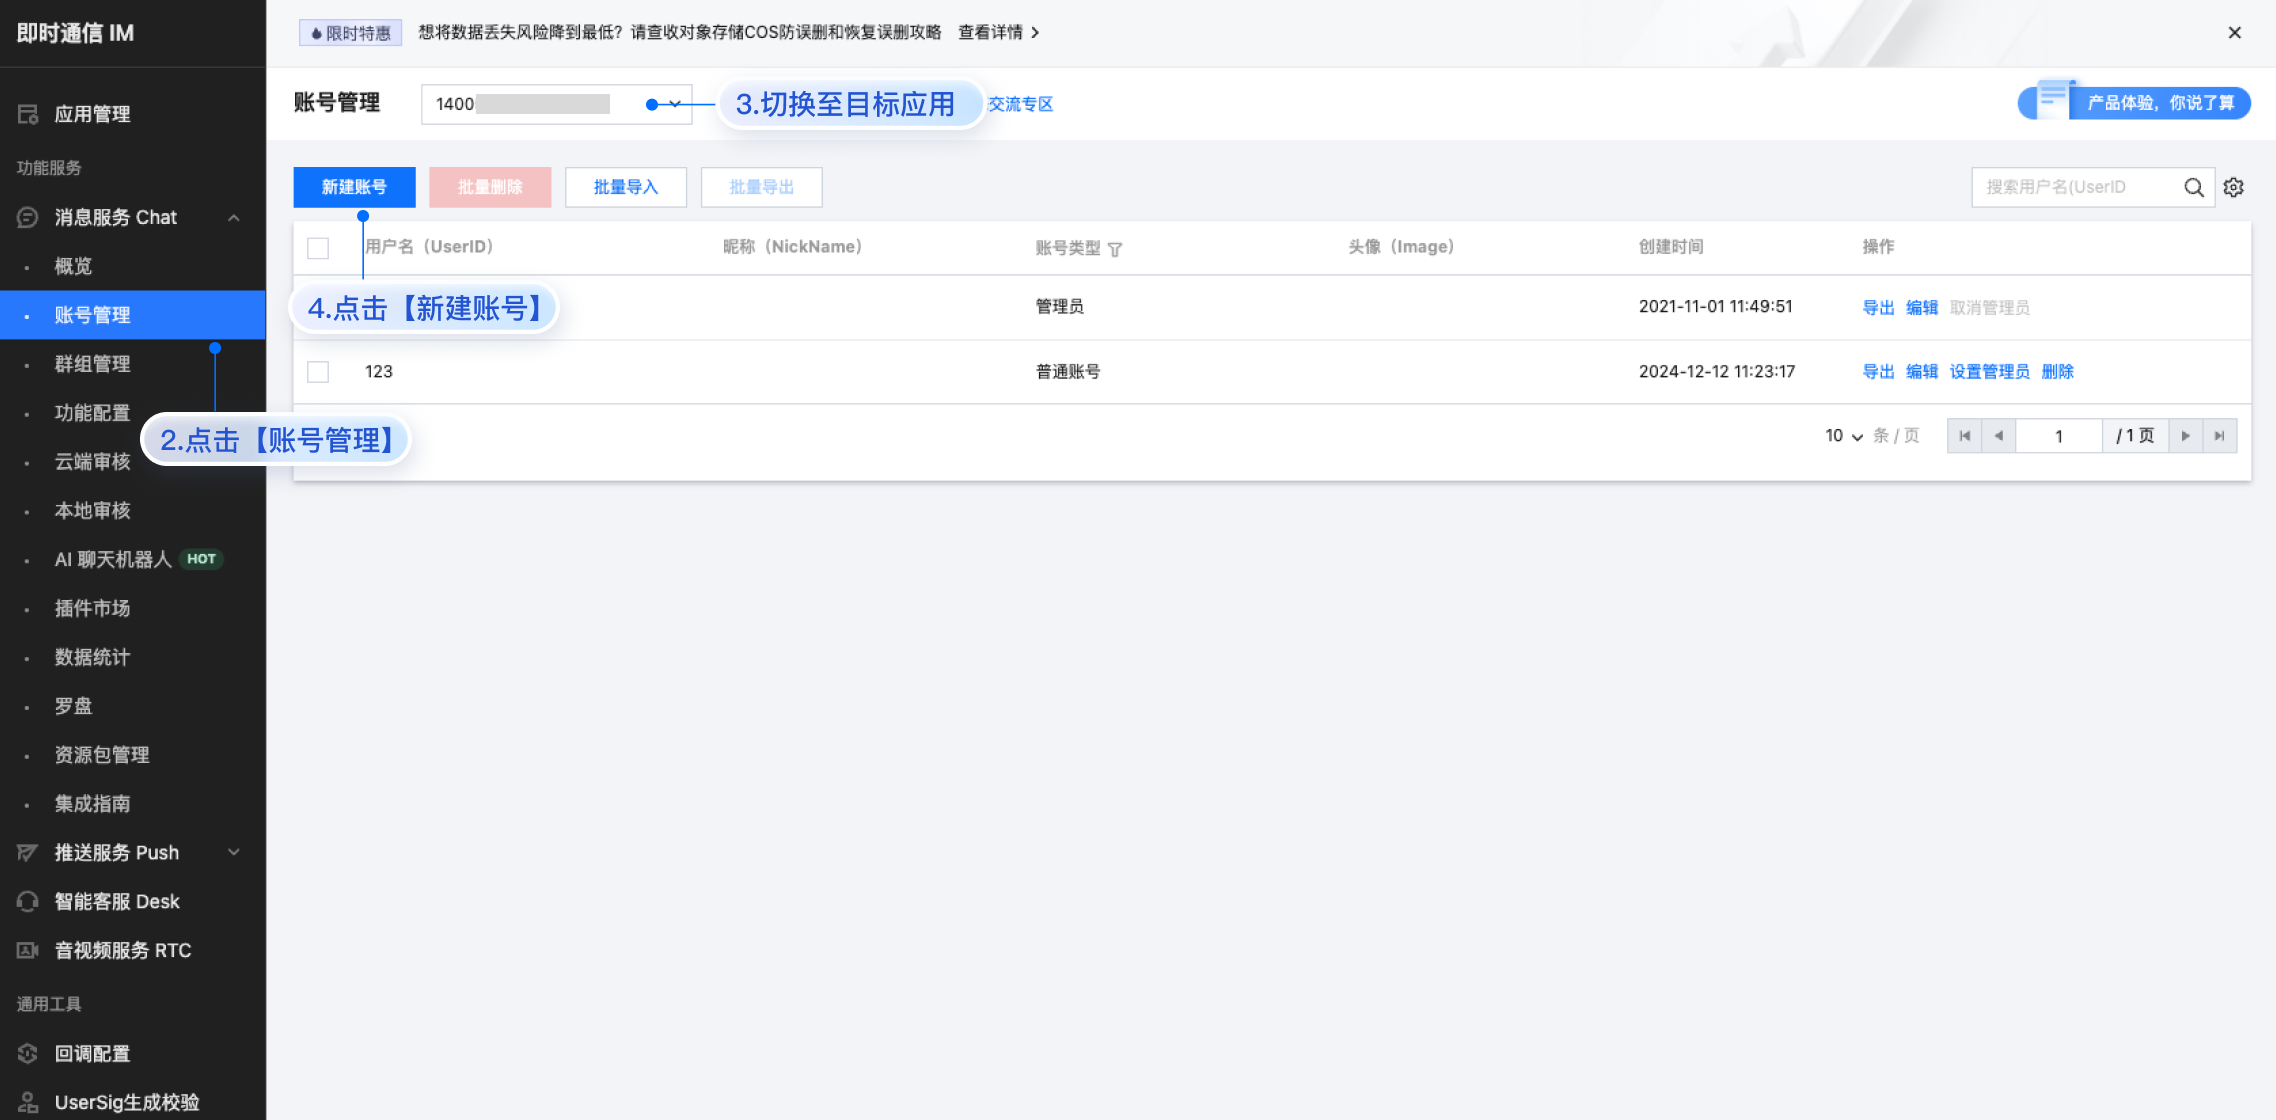
userID:单击 即时通信 IM 控制台 > 消息服务 Chat > 账号管理,切换至目标应用所在账号,您可以创建 2~3 个账号用于体验单聊、群聊的功能。
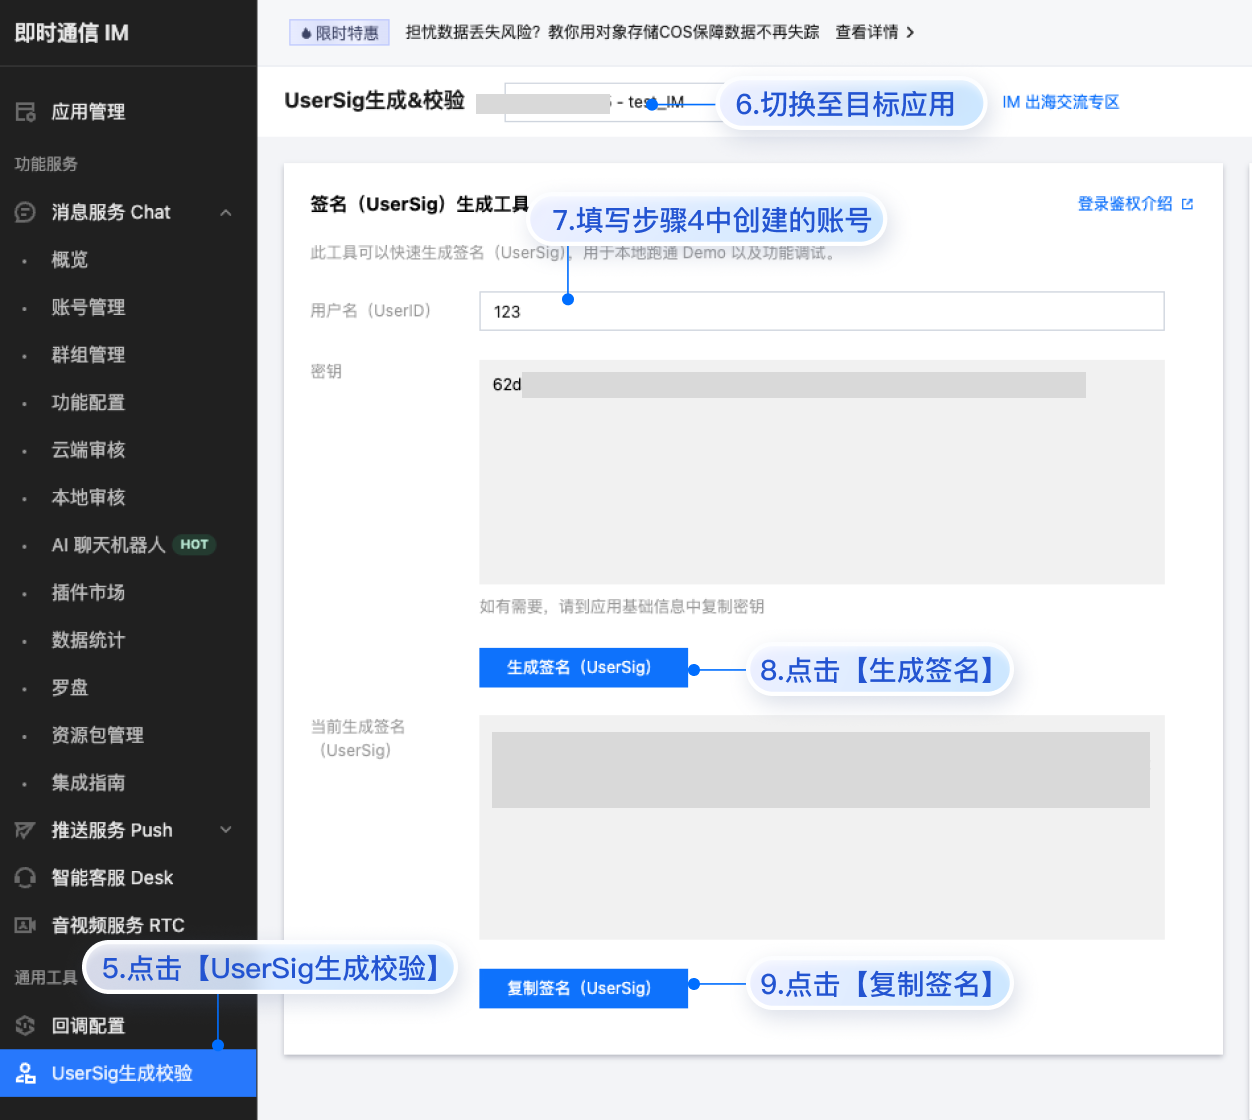
userSig:单击 即时通信 IM 控制台 > 开发工具 > UserSig 生成校验,切换至目标应用所在账号,填写创建的 userID,即可生成 userSig。
运行和测试
使用以下命令运行项目:
npm run dev
集成更多高级特性
音视频通话
说明:
TUICallKit 是腾讯云推出的一款音视频通话 UI 组件,通过集成该组件,您只需要编写几行代码就可以在聊天应用中体验音视频通话功能。
在上面的过程中已经集成了 TUICallKit,若不需要音视频通话功能,可参考以下过程移除集成代码。
1. 安装 @trtc/calls-uikit-vue 依赖。
npm install @trtc/calls-uikit-vue
2. 从 @trtc/calls-uikit-vue 导出 TUICallKit,并挂载到 DOM 节点上。
在 src/App.vue 文件中继续补充下面的代码:
<script setup lang="ts">import { ref, watch } from 'vue';import { UIKitProvider, useLoginState } from '@tencentcloud/chat-uikit-vue3';import { TUICallKit } from '@trtc/calls-uikit-vue';import LoginView from './LoginView.vue';import ChatLayout from './ChatLayout.vue';import { languageResources } from './i18n';enum LoginStatus {UNKNOWN = 0,LOGINED = 1,}// Language is owned here and configured via UIKitProvider's `language` prop.// This is the recommended way to control the language: children request a change// and we update this single source of truth, which drives the whole UIKit.const language = ref('zh-CN');const { loginStatus } = useLoginState();</script><template><UIKitProvider :language="language" :language-resources="languageResources"><LoginView v-if="loginStatus !== LoginStatus.LOGINED" /><ChatLayout v-else /><!-- Audio/video calls. Mount once at the app root; it shares the chat loginsession, so no extra login is needed. The call buttons are alreadybuilt into the chat header. --><div v-if="loginStatus === LoginStatus.LOGINED" class="call-kit"><TUICallKit /></div></UIKitProvider></template><style>/* Call overlay: full-screen, on top of everything, but click-through when nocall is active (only the call UI itself catches clicks). */.call-kit {position: fixed;inset: 0;z-index: 9999;pointer-events: none;}.call-kit > * {pointer-events: auto;}</style>
3. 如果不需要集成音视频通话,可以通过移除
<TUICallKit />、修改 MessageInputH5 组件的 actions 属性,来移除音视频通话的能力。<MessageInputH5 class="chat-pane__input" :actions="['EmojiPicker', 'ImagePicker', 'VideoPicker', 'FilePicker']" />
视频会议
TUIRoomKit 是一款定位企业会议、网络研讨会、在线教育等多人音视频会话场景的含 UI 低代码组件,提供房间管理、成员管理、屏幕分享等会控功能,支持标清、高清、超高清等多种画质。
上述接入过程默认集成视频会议功能,如果需要关闭视频会议功能,在
<MessageInput /> 组件中,使用 actions 属性控制输入框工具栏,删除掉视频会议工具(QuickConferencePicker)即可。<MessageInputH5class="chat-pane__input":actions="['EmojiPicker', 'ImagePicker', 'VideoPicker', 'FilePicker', 'AudioCallPicker', 'VideoCallPicker']"/>
云端搜索
说明:
搜索在客服、社交、在线教育、在线医疗、OA 等场景下是刚需功能,可帮助用户快速查找群组、用户、消息,提升产品使用体验和用户粘性。
由于 Web 平台本地存储特殊性等原因,无法实现本地搜索,为了更好的满足对于搜索能力的需求,推出了云端搜索能力。云端搜索功能支持全局搜索和会话内搜索,同时支持搜索群组、用户和消息。
云端搜索在“步骤 2”中已经默认集成,如果需要关闭云端搜索功能,请参考以下代码:
1. 设置
ConversationList 的 enableSearch 属性为 false:<ConversationListH5 :enable-search="false" />
2. 注释会话内搜索相关的代码:
<ChatHeaderH5 :enable-user-status="true" :on-back="handleChatBack"><template #ChatHeaderRight><div class="chat-pane__actions"><!-- <button class="icon-btn" type="button" :aria-label="t('demo.search')" @click="openFromChat('search')"><IconSearch :size="20" /></button> --><button class="icon-btn" type="button" :aria-label="t('demo.setting')" @click="openFromChat('setting')"><IconMenu :size="20" /></button></div></template></ChatHeaderH5>
常见问题
什么是 UserSig?如何生成 UserSig?
UserSig 是用户登录即时通信 IM 的密码,其本质是对 UserID 等信息加密后得到的密文。UserSig 签发方式是将 UserSig 的计算代码集成到您的服务端,并提供面向项目的接口,在需要 UserSig 时由您的项目向业务服务器发起请求获取动态 UserSig。更多详情请参见 服务端生成 UserSig。
注意:
我能不能使用第三方组件库,例如 Element-Plus?
核心组件之间的粘连代码可以使用其他组件库,这一点在示例代码中也可以看到,例如您可以将
<ChatSettingH5 /> 封装成全屏抽屉组件。但是核心组件内部已经存在的组件暂时不支持修改。const isChatSettingShow = ref(false);<el-drawerv-model="isChatSettingShow"title="设置"><ChatSettingH5 /></el-drawer>
表情包使用