操作场景
本文档介绍如何新建 Custom Runtime 云函数,并将其打包发布,响应触发事件。您可通过本文了解 Custom Runtime 的开发流程及运行机制。
操作步骤
创建 bootstrap 文件
bootstrap 是运行时入口引导程序文件,Custom Runtime 加载函数时固定检索 bootstrap 同名文件,并执行该程序来启动 Custom Runtime 运行时。Custom Runtime 支持任意语言及版本开发运行函数,主要基于 bootstrap 引导程序由开发者自定义实现。其中,bootstrap 需具备以下条件:
需具有可执行权限。
能够在 SCF 系统环境(CentOS 7.6)中运行。
您可参考以下示例代码,在命令行终端创建 bootstrap 文件。本示例通过 bash 实现。
#! /bin/bashset -euo pipefail# 初始化 - 加载函数文件source ./"$(echo $_HANDLER | cut -d. -f1).sh"# 初始化完成,访问运行时API上报就绪状态curl -d " " -X POST -s "http://$SCF_RUNTIME_API:$SCF_RUNTIME_API_PORT/runtime/init/ready"### 循环监听处理事件调用while truedoHEADERS="$(mktemp)"# 长轮询获取事件EVENT_DATA=$(curl -sS -LD "$HEADERS" -X GET -s "http://$SCF_RUNTIME_API:$SCF_RUNTIME_API_PORT/runtime/invocation/next")# 调用函数处理事件RESPONSE=$($(echo "$_HANDLER" | cut -d. -f2) "$EVENT_DATA")# 推送函数处理结果curl -X POST -s "http://$SCF_RUNTIME_API:$SCF_RUNTIME_API_PORT/runtime/invocation/response" -d "$RESPONSE"done
示例文件解析
在示例中,Custom Runtime 运行时分为初始化阶段和调用阶段。初始化阶段仅在函数的执行实例冷启动过程中一次性执行。初始化完成后进入循环的调用阶段,监听事件并调用函数处理。
初始化阶段
关于初始化阶段详细信息,请参见 函数初始化。
初始化阶段完成后,需要主动调用运行时 API 初始化就绪接口通知 SCF。示例代码如下:
# 初始化完成,访问运行时API上报就绪状态curl -d " " -X POST -s "http://$SCF_RUNTIME_API:$SCF_RUNTIME_API_PORT/runtime/init/ready"
其中,由于 Custom Runtime 由开发者使用自定义语言及版本实现,需要通过标准协议与 SCF 进行通信,本示例中 SCF 通过 HTTP 协议提供运行时 API 及内置环境变量,更多关于环境变量信息请参见 环境变量。
SCF_RUNTIME_API:运行时 API 地址。SCF_RUNTIME_API_PORT:运行时 API 端口。初始化日志及异常
初始化阶段日志及异常信息,请参见 日志及异常。
调用阶段
关于调用阶段详细信息,请参见 函数调用。
1.1 完成初始化后,进入循环的调用阶段,监听事件并调用函数处理。示例代码如下:
# 长轮询获取事件EVENT_DATA=$(curl -sS -LD "$HEADERS" -X GET -s "http://$SCF_RUNTIME_API:$SCF_RUNTIME_API_PORT/runtime/invocation/next")
长轮询获取事件请勿设置 get 方法超时,在访问运行时 API 的事件获取接口,阻塞等待事件下发,在一次调用内重复访问此接口均返回相同事件数据。响应体为事件数据 event_data,响应头包含以下信息:
Request_Id:请求 ID,用于标识触发了函数调用的请求。
Memory_Limit_In_Mb:函数内存限制,单位为 MB。
Time_Limit_In_Ms:函数超时时间,单位为毫秒。
1.2 根据环境变量、响应头中所需信息及事件信息构建函数调用的参数,调用函数处理程序。示例代码如下:
# 调用函数处理事件RESPONSE=$($(echo "$_HANDLER" | cut -d. -f2) "$EVENT_DATA")
1.3 访问运行时 API 响应结果接口,推送函数处理结果。若首次调用成功为事件终态,则 SCF 将进行状态锁定,推送后结果不可变更。示例代码如下:
# 推送函数处理结果curl -X POST -s "http://$SCF_RUNTIME_API:$SCF_RUNTIME_API_PORT/runtime/invocation/response" -d "$RESPONSE"
如果函数调用阶段出现错误,通过访问运行时 API 调用错误接口推送错误信息。同时本次调用结束,首次调用视为事件终态,SCF 将进行状态锁定,继续推送结果不可变更。示例代码如下:
# 推送函数处理错误curl -X POST -s "http://$SCF_RUNTIME_API:$SCF_RUNTIME_API_PORT/runtime/invocation/error" -d "parse event error"
调用日志及异常
调用阶段日志及异常信息,请参见 日志及异常。
创建函数处理文件
说明:
函数处理文件包含函数逻辑的具体实现,执行方式及参数可以通过运行时自定义实现。
在命令行终端创建 index.sh。
function main_handler () {EVENT_DATA=$1echo "$EVENT_DATA" 1>&2;RESPONSE="Echoing request: '$EVENT_DATA'"echo $RESPONSE}
发布函数
├ bootstrap└ index.sh
2. 执行以下命令,设置文件可执行权限:
说明:
Windows 系统下不支持
chmod 755 命令,需要在 Linux 或 macOS 系统下执行。$ chmod 755 index.sh bootstrap
3. 使用 Serverless Cloud Framework 创建和发布函数。或执行以下命令,打包生成 zip 包,通过 SDK 或 Serverless 控制台 来创建和发布函数。
$ zip demo.zip index.sh bootstrapadding: index.sh (deflated 23%)adding: bootstrap (deflated 46%)
使用 Serverless Cloud Framework 创建及发布函数
创建函数
1. 安装 Serverless Cloud Framework。
2. 在 bootstrap 目录下配置 Serverless.yml 文件,创建 dotnet 函数:
#组件信息component: scf # 组件名称,本例中为scf组件name: ap-guangzhou_default_helloworld # 实例名称#组件参数inputs:name: helloworld #函数名称src: ./description: helloworld blank template function.handler: index.main_handlerruntime: CustomRuntimenamespace: defaultregion: ap-guangzhoumemorySize: 128timeout: 3events:- http:parameters:netConfig:enableExtranet: trueenableIntranet: truequalifier: $DEFAULT
说明:
3. 执行
scf deploy 命令创建云函数,创建成功则返回结果如下:serverless-cloud-frameworkAction: "deploy" - Stage: "dev" - App: "ap-guangzhou_default_helloworld" - Name: "ap-guangzhou_default_helloworld"code:bucket: sls-cloudfunction-ap-guangzhou-codeobject: /scf_component_13431st-1778141543.zipdescription: helloworld blank template function.functionName: helloworldhandler: index.main_handlerlastVersion: $LATESTmemorySize: 128namespace: defaultruntime: CustomRuntimesourceCodeDownloadUrl: xxxxxxxxxxxxtraffic: 1triggers:-AddTime:AvailableStatus: AvailableBindStatus:CustomArgument:Description:Enable: 1ModTime:NeedCreate: trueQualifier: $DEFAULTResourceId:TriggerAttribute:TriggerDesc: {"AuthType":"NONE","NetConfig":{"EnableIntranet":true,"IntranetUrl":"https://123456789-*******.ap-guangzhou.tencentscf.com","IntranetHTTPUrl":"http://123456789-*******.ap-guangzhou.tencentscf.com","ExtranetUrl":"https://123456789-*******.ap-guangzhou.tencentscf.com","ExtranetHTTPUrl":"http://123456789-*******.ap-guangzhou.tencentscf.com","WssIntranetUrl":"","WsIntranetUrl":"","WssExtranetUrl":"","WsExtranetUrl":"","EnableExtranet":true},"CorsConfig":{"Enable":false,"Origins":null,"Headers":null,"Methods":null,"ExposeHeaders":null,"MaxAge":0,"Credentials":false},"ApiGwCompatible":false,"EnableSimpleMode":false,"SecurityRestricted":false}TriggerId: 6823409TriggerName: gupaqqus39Type: httptype: eventApplication Console: https://console.cloud.tencent.com/sls/detail?stageName=dev&appName=ap-guangzhou_default_helloworld&instanceName=ap-guangzhou_default_helloworld&stageList=dev58s ›ap-guangzhou_default_helloworld› Execution completed
说明:
调用函数
由于 serverless.yml 中添加了
events 为 http (函数 URL) 的配置,因此创建函数的同时也创建了 函数 URL,可通过 函数 URL 访问云函数。返回类似如下信息,即表示访问成功。# 请求示例:curl http://1253970226-gupaqqus39.ap-guangzhou.tencentscf.com# 返回返回信息示例:Echoing request:'{"body": "","headers": {"accept": "*/*","user-agent": "curl/8.4.0","x-scf-remote-addr": "1.1.1.1","x-scf-request-domain": "123456789-*******.ap-guangzhou.tencentscf.com","x-scf-request-id": "e9345cda-49ec-11f1-b7a5-*************"},"httpMethod": "GET","path": "/","queryString": {}}'
使用 SDK 创建及发布函数
创建函数
执行以下命令,通过 SCF 的 Python SDK 创建名为 CustomRuntime-Bash 的函数。
from tencentcloud.common import credentialfrom tencentcloud.common.profile.client_profile import ClientProfilefrom tencentcloud.common.profile.http_profile import HttpProfilefrom tencentcloud.common.exception.tencent_cloud_sdk_exception import TencentCloudSDKExceptionfrom tencentcloud.scf.v20180416 import scf_client, modelsfrom base64 import b64encodetry:cred = credential.Credential("SecretId", "secretKey")httpProfile = HttpProfile()httpProfile.endpoint = "scf.tencentcloudapi.com"clientProfile = ClientProfile()clientProfile.httpProfile = httpProfileclient = scf_client.ScfClient(cred, "ap-guangzhou", clientProfile)req = models.CreateFunctionRequest()f = open('demo.zip', 'r')code = f.read()f.close()params = '{\\"FunctionName\\":\\"CustomRuntime-Bash\\",\\"Code\\":{\\"ZipFile\\":\\"'+b64encode(code)+'\\"},\\"Timeout\\":3,\\"Runtime\\":\\"CustomRuntime\\",\\"InitTimeout\\":3}'req.from_json_string(params)resp = client.CreateFunction(req)print(resp.to_json_string())except TencentCloudSDKException as err:print(err)
Custom Runtime 特殊参数说明
参数类型 | 说明 |
"Runtime":"CustomRuntime" | Custom Runtime 对应的 runtime 类型。 |
"InitTimeout":3 | 初始化超时时间。Custom Runtime 针对初始化阶段新增超时控制配置,时间区间以 bootstrap 启动为始,以上报运行时 API 就绪状态为止。超出后将终止执行并返回初始化超时错误。 |
"Timeout":3 | 调用超时时间。事件调用的超时控制配置,时间区间以事件下发为始,以函数处理完成推送结果至运行时 API 为止。超出后将终止执行并返回调用超时错误。 |
调用函数
from tencentcloud.common import credentialfrom tencentcloud.common.profile.client_profile import ClientProfilefrom tencentcloud.common.profile.http_profile import HttpProfilefrom tencentcloud.common.exception.tencent_cloud_sdk_exception import TencentCloudSDKExceptionfrom tencentcloud.scf.v20180416 import scf_client, modelstry:cred = credential.Credential("SecretId", "secretKey")httpProfile = HttpProfile()httpProfile.endpoint = "scf.tencentcloudapi.com"clientProfile = ClientProfile()clientProfile.httpProfile = httpProfileclient = scf_client.ScfClient(cred, "ap-guangzhou", clientProfile)req = models.InvokeRequest()params = '{\\"FunctionName\\":\\"CustomRuntime-Bash\\",\\"ClientContext\\":\\"{ \\\\\\"key1\\\\\\": \\\\\\"test value 1\\\\\\", \\\\\\"key2\\\\\\": \\\\\\"test value 2\\\\\\" }\\"}'req.from_json_string(params)resp = client.Invoke(req)print(resp.to_json_string())except TencentCloudSDKException as err:print(err)
返回类似如下信息,即表示调用成功。
{"Result":{"MemUsage": 7417***,"Log": "", "RetMsg":"Echoing request: '{\\"key1\\": \\"test value 1\\",\\"key2\\": \\"test value 2\\"}'","BillDuration": 101,"FunctionRequestId": "3c32a636-****-****-****-d43214e161de","Duration": 101,"ErrMsg": "","InvokeResult": 0},"RequestId": "3c32a636-****-****-****-d43214e161de"}
使用控制台创建及发布函数
创建函数
1. 登录 Serverless 控制台,单击左侧导航栏的函数服务。
2. 在函数服务页面上方选择期望创建函数的地域,并单击新建,进入函数创建流程。
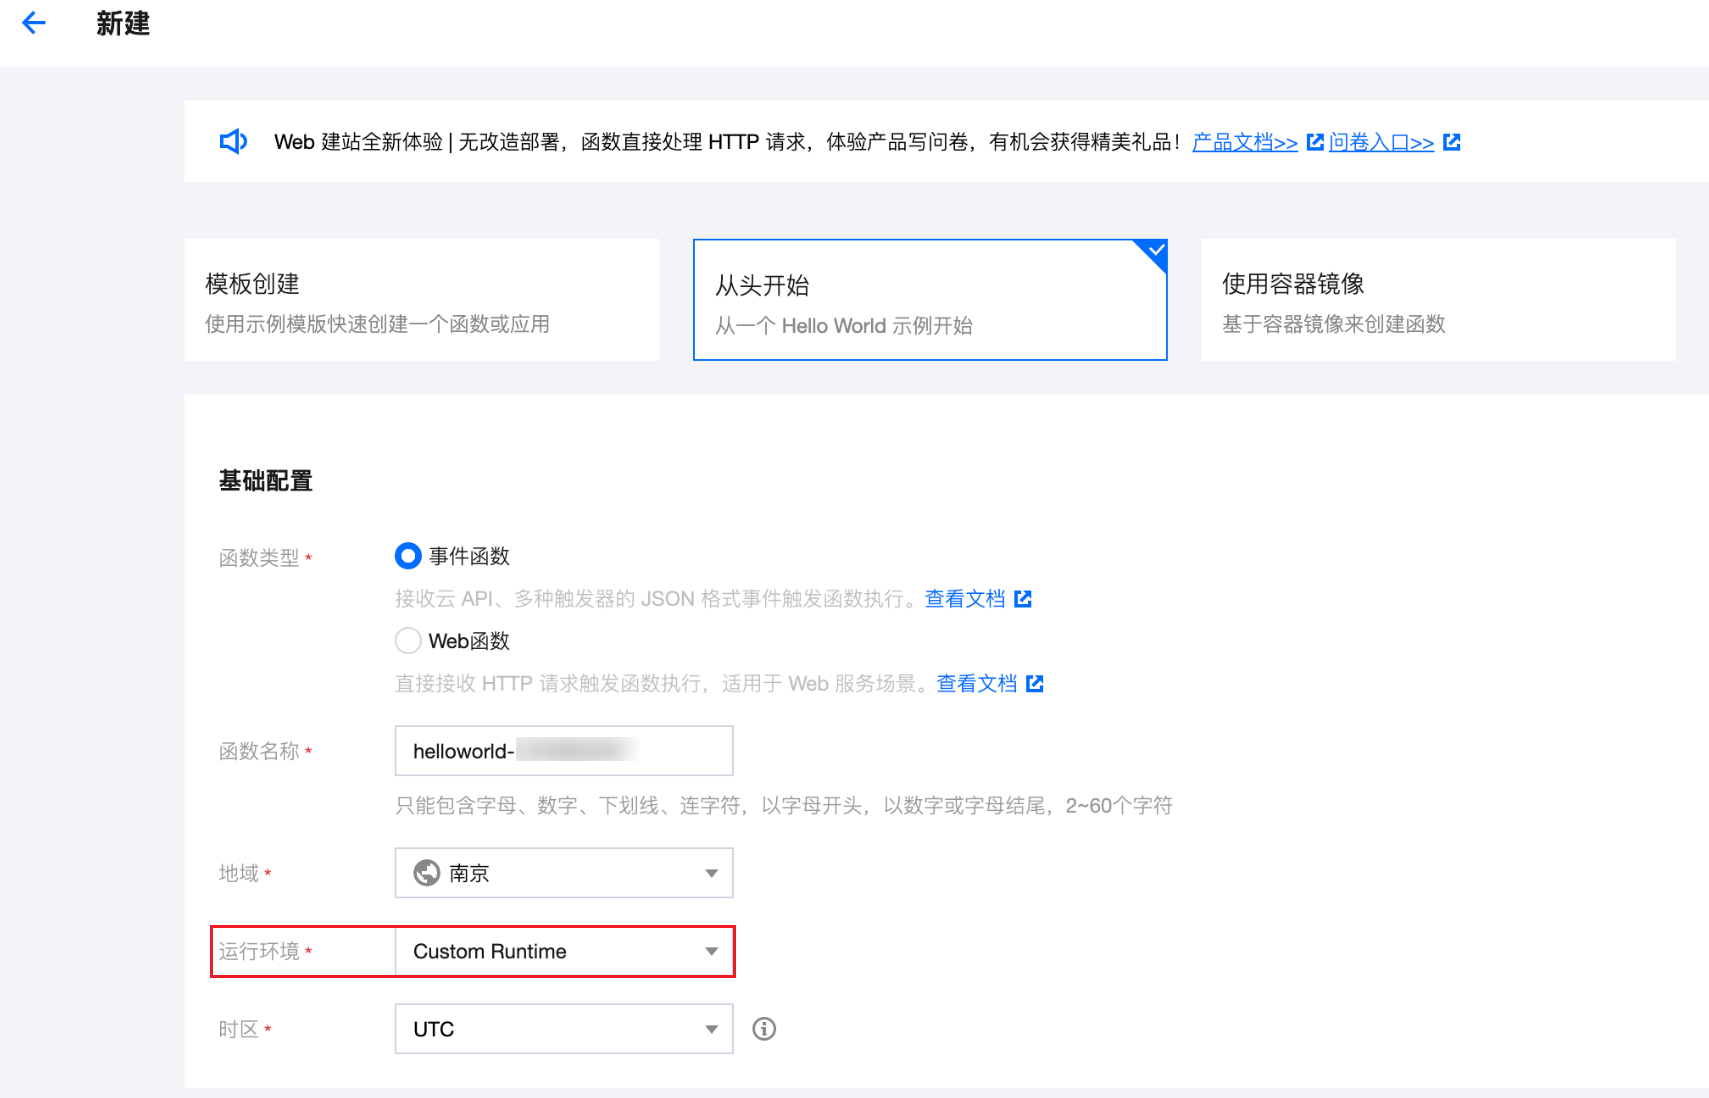
3. 在新建函数页面中选择从头开始,并在运行环境中选择 Custom Runtime。如下图所示:
4. 在函数代码中,对“提交方法”和“函数代码”进行配置。如下图所示:

提交方法:选择“本地上传 zip 包”。
函数代码:选择打包好的 demo.zip。
高级设置:展开配置项,配置“初始化超时时间”及其他相关参数。
5. 单击完成即可完成函数创建。
调用函数
1. 登录 Serverless 控制台,单击左侧导航栏的函数服务。
2. 在函数服务页面上方选择期望调用函数的地域,并单击列表页中期望调用的函数,进入函数详情页面。
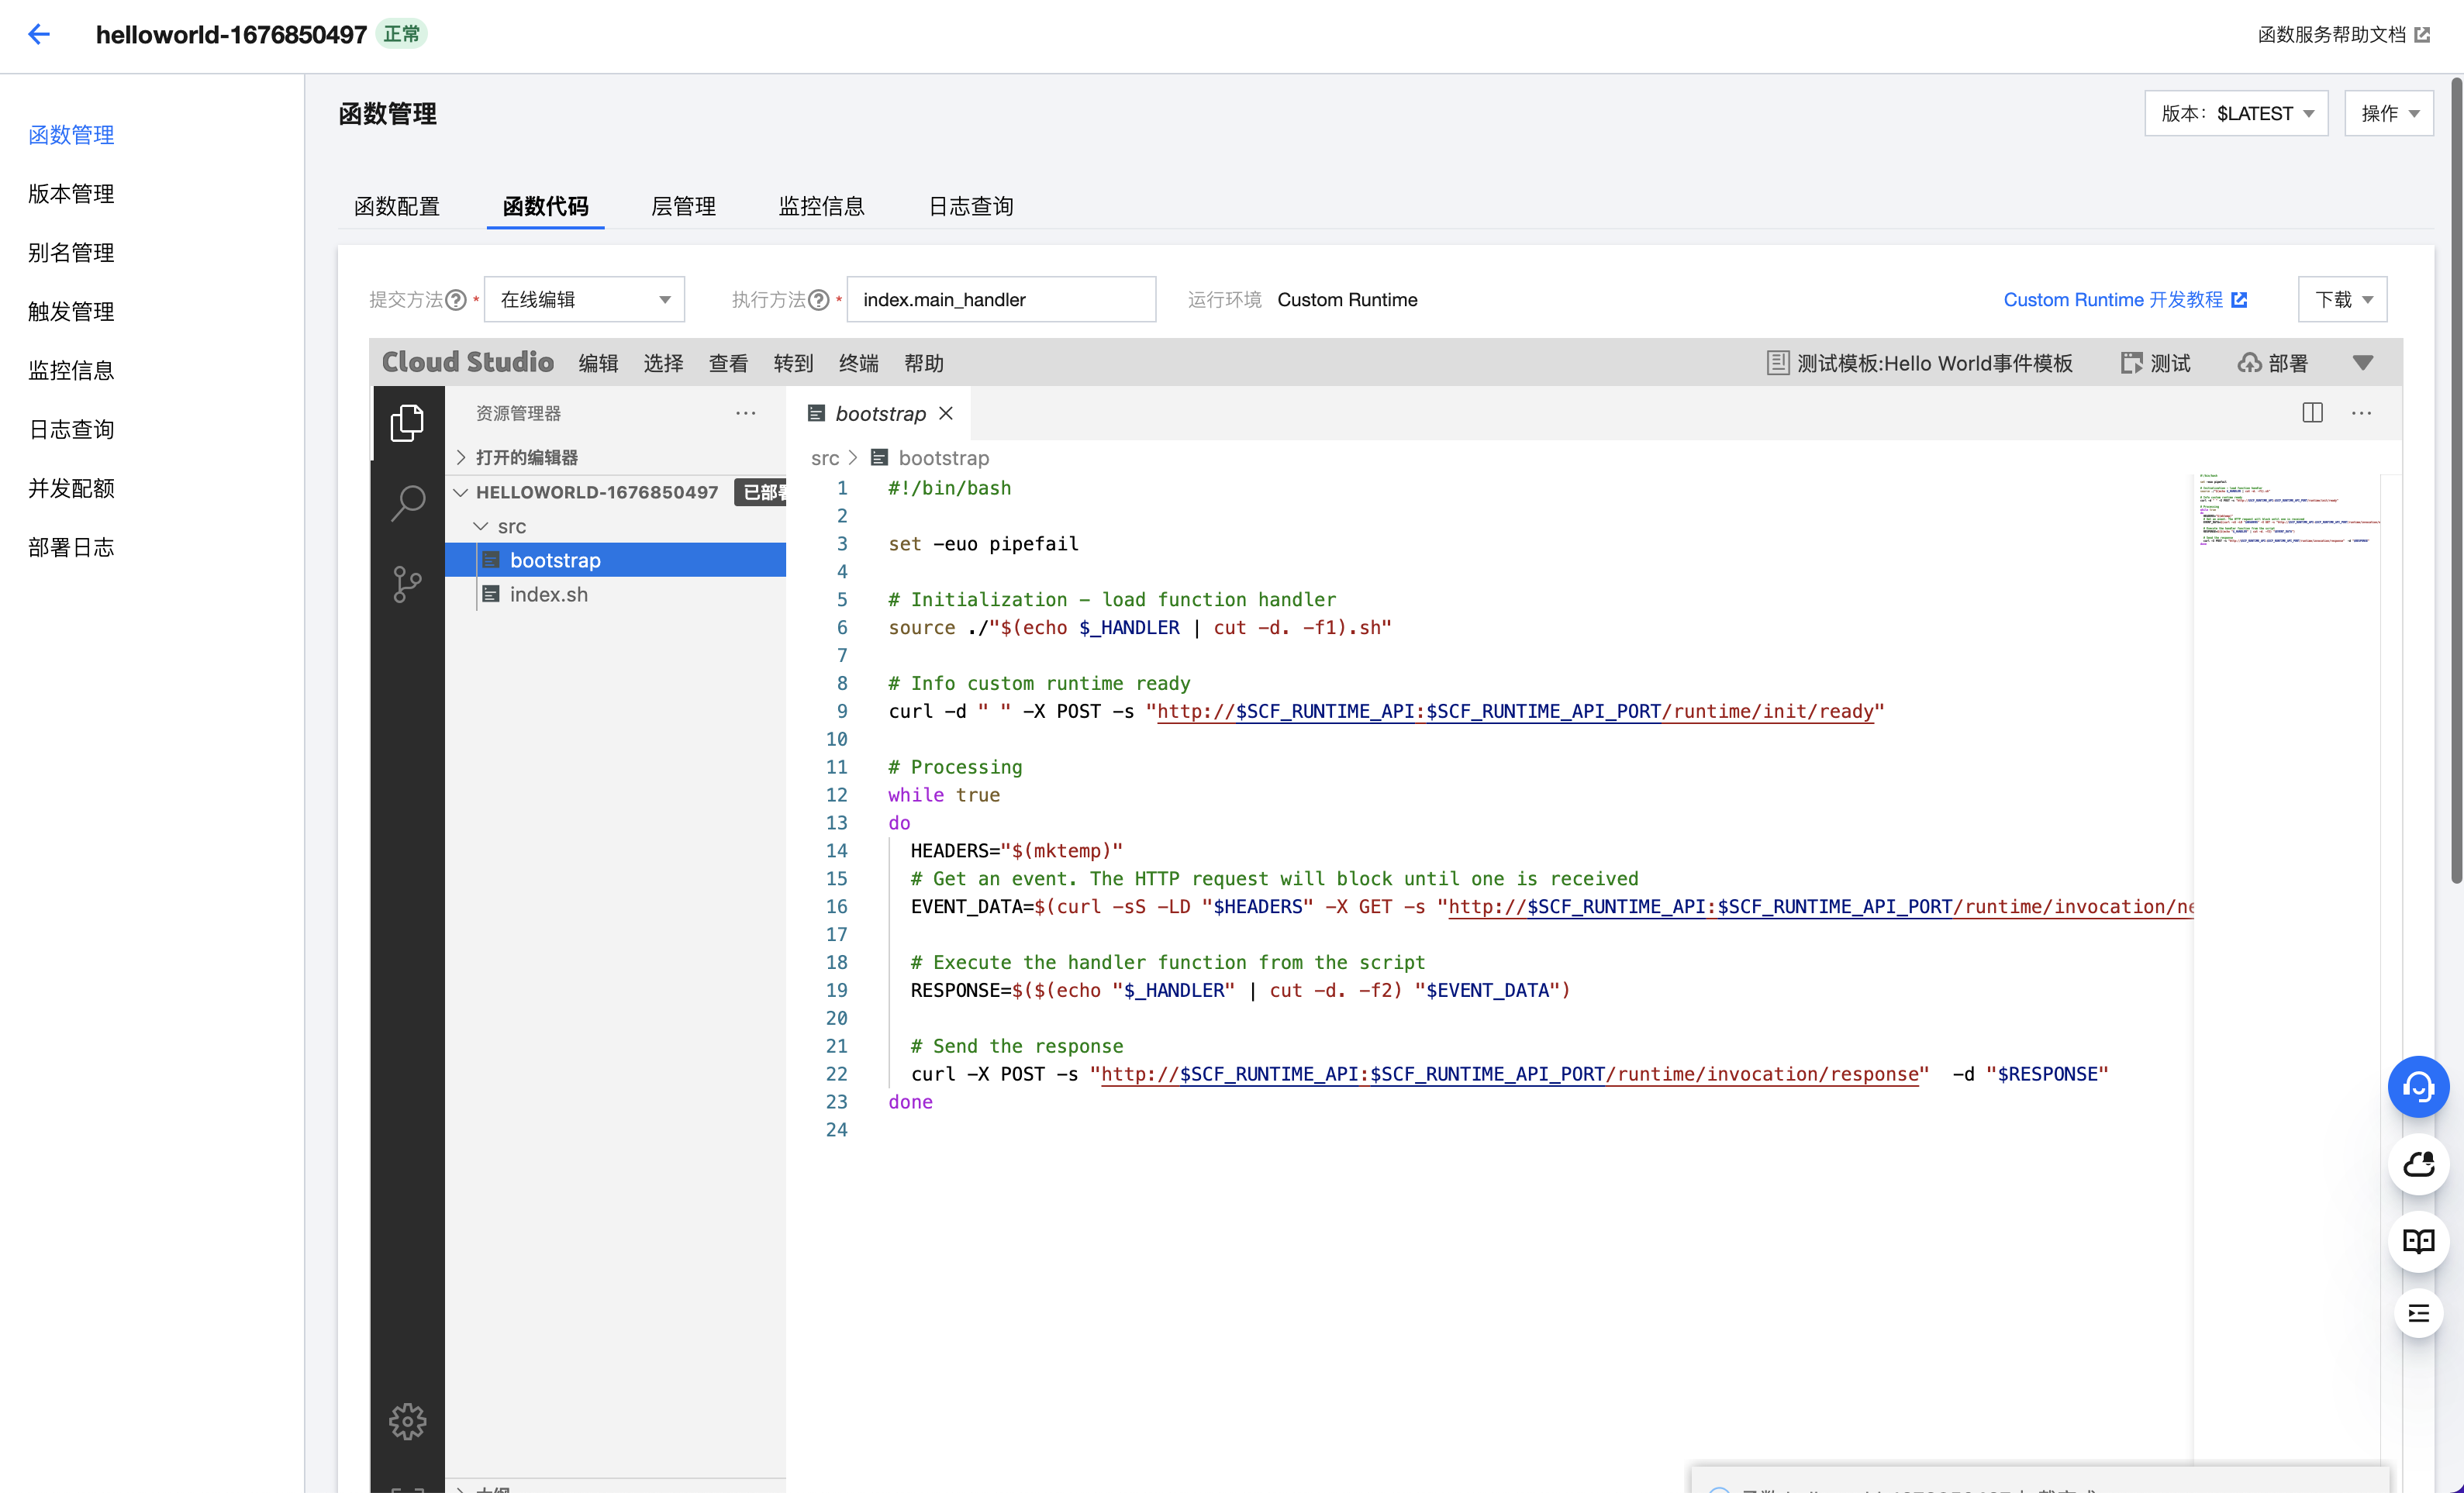
3. 选择左侧函数管理,并在“函数管理”页面选择函数代码页签。如下图所示:
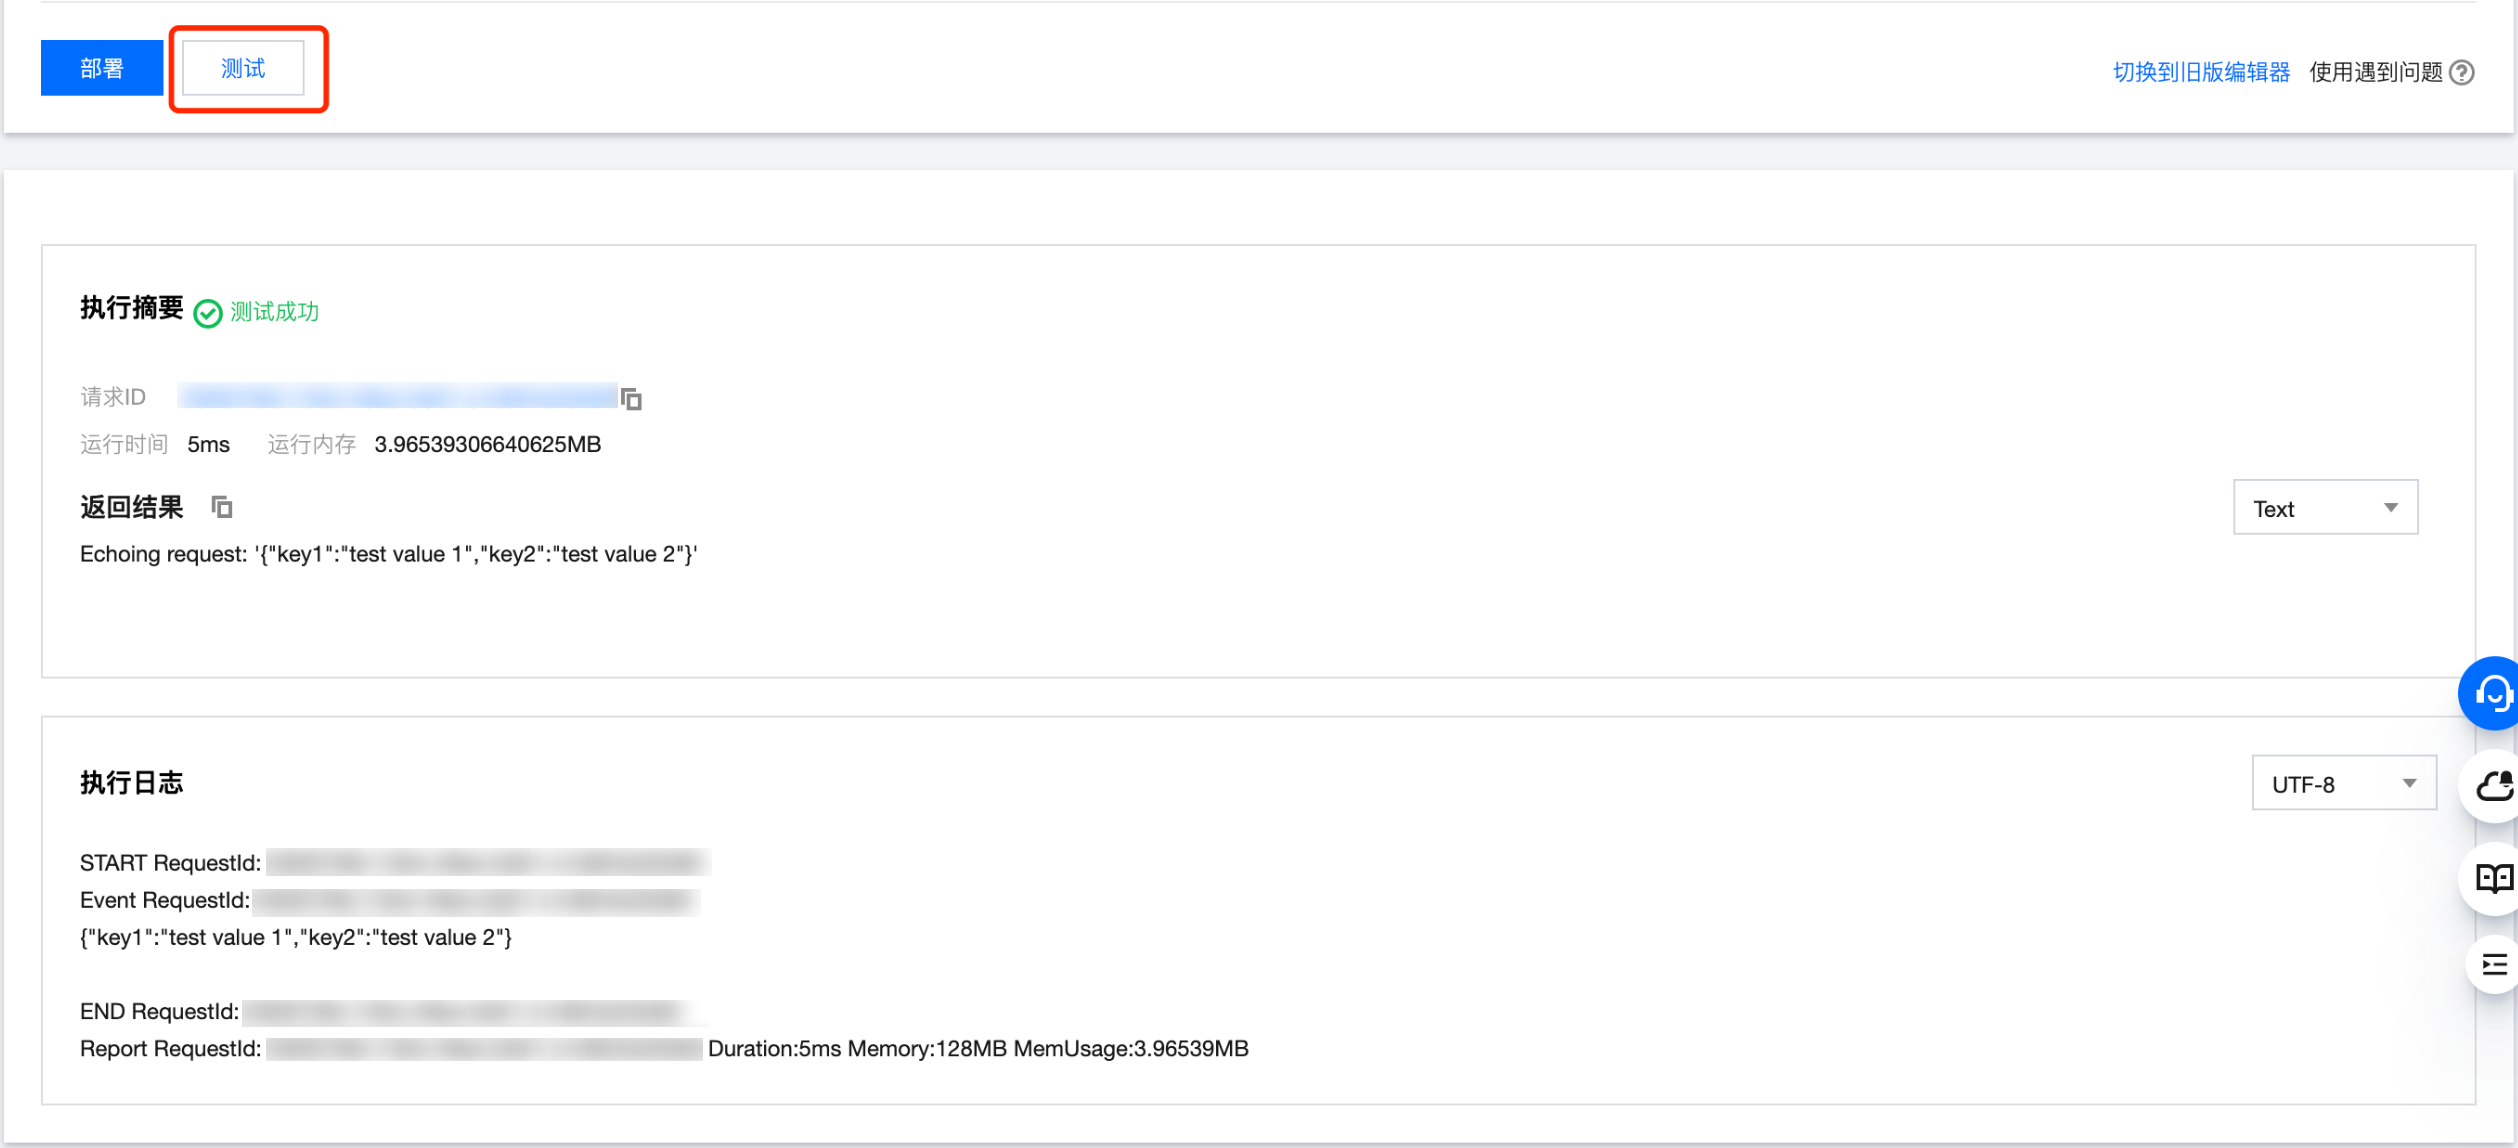
4. 单击编辑器下方的测试,控制台将展示出调用的执行结果及日志。如下图所示: