操作场景
Onesuite-Pilot 是一款以本地常驻服务形式运行的数据采集程序,可自动探测并接入本机已安装的 AI Agent ,将 AI Agent 的会话数据采集、加工后上报至日志服务(Cloud Log Service,CLS),帮助您在 CLS 中对 AI Agent 的活动进行检索分析与观测。
本文介绍如何安装、配置、验证及维护 Onesuite-Pilot。Onesuite-Pilot 当前已支持接入 Codebuddy、WorkBuddy、DeepSeek Harness、Claude Code、Codex、MiMo Code、OpenClaw、Pi Coding Agent、Hermes Agent、Cursor、OpenCode,后续将持续扩展对更多 AI 工具的支持。
本文提供以下两种接入方式,您可根据实际情况选择:
接入方式 | 说明 | 推荐场景 |
使用支持 Skill 的 AI 工具,由 AI 自动创建或复用日志主题、识别环境并完成接入与分析。 | 使用支持 Skill 的 AI 工具,希望一键接入、减少手动配置。 | |
按步骤执行安装命令,手动填写地域接入点、日志主题、密钥等参数完成接入。 | 需要精细化控制接入参数,或所用工具不支持 Skill。 |
前提条件
在安装前,请确认已满足以下条件:
已开通 日志服务 CLS。
已准备具备 CLS 写入权限的访问凭证,例如 CAM 子账号、CAM Role 或临时密钥。云 API 密钥信息请前往 API 密钥管理 获取。
操作系统为 macOS、Linux 或 Windows。
Node.js 版本 ≥ 18(安装脚本会自动探测 node、nvm 及常见路径)。
已获取接入所需的地域接入点(endpoint):即 Agent 应用所在地域的 CLS 接入点域名,请参见 地域和访问域名。以广州地域为例,方式一中对应填写
Region(如 ap-guangzhou);方式二中对应填写域名,内网域名为 ap-guangzhou.cls.tencentyun.com,外网域名为 ap-guangzhou.cls.tencentcs.com。方式一:通过 Skill 快速接入与分析
请使用腾讯云 Agent 可观测 Skill:https://skillhub.cn/skills/tencentcloud-cls-agent-obs帮我把当前 AI Agent 接入腾讯云 Agent 可观测。
方式二:手动配置接入
手动接入需按步骤执行安装命令,并在命令中填写前提条件中已获取的地域接入点、日志主题 ID 及密钥信息。手动接入前,请先登录 日志服务控制台 > Agent 可观测,通过应用接入创建应用,并在日志主题列表中找到名称为 {应用名称}-trace-topic 的日志主题,复制其日志主题 ID(用于下方
cls-topic-id)。步骤1:执行命令
执行以下一键安装命令。请将参数值替换为您在 CLS 控制台获取的实际信息。Onesuite-Pilot 上报 CLS 支持强鉴权与弱鉴权两种方式,请任选其一。
强鉴权:使用访问密钥(SecretId / SecretKey)上报,密钥需对目标主题有写入权限,权限模板参见 使用 Onesuite-Pilot 采集 AI Agent 可观测数据。
curl -fsSL https://onesuite-pilot-1254077820.cos.ap-shanghai.myqcloud.com/onesuite-pilot/installer.sh | bash -s -- install \\--cls-endpoint "<your-cls-endpoint>" \\--cls-topic-id "<your-topic-id>" \\--cls-secret-id "<your-secret-id>" \\--cls-secret-key "<your-secret-key>"
在 PowerShell 中执行以下命令:将安装器下载到本地后以
-File 方式运行(安装参数无法通过管道传入,故不使用 irm | iex)。$installer = Join-Path $env:TEMP 'onesuite-installer.ps1'irm https://onesuite-pilot-1254077820.cos.ap-shanghai.myqcloud.com/onesuite-pilot/installer.ps1 -OutFile $installerUnblock-File -LiteralPath $installerpowershell -NoProfile -ExecutionPolicy Bypass -File $installer install `-Mirror "cn" `-ClsEndpoint "<your-cls-endpoint>" `-ClsTopicId "<your-topic-id>" `-ClsSecretId "<your-secret-id>" `-ClsSecretKey "<your-secret-key>"
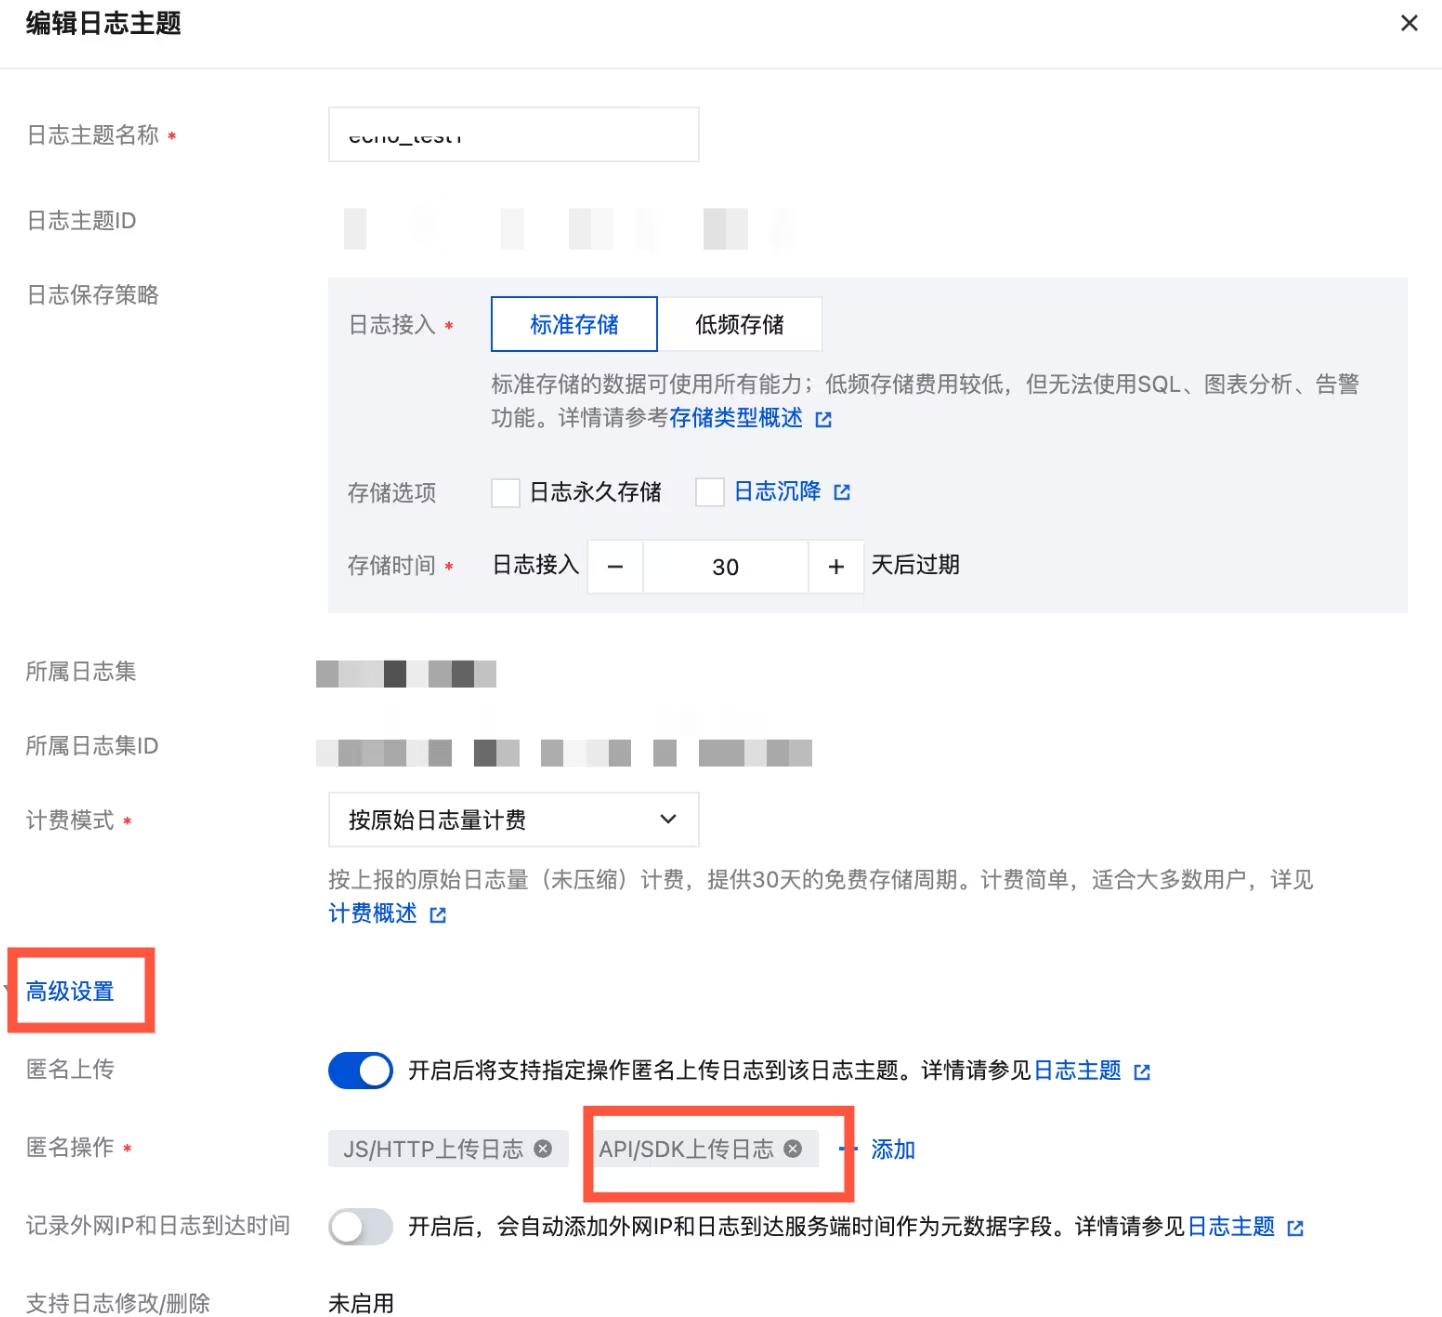
弱鉴权:使用账号 UIN 上报,无需配置密钥,但需进入目标日志主题的基本信息页面,在高级设置中开启匿名上传,并在匿名操作中开启 API/SDK 上传日志。
curl -fsSL https://onesuite-pilot-1254077820.cos.ap-shanghai.myqcloud.com/onesuite-pilot/installer.sh | bash -s -- install \\--cls-endpoint "<your-cls-endpoint>" \\--cls-topic-id "<your-topic-id>" \\--cls-uin "<your-account-uin>"
弱鉴权无需密钥,仅需 UIN。同样将安装器下载到本地后以
-File 方式运行:$installer = Join-Path $env:TEMP 'onesuite-installer.ps1'irm https://onesuite-pilot-1254077820.cos.ap-shanghai.myqcloud.com/onesuite-pilot/installer.ps1 -OutFile $installerUnblock-File -LiteralPath $installerpowershell -NoProfile -ExecutionPolicy Bypass -File $installer install `-Mirror "cn" `-ClsEndpoint "<your-cls-endpoint>" `-ClsTopicId "<your-topic-id>" `-ClsUin "<your-account-uin>"
鉴权优先级:若同时提供了密钥对(SecretId / SecretKey)与 UIN,则以密钥对(强鉴权)为准,UIN 被忽略;仅提供 UIN 时走弱鉴权;两者均未提供时 CLS 上报不会启用。
安装参数说明:
参数(macOS / Linux) | 参数(Windows) | 必填 | 说明 |
--cls-endpoint | -ClsEndpoint | 是 | 以广州地域为例,内网域名:ap-guangzhou.cls.tencentyun.com,外网域名:ap-guangzhou.cls.tencentcs.com。 |
--cls-topic-id | -ClsTopicId | 是 | 目标日志主题 ID(TopicId)。 |
--cls-secret-id | -ClsSecretId | 强鉴权时必填 | |
--cls-secret-key | -ClsSecretKey | 强鉴权时必填 | |
--cls-uin | -ClsUin | 弱鉴权时必填 | 账号 UIN,弱鉴权模式使用,与密钥对(SecretId / SecretKey)二选一,UIN 在配置文件中以明文存储;使用前需进入目标日志主题的基本信息页面,在高级设置中开启匿名上传,并在匿名操作中开启 API/SDK 上传日志。 |
--user-id | -UserId | 否 | 数据归属用户标识,写入上报数据的 gen_ai.user.id 字段。不指定时默认取主机名。macOS / Linux 也可写作 --userId 或 --user.id,Windows 也可写作 -user.id。 |
--user-name | -UserName | 否 | 用户展示名,映射为 gen_ai.user.name,与 userId 为两个独立字段。仅 macOS / Linux 安装脚本支持;Windows 如需设置,请在安装后编辑 config.json 添加 userName 字段并重启服务。 |
--agent-alias | -AgentAlias | 否 | 自定义 Agent 名称。配置后,上报日志中的 service.name、gen_ai.agent.type 等 Agent 字段将统一使用该值。 |
--agents | -Agents | 否 | 指定接入的 Agent 列表(逗号分隔)。不指定时自动接入所有探测到的 Agent。 |
--data-dir | -DataDir | 否 | 自定义数据目录。默认 macOS / Linux 为 ~/.onesuite-pilot,Windows 为 %USERPROFILE%\\.onesuite-pilot。 |
--mirror | -Mirror | 否 | npm 依赖下载镜像。国内网络环境建议填 cn(使用 npmmirror 镜像源),可显著提升安装成功率与速度;也可填写自定义镜像地址。填 none 表示不使用镜像。 |
--auto-update | -AutoUpdate | 否 | 自动升级,建议开启。 |
--skip-cls-check | -SkipClsCheck | 否 | 跳过安装时的 CLS 连通性与鉴权校验,直接写入配置。仅在无外网连通等特殊场景下使用,一般不建议开启。 |
安装脚本将依次完成:依赖检查 → 下载安装包 → 探测 AI Agent → 部署程序 → 安装 Hook 脚本 → 写入配置 → 注册并启动服务。出现
✅ 安装完成! 即表示部署成功。说明:
关于 userId 的取值优先级,最终生效的 userId 按以下优先级解析:
环境变量
ONESUITE_PILOT_USER_ID → 配置文件 userId → 配置文件 user.id → 主机名(兜底)。步骤2:验证安装
安装完成后,执行以下命令查看服务状态与配置信息:
onesuite-pilot status # 查看服务运行状态onesuite-pilot info # 查看版本、配置文件路径与完整配置
正常输出应包含
✅ onesuite-pilot v... is running (PID xxxxx),且 autostart: enabled。说明:
若执行命令时提示
onesuite-pilot: command not found(Windows 下为 onesuite-pilot : 无法识别),请重启终端使环境变量生效后重试;macOS / Linux 也可执行 source ~/.bashrc。该提示不影响 OneSuite-Pilot 服务运行。常用操作
完成接入后,您可参考本节内容对 Onesuite-Pilot 进行升级、配置变更、日常管理与卸载等运维操作。
常用命令
命令 | 说明 |
onesuite-pilot status | 查看服务运行状态、PID、自启状态。 |
onesuite-pilot info | 查看版本、配置文件路径、数据目录及完整配置。 |
onesuite-pilot restart | 重启服务。修改配置后须执行,重启时会强制刷出缓冲区数据。 |
onesuite-pilot stop / start | 停止 / 启动服务。 |
修改配置
若已完成安装,无需重跑安装脚本。直接编辑配置文件(macOS / Linux 为
~/.onesuite-pilot/config.json,Windows 为 %USERPROFILE%\\.onesuite-pilot\\config.json),修改后重启服务即可生效。配置文件为标准 JSON,核心结构如下。其中 flushers.cls 的鉴权字段按方式二选一:强鉴权填 secretId / secretKey,弱鉴权填 uin。下例为强鉴权配置,若使用弱鉴权,请参见下方 场景四:切换为弱鉴权(UIN)上报。{"enabled": true,"dataDir": "/Users/you/.onesuite-pilot","userId": "122855467","userName": "helloworld","agentAlias": "internal-agent","flushers": {"cls": {"endpoint": "ap-guangzhou.cls.tencentyun.com","topicId": "<your-topic-id>","secretId": "<your-secret-id>","secretKey": "<your-secret-key>"}}}
修改前请务必备份配置文件,手动编辑 config.json 时若出现 JSON 格式错误或误改字段,可能导致服务无法启动或上报异常,保留备份可在出问题时还原。
macOS / Linux:
cp ~/.onesuite-pilot/config.json ~/.onesuite-pilot/config.json.bak
Windows(PowerShell):
Copy-Item "$env:USERPROFILE\\.onesuite-pilot\\config.json" "$env:USERPROFILE\\.onesuite-pilot\\config.json.bak"
在配置文件顶层(与
dataDir 同级)加入 userId 与 userName 两个字段,然后重启服务。1. 编辑
config.json,新增以下字段:"userId": "122855467","userName": "helloworld"
2. 重启服务使配置生效:
onesuite-pilot restart
通过配置
agentAlias,可统一设置 Agent 相关日志字段的自定义名称。配置后,service.name、gen_ai.agent.type 等 Agent 字段将使用相同的自定义值。1. 编辑
config.json,增加 agentAlias 字段。例如:"agentAlias": "internal-agent"
如果
agent-alias 前还有其他字段,请在前一个字段末尾添加逗号;如果 agentAlias 是最后一个字段,则末尾不需要添加逗号。2. 重启服务使配置生效:
onesuite-pilot restart
3. 重新运行 Agent 并产生新日志,检查最新记录中的
service.name、gen_ai.agent.type 等 Agent 字段是否已更新。配置仅影响新产生的日志,历史日志不会自动更新。修改
flushers.cls 下的 endpoint(地域接入点)与 topicId(目标主题),重启后生效。例如切换到 ap-guangzhou-open 地域的新主题:"flushers": {"cls": {- "endpoint": "ap-guangzhou.cls.tencentyun.com",+ "endpoint": "ap-guangzhou-open.cls.tencentyun.com",- "topicId": "9263b751-9b29-4931-aeb9-4405cf69a2ea",+ "topicId": "3189f2f4-1f03-4f4a-b4c5-b139d037df61",...}}
注意:
切换主题时,请确认当前 SecretId / SecretKey 对新主题具备写入权限。日志写入权限由访问管理 CAM 控制(对应操作 cls:UploadLog,可精确到单个日志主题),配置方法参见 CLS 权限管理 与 CLS 访问策略模板。若新主题属于不同账号,须同步更新密钥,否则上报将因鉴权失败而被拒绝。
若不便使用密钥对(SecretId / SecretKey),可改用账号 UIN 走弱鉴权上报。使用前需先确保在目标日志主题的基本信息页面,在高级设置中开启匿名上传,并在匿名操作中勾选 API/SDK 上传日志。编辑
flushers.cls:删除 secretId / secretKey,改填 uin,重启后生效。"flushers": {"cls": {"endpoint": "ap-guangzhou.cls.tencentyun.com","topicId": "<your-topic-id>",- "secretId": "<your-secret-id>",- "secretKey": "<your-secret-key>",+ "uin": "<your-account-uin>"}}
注意:
程序按 secretId 与 secretKey 是否同时存在来判定鉴权方式:两者同时存在时走强鉴权,
uin 被忽略;两者缺失且配置了 uin 时走弱鉴权。因此启用弱鉴权时请务必移除 secretId / secretKey。UIN 以明文存储于配置文件中。修改后重启服务使配置生效:
onesuite-pilot restart
升级
Onesuite-Pilot 会持续迭代。以下情况建议升级到最新版本:
发布了新版本,您需要使用新功能或获取问题修复。
安装时未开启
--auto-update,需要手动更新到最新版本。说明:
安装时已开启
--auto-update 的用户,程序会自动升级,通常无需手动执行本命令。升级不会覆盖已有的配置文件(macOS / Linux 为 ~/.onesuite-pilot/config.json,Windows 为 %USERPROFILE%\\.onesuite-pilot\\config.json)。直接执行以下命令即可完成升级。升级过程会重新安装依赖,国内网络环境建议保留
--mirror "cn"(Windows 为 -Mirror "cn")以提升下载成功率;若无需镜像可去掉该参数。curl -fsSL https://onesuite-pilot-1254077820.cos.ap-shanghai.myqcloud.com/onesuite-pilot/installer.sh | bash -s -- upgrade \\--mirror "cn"
$installer = Join-Path $env:TEMP 'onesuite-installer.ps1'irm https://onesuite-pilot-1254077820.cos.ap-shanghai.myqcloud.com/onesuite-pilot/installer.ps1 -OutFile $installerUnblock-File -LiteralPath $installerpowershell -NoProfile -ExecutionPolicy Bypass -File $installer upgrade `-Mirror "cn"
升级完成后,可执行
onesuite-pilot info 确认版本已更新。卸载
如需卸载,重新执行安装脚本并附加
--purge 参数(Windows 为 -Purge,或按服务管理脚本提示操作),即可停止服务、移除 Hook 与自启项。数据目录(macOS / Linux 为 ~/.onesuite-pilot,Windows 为 %USERPROFILE%\\.onesuite-pilot)可按需手动清理。curl -fsSL https://onesuite-pilot-1254077820.cos.ap-shanghai.myqcloud.com/onesuite-pilot/installer.sh | bash -s -- uninstall --purge
$installer = Join-Path $env:TEMP 'onesuite-installer.ps1'irm https://onesuite-pilot-1254077820.cos.ap-shanghai.myqcloud.com/onesuite-pilot/installer.ps1 -OutFile $installerUnblock-File -LiteralPath $installerpowershell -NoProfile -ExecutionPolicy Bypass -File $installer uninstall -Purge
常见问题
安装后上报的 userId 是主机名,如何改成自定义值?
如何自定义 Agent 相关日志字段的名称?
安装时可通过 macOS / Linux 的
--agent-alias 参数或 Windows 的 -AgentAlias 参数设置。修改配置后是否需要重装?
不需要。直接编辑
config.json 并执行 onesuite-pilot restart 即可。重装会覆盖现有配置,仅在需要全新部署时使用。日志文件里为什么还是旧的 userId / 旧主题?
本地日志文件(如
logs/ 下的 metrics 文件)仅在有数据流入时刷新,空闲期保留的是历史残留值。以 config.json 与 onesuite-pilot info 的输出为准,二者即为当前实际生效配置。如何确认配置真正生效?
执行
onesuite-pilot info 查看服务加载的配置;待下一次有 Agent 活动产生数据后,检查日志文件(macOS / Linux 为 ~/.onesuite-pilot/logs/<agent>/*.jsonl,Windows 为 %USERPROFILE%\\.onesuite-pilot\\logs\\<agent>\\*.jsonl)中最新记录的字段即可确认。例如修改 userId 后检查 gen_ai.user.id 字段;修改 agentAlias 后检查 service.name、gen_ai.agent.type 和 agent.opencode.cwd 三个字段是否已更新。旧日志不会因修改配置而自动更新。为什么上报后 CLS 控制台暂时看不到新数据?
这通常是上报节奏所致,而非故障。数据采集仅在有 AI Agent 实际编码活动时发生;服务空闲时不产生新数据。新采集的数据会先在本地缓冲,待满足触发条件后统一上报。为降低网络开销、提升吞吐,Onesuite-Pilot 采用攒批上报(batch flush)机制,而非每产生一条数据即实时发送。触发一次上报需满足以下任意条件:
累积达到一定条数
到达时间间隔
积累到一定字节数


