
如何使用cropme.js允许用户上传其配置文件图像?
这是一个知识共享问答。
克罗普梅是一个很好的JS附加组件,用于使用可视滑块裁剪和旋转图像。作者提供了很好的文档,但是构建一个工作实现并不像它应该的那样简单。
我想回答的问题是:
我想让我的网站-用户上传他们的个人资料图像。该图像必须精确地为240x292像素。用户应该能够缩放和旋转他们的图像,然后裁剪到这个特定的大小,并上传到我的网站。我怎么能用作物做这些呢?
这些是需要采取的步骤:
- 显示我们希望用户加载的图像的空占位符。
- 通过单击“获取图像”按钮,用户可以从其本地文件中选择图像。
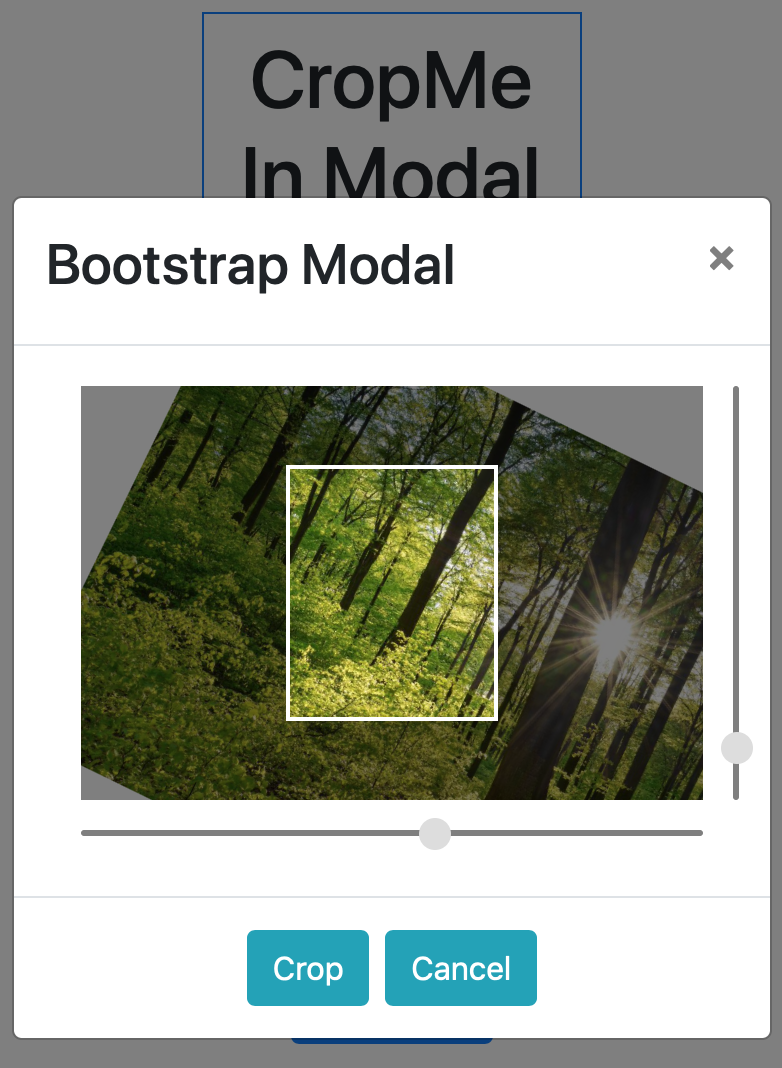
- 所选文件被加载到内存中,并显示为使用“cropme”进行编辑。用户可以使用可视滑块旋转和放大/缩小。
- 单击“裁剪”后,用户将收到裁剪后的图像,并可以决定保存图像或取消图像。
- 单击"Save“后,裁剪的图像被上传到PHP服务器,模式窗口被关闭,占位符图像被替换为指向刚刚上传的图像的链接。
那我们该怎么做呢?
回答 1
Stack Overflow用户
发布于 2020-12-29 10:44:39
这里展示了一个完全工作的演示:
https://codepen.io/ishahak/pen/XWjVzLr
我会一步一步地解释一些细节。
注意:通常在我的代码中,当您看到obj时,它只是将jQuery对象转换为一个简单的JS对象。
1.显示图像的占位符。
我们可以使用以下代码动态创建一个真实的SVG映像:
getImagePlaceholder: function(width, height, text) {
  //based on https://cloudfour.com/thinks/simple-svg-placeholder/
  var svg = '\
    <svg xmlns="http://www.w3.org/2000/svg" width="{w}" \
    height="{h}" viewBox="0 0 {w} {h}">\
    <rect fill="#ddd" width="{w}" height="{h}"/>\
    <text fill="rgba(0,0,0,0.5)" font-family="sans-serif"\
    font-size="30" dy="10.5" font-weight="bold"\
    x="50%" y="50%" text-anchor="middle">{t}</text>\
    </svg>';
  var cleaned = svg
    .replace(/{w}/g, width)
    .replace(/{h}/g, height)
    .replace('{t}', text)
    .replace(/[\t\n\r]/gim, '') // Strip newlines and tabs
    .replace(/\s\s+/g, ' ') // Condense multiple spaces
    .replace(/'/gim, '\\i'); // Normalize quotes

  var encoded = encodeURIComponent(cleaned)
    .replace(/\(/g, '%28') // Encode brackets
    .replace(/\)/g, '%29');

  return 'data:image/svg+xml;charset=UTF-8,' + encoded;
}
2.通过单击“获取图像”按钮,用户可以从其本地文件中选择图像。
这个过程涉及一个输入元素"file“,它没有可见的外观(我们用‘d’类来设置它),还有一个按钮元素,它‘单击’它来打开一个对话框:
  <button id="btnGetImage" class="btn btn-primary">Get Image</button>
  <input class="d-none" type="file" id="fileUpload" accept="image/*" />
及有关守则:
$('#btnGetImage').on('click', function(){
  //force 'change' event even if repeating same file:
  $('#fileUpload').prop("value", "");
  $('#fileUpload').click();
});
$('#fileUpload').on('change', function(){
  CiM.read_file_from_input(/*input elem*/this, function() {
    console.log('image src fully loaded');
    $('#imgModal-dialog').modal('show');
  });
});
当选择一个文件时,“change”事件正在触发,导致我们将该文件读取到内存中。
3.将选定的文件加载到内存中,并显示为使用“cropme”进行编辑。用户可以使用可视滑块旋转和放大/缩小。
我们上面提到的read_file_from_input是这样实现的:
imgHolder: null,
imgHolderCallback: null,
read_file_from_input: function(input, callback) {
  if (input.files && input.files[0]) {
      imgHolderCallback = callback;
      var reader = new FileReader();
      if (!CiM.imgHolder) {
        CiM.imgHolder = new Image();
        CiM.imgHolder.onload = function () {
           if (imgHolderCallback) {
             imgHolderCallback();
           }
        }
      }
      reader.onload = function (e) {
        console.log('image data loaded!');
        CiM.imgHolder.src = e.target.result; //listen to img:load...
      }
      reader.readAsDataURL(input.files[0]);
  }
  else {
    console.warn('failed to read file');
  }
}
当FileReader准备就绪时,我们为内部图像保持设置src,并等待'load‘事件,这表明img元素已经准备好使用新内容。
我们听那个“load”事件,当触发时我们显示模态。Bootstrap中的一个模式有几个事件。我们听一个信号,表明模式显示,这意味着宽度和设置,我们可以计划我们的作物尺寸的基础上。
update_options_for_width: function(w) {
  var o = CiM.opt, //shortcut
      vp_ratio = o.my_final_size.w / o.my_final_size.h,
      h, new_vp_w, new_vp_h;
  w = Math.floor(w * 0.9);
  h = Math.floor(w / o.my_win_ratio);
  o.container.width = w;
  o.container.height = h;
  new_vp_h = 0.6 * h;
  new_vp_w = new_vp_h * vp_ratio;
  // if we adapted to the height, but it's too wide:
  if (new_vp_w > 0.6 * w) {
    new_vp_w = 0.6 * w;
    new_vp_h = new_vp_w / vp_ratio;
  }
  new_vp_w = Math.floor(new_vp_w);
  new_vp_h = Math.floor(new_vp_h);
  o.viewport.height = new_vp_h;
  o.viewport.width = new_vp_w;
}
我们等待设置模式的大小,因为cropme必须使用特定的viewport维度来设置。在shown.bs.modal处理程序的末尾,我们创建了Cropme实例。
4.单击“裁剪”后,用户将收到裁剪后的图像,并决定保存图像或取消图像。
下面是保存按钮处理程序:
$('#imgModal-btnSave').on('click', function(){
  uploadImage(croppedImg[0], function(path_to_saved) {
    savedImg[0].src = path_to_saved;
    $('#imgModal-dialog').modal('hide');
  });
});
uploadImage函数如下所示:
uploadImage: function(img, callback){
  var imgCanvas = document.createElement("canvas"),
  imgContext = imgCanvas.getContext("2d");

  // Make sure canvas is as big as the picture (needed??)
  imgCanvas.width = img.width;
  imgCanvas.height = img.height;

  // Draw image into canvas element
  imgContext.drawImage(img, 0, 0, img.width, img.height);

  var dataURL = imgCanvas.toDataURL();

  $.ajax({
    type: "POST",
    url: "save-img.php", // see code at the bottom
    data: {
       imgBase64: dataURL
    }
  }).done(function(resp) {
    if (resp.startsWith('nok')) {
      console.warn('got save error:', resp);
    } else {
      if (callback) callback(resp);
    }
  });
}
它与一个简单的PHP脚本匹配,该脚本出现在代码页中HTML的末尾。我想这个回答太久了,所以我就在这里讲完。
祝你好运--玩得开心:)
https://stackoverflow.com/questions/65490868
复制相似问题
腾讯云开发者

Copyright © 2013 - 2026 Tencent Cloud. All Rights Reserved. 腾讯云 版权所有
深圳市腾讯计算机系统有限公司 ICP备案/许可证号:粤B2-20090059  粤公网安备44030502008569号
腾讯云计算(北京)有限责任公司 京ICP证150476号 | 京ICP备11018762号