云原生 | 在 Kubernetes 中使用 Cilium 替代 Calico 网络插件实践指南!

云原生 | 在 Kubernetes 中使用 Cilium 替代 Calico 网络插件实践指南!

全栈工程师修炼指南
发布于 2024-09-10 20:42:38
发布于 2024-09-10 20:42:38
[ 知识是人生的灯塔,只有不断学习,才能照亮前行的道路 ]
0x00 简述介绍
什么是 Cilium?
Cilium 是一款开源软件,它基于一种名为eBPF的新的Linux内核技术提供动力,用于透明地保护使用 Docker 和 Kubernetes 等Linux 容器管理平台中部署的应用程序服务之间的网络连接,Cilium 主要使用场景是在 Kubernetes 中,但 Cilium 的优势并不仅限于 Kubernetes 环境。

在 Kubernetes 环境中,Cilium 可充当网络插件,提供 pod 之间的连接。它通过执行网络策略 (network policy) 和透明加密来提供安全性,而 Cilium 的 Hubble 组件则提供了网络流量流的深度可见性(监控功能)。
得益于 eBPF,Cilium 的网络、安全和可观察性逻辑可以 直接编程到内核 中,从而使 Cilium 和 Hubble 的功能对应用工作负载完全透明。这些将是 Kubernetes 集群中的容器化工作负载,不过 Cilium 也能连接虚拟机和标准 Linux 进程等传统工作负载。
项目地址:https://github.com/cilium/cilium
文档地址:https://docs.cilium.io/en/stable/
能看到此文的看友,说明冥冥之中,必有定数,何不关注一下作者!
为啥用 Cilium & Hubble?
背景:现代数据中心应用程序的开发已转向面向服务的架构(即微服务) ,其中大型应用程序被拆分为小型独立服务,这些服务与通过使用 HTTP 等轻量级协议的 API 相互连接。微服务应用程序往往是高度动态的,单个容器在应用程序横向扩展/缩减时启动或销毁,以适应负载变化以及作为持续交付的一部分部署的滚动更新期间。传统的Linux网络安全方法(如iptables)会过滤IP地址和TCP/UDP端口,但IP地址在动态微服务环境中经常变动。容器的高度不稳定的生命周期导致这些方法难以与应用程序并行扩展,因为负载平衡表和访问控制列表承载了数十万条规则,这些规则需要以不断增长的频率进行更新。出于安全目的,协议端口(例如用于HTTP流量的TCP端口80)不能再用于区分应用程序流量,因为该端口用于跨服务的各种消息。另一个挑战是提供准确可见性的能力,因为传统系统使用IP地址作为主要识别工具,在微服务架构中,IP地址的寿命可能会大大缩短,只有几秒钟。
解决:通过利用Linux eBPF,Cilium保留了透明地插入安全可见性+强制执行的能力,但这种方式是基于 service / pod / container 的(与传统系统中的IP地址标识相反),并且可以在应用层进行过滤(例如HTTP)。它能原生理解容器和 Kubernetes 身份,并解析 HTTP、gRPC 和 Kafka 等 API 协议,提供比传统防火墙更简单、更强大的可视性和安全性。总得来说,Cilium 就是为大规模、高动态的容器化环境而设计的,实现了对系统和应用程序的可高性能、安全性以及观察性(可见性)。
功能:
- Protect and secure APIs transparently:保护现代应用程序协议,如 REST/HTTP、gRPC和Kafka。
- Secure service to service communication based on identities:将安全标识分配给共享相同安全策略的应用程序容器组。
- Secure access to and from external services:除了支持基于标签的安全性的访问控制,还支持基于CIDR(IP地址段)来限定对于应用程序容器的访问。
- Simple Networking: 支持多节点网络模型,例如,overlay 跨所有主机的基于封装的虚拟网络,Native Routing 使用原生路由使得能够访问到应用程序的IP地址。
- Load Balancing:为应用程序容器和外部服务之间的流量实现分布式负载平衡,并能够完全替换kube-proxy等组件,支持 南北/东西流量类型的负载均衡。
- Bandwidth Management: 通过高效的基于EDT(最早出发时间)的速率限制(eBPF)来实现带宽管理,以用于节点出口的容器流量。
- Monitoring and Troubleshooting: 可使用 Hubble 针对应用程序容器和外部服务之间的所有流量进行监控和故障排除,支持 Prometheus 指标的导出。
Cilium 组件概述
Cilium 和 Hubble 的部署由以下组件组成,这些组件运行 在集群中:
Cilium
- Cilium Operator:可理解为 Cilium 的管理平面或操作运维平面, 它不处于任何转发或网络策略决策的关键路径上,所以即使 Operator 暂时不可用,集群一般也能继续运行。
- Cilium Agent :以 daemonset 形式在集群中的每个节点上运行,侦听来自编排系统的事件,管理 Linux 内核用于控制所有网络的 eBPF 程序访问这些容器,与 K8S API 进行交互同步,也与 Linux Kernel 进行交互,通过文件系统 socket 与 Cilium CNI 插件可执行文件交互以获得新调度工作负载的通知,根据要求的网络策略,按需创建 DNS 和 Envoy Proxy 服务器,启用 Hubble 时创建 Hubble gRPC 服务。
- Cilium CLI client :Cilium Agent 守护进程中的每个 pod 都带有一个 Cilium Client 可执行文件,可用于检查该节点上安装的 Cilium Agent 和 eBPF map 资源的状态,它是 Cilium 的 REST API 交互 代理程序,用于与检查运行状态和 本地代理的状态。
- CNI Plugin: 此插件可执行文件安装到 Kubernetes 主机文件系统中,并重新配置节点的 CNI 以使用该插件。CNI 插件可执行文件与 Cilium Agent 分开,作为 Agent 守护程序初始化的一部分进行安装(即 install-cni-binaries init container)。需要时,Cilium CNI 插件将使用主机文件系统 socket 与运行中的 Cilium Agent 通信。
Hubble
- Hubble Server: 运行在集群中,在每个节点上运行并检索基于 eBPF 的可见性 来自 Cilium。
- Hubble Relay: 一个独立的组件,暴露所有运行 Hubble 服务器,并通过连接到它们各自的 gRPC API 并提供代表所有服务器的 API 在集群中,从而实现集群范围内的可观测性,集群中将添加 hubble relay deploy 以及两个附加服务:Hubble Observer 服务和 the Hubble Peer 服务。
- Client (CLI):一个命令行工具,可以连接到Hubble-relay的gRPC API或本地服务器以检索流事件。
- Graphical UI (GUI):图形用户界面(hubble-ui),提供图形化的服务依赖关系和连接图。
eBPF
eBPF 是一个Linux内核字节码解释器,最初用于过滤网络数据包,例如tcpdump和套接字过滤器。此后,它被扩展了额外的数据结构,如哈希表和数组,以及支持数据包处理、转发、封装等的额外操作。内核内验证器确保eBPF程序安全运行,JIT编译器将字节码转换为CPU架构特定的指令,以提高本机执行效率。eBPF程序可以在内核中的各种挂钩点运行,例如用于传入和传出数据包。Cilium 能够探测Linux内核的可用功能,并在检测到最新功能时自动使用这些功能。
Data Store
Cilium 需要一个数据存储来在 agent 之间传播 state,通常使用 Kubernetes 自定义资源定义 (CRD)或者KV存储数据库(etcd),注:可以直接利用 Kubernetes 的 etcd 集群,或者 维护专用的 etcd 集群。
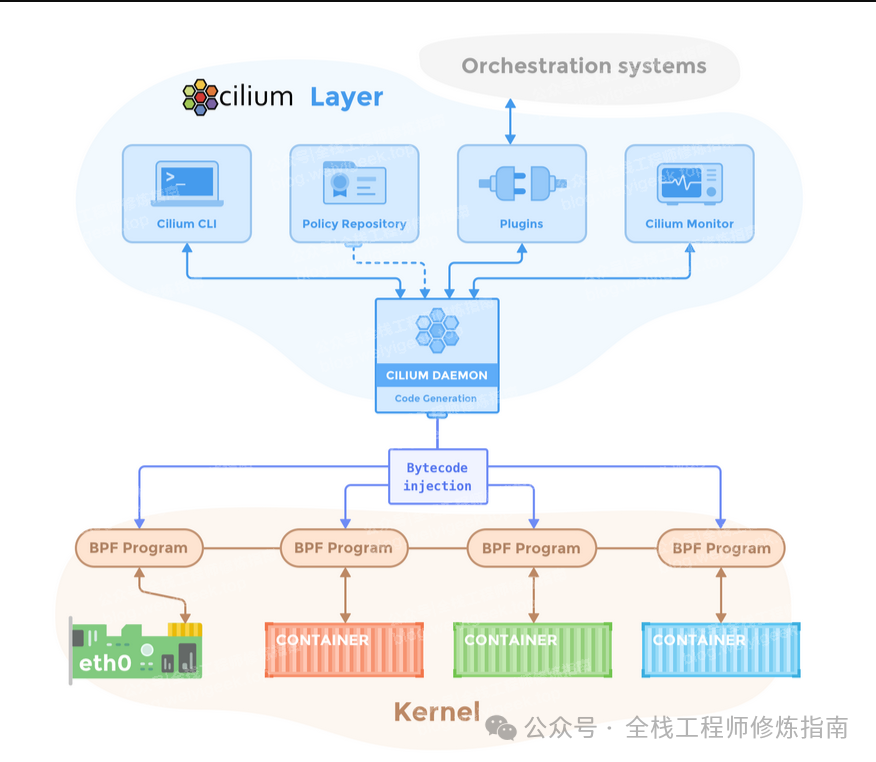
weiyigeek.top-Cilium 组件概览图
Cilium 重要概念
Cilium Endpoints:
容器 Pod 及其分配的 IP 地址,你可简单理解为基本等价于 Kubernetes 的 endpoints, 但是包含的信息更多。
$ kubectl get ciliumendpoints.cilium.io -A
  # NAMESPACE       NAME                                                              SECURITY IDENTITY   ENDPOINT STATE   IPV4           IPV6
  # cilium-test-1   perf-client-6cf4c7f9d7-prkrv                                      4668                ready            172.20.0.64
  # cilium-test-1   perf-client-other-node-6d4b466c98-p72p8                           16752               ready            172.20.1.189
  # cilium-test-1   perf-server-89f58b7c8-jzj24                                       37138               ready            172.20.0.87
  # default         nfs-storage-225-nfs-subdir-external-provisioner-6f5496bb9-86q6d   10286               ready            172.20.3.78
  # default         nginx                                                             17741               ready            172.20.3.128
  # kube-system     coredns-5b59764654-2zkws                                          9223                ready            172.20.3.172
  # kube-system     coredns-5b59764654-qrvpn                                          9223                ready            172.20.2.40
  # kube-system     hubble-relay-6c7d5d9445-qpg4p                                     28844               ready            172.20.3.138
  # kube-system     hubble-ui-59bb4cb67b-jn8s8                                        36286               ready            172.20.3.242
由上可看出,coredns 的两个 Pod 其 SECURITY IDENTITY 都是同一个 9223 。
Cilium Identity(身份):
它是 Cilium 能高效工作的关键概念,有 Cilium Endpoints 都有一个基于标签的标识。
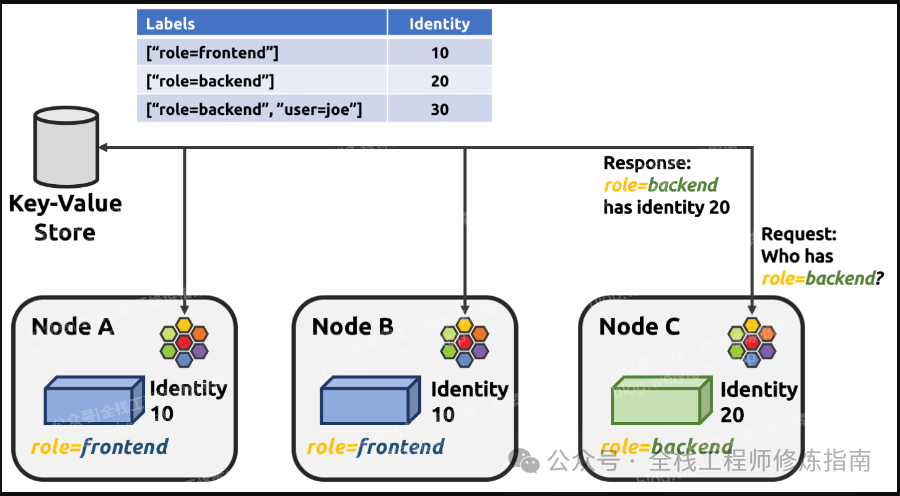
weiyigeek.top-Cilium Identity(身份标识)图
Cilium 身份由标签决定,在整个集群中是唯一的。端点会被分配与端点安全相关标签相匹配的身份,也就是说,共享同一组安全相关标签的所有端点将共享相同的身份。与每个身份相关的唯一数字标识符会被 eBPF 程序用于网络数据路径中的快速查找,这也是 Hubble 能够提供 Kubernetes 感知网络可观察性的基础。
当网络数据包进入或离开节点时,Cilium 的 eBPF 程序会将源地址和目标 IP 地址映射到相应的数字身份标识符,然后根据引用这些数字身份标识符的策略配置来决定应采取哪些数据路径行动。每个 Cilium Agent 负责通过观察相关 Kubernetes 资源的更新,用与节点上本地运行的端点相关的数字标识符更新与身份相关的 eBPF 映射。
例如,查看集群中 ciliumidentities 资源信息。
kubectl get ciliumidentities.cilium.io -A | grep -v "argocd"
  # NAME    NAMESPACE       AGE
  # 10286   default         13d
  # 16752   cilium-test-1   5h12m
  # 17741   default         17d
  # 28844   kube-system     17d
  # 36286   kube-system     28h
  # 37138   cilium-test-1   5h12m
  # 4668    cilium-test-1   5h12m
  # 9223    kube-system     18d
0x01 快速上手
1.Cilium 安装要求
在安装 Cilium 之前,请确保您的系统满足最低要求要求如下。
- 1.使用容器镜像运行 Cilium 时,需要在具有 AMD64 或 AArch64 架构的主机 以及Linux 内核 >= 5.4 或同等版本(例如,RHEL 8.6 上的 4.18)
- 2.使用二进制方式运行 Cilium 时,将其作为原生进程运行时 必须满足以下以下额外要求
clang+LLVM >= 10.0,etcd >= 3.1.0
Requirement | Minimum Version | In cilium container |
|---|---|---|
Linux kernel | >= 5.4 or >= 4.18 on RHEL 8.6 | no |
Key-Value store (etcd) | >= 3.1.0 | no |
clang+LLVM | >= 10.0 | yes |
系统要求参考文档:https://docs.cilium.io/en/stable/operations/system_requirements/
2.Cilium 安装实践
实践环境:
$ kubectl get node -o wide
NAME        STATUS   ROLES           AGE   VERSION   INTERNAL-IP      EXTERNAL-IP   OS-IMAGE                                  KERNEL-VERSION                    CONTAINER-RUNTIME
master-197   Ready    control-plane   19d   v1.30.3   192.168.10.197   <none>        Kylin Linux Advanced Server V10 (Lance)   4.19.90-52.39.v2207.ky10.x86_64   containerd://1.7.20
master-198   Ready    control-plane   19d   v1.30.3   192.168.10.198   <none>        Kylin Linux Advanced Server V10 (Lance)   4.19.90-52.39.v2207.ky10.x86_64   containerd://1.7.20
master-199   Ready    control-plane   19d   v1.30.3   192.168.10.199   <none>        Kylin Linux Advanced Server V10 (Lance)   4.19.90-52.39.v2207.ky10.x86_64   containerd://1.7.20
node-200     Ready    work            19d   v1.30.3   192.168.10.200   <none>        Kylin Linux Advanced Server V10 (Lance)   4.19.90-52.26.v2207.ky10.x86_64   containerd://1.7.20
由上实践环境可知,作者在 Kylin Linux Advanced Server V10 (Lance) 系统中部署了最新的 Kubernetes 集群,其内核版本为 4.19.90-52.39.v2207.ky10.x86_64,其版本低于 Cilium 全部功能要求的最低版本>= 5.4,这并不是说此版本集群中不能运行 Cilium,而是一些 Cilium 高级功能可能依赖于较新的内核版本,你可以按照自身需要,自行通过升级到更新的内核版本来启用。
Cilium Feature | Minimum Kernel Version |
|---|---|
Bandwidth Manager | >= 5.1 |
Egress Gateway | >= 5.2 |
VXLAN Tunnel Endpoint (VTEP) Integration | >= 5.2 |
WireGuard Transparent Encryption | >= 5.6 |
Full support for Session Affinity | >= 5.7 |
BPF-based proxy redirection | >= 5.7 |
Socket-level LB bypass in pod netns | >= 5.7 |
L3 devices | >= 5.8 |
BPF-based host routing | >= 5.10 |
Multicast Support in Cilium (Beta) (AMD64) | >= 5.10 |
IPv6 BIG TCP support | >= 5.19 |
Multicast Support in Cilium (Beta) (AArch64) | >= 6.0 |
IPv4 BIG TCP support | >= 6.3 |
快速安装
Step 1.下载指定版本的 Cilium 客户端(cilium-cli)。
# 系统架构
CLI_ARCH=amd64
# 稳定版本
CILIUM_CLI_VERSION=$(curl -s https://raw.githubusercontent.com/cilium/cilium-cli/master/stable.txt)
# 验证是否为 aarch64 系统架构
if [ "$(uname -m)" = "aarch64" ]; then CLI_ARCH=arm64; fi
# 拉取 cilium cli 客户端及其校验文件
curl -L --fail --remote-name-all https://github.com/cilium/cilium-cli/releases/download/${CILIUM_CLI_VERSION}/cilium-linux-${CLI_ARCH}.tar.gz{,.sha256sum}
# 国内环境代理下载
  # curl -L --remote-name-allhttps://down.npee.cn/?https://github.com/cilium/cilium-cli/releases/latest/download/cilium-linux-amd64.tar.gz{,.sha256sum}
# 校验是否被串改
sha256sum --check cilium-linux-${CLI_ARCH}.tar.gz.sha256sum
  # cilium-linux-amd64.tar.gz: OK

# 解压 cilium-cli 到 /usr/local/bin
sudo tar xzvfC cilium-linux-${CLI_ARCH}.tar.gz /usr/local/bin
rm cilium-linux-${CLI_ARCH}.tar.gz{,.sha256sum}

# 查看客户端版本
cilium version --client
  # cilium-cli: v0.16.15 compiled with go1.22.5 on linux/amd64
  # cilium image (default): v1.16.0
除此之外,还可通 helm 方式安装 Cilium 到集群中,选择其中一种安装即可,其参数应该八字。
# 添加仓库
helm repo add cilium https://helm.cilium.io/
# 部署cilium
helm install cilium cilium/cilium --version 1.16.0 \
   --namespace kube-system \
   --set operator.replicas=1 \
   --set k8sServiceHost=dev-lb.k8s.weiyigeek.top \
   --set k8sServicePort=16443 \
   --set tunnel=disabled \
   --set autoDirectNodeRoutes=true \
   --set ipv4NativeRoutingCIDR=172.20.0.0/16 \
   --set hubble.relay.enabled=true \
   --set hubble.ui.enabled=true
Step 2.查看可以用 Cilium 版本列表。
cilium install --list-versions | head -n 10
  # v1.16.0 (default)
  # v1.16.0-rc.2
  # v1.16.0-rc.1
  # v1.16.0-rc.0
  # v1.16.0-pre.3
Step 3.安装 Cilium 到 Kubernetes 集群中。
# 默认安装 Cilium 1.16.0 版本,其缺省参数为如下:
cilium install --dry-run-helm-values
  # cluster:
  #   name: kubernetes
  # operator:
  #   replicas: 1
  # routingMode: tunnel
  # tunnelProtocol: vxlan

# 自定义安装,注意将Pod池设置为在创建 Kubernetes 集群时 podSubnet 参数指定的值 172.16.0.0/16 ,并且启用 Hubble 来可视化展示 Cilium 网络通信关系。
cilium install \
  --set ipam.mode=kubernetes \
  --set ipam.operator.clusterPoolIPv4PodCIDRList=172.20.0.0/16 \
  --set ipam.Operator.ClusterPoolIPv4MaskSize=24 \
  --set ipv4NativeRoutingCIDR=172.20.0.0/16 \
  --set tunnel=disabled \
  --set routingMode=native \
  --set autoDirectNodeRoutes=true \
  --set ingressController.enabled=true \
  --set ingressController.loadbalancerMode=shared \
  --set hubble.enabled="true" \
  --set hubble.listenAddress=":4244" \
  --set hubble.relay.enabled="true" \
  --set hubble.ui.enabled="true"

# 高级特性
# 开启 bpf masquerade
--set bpf.masquerade=true
# 启用 bpf LegacyRouting
--set bpf.hostLegacyRouting=true

# 设置负载均衡模式
--set loadBalancer.mode=dsr     # dsr 模式
--set loadBalancer.mode=hybrid  # 混合模式,即dsr和snat两种
温馨提示:建议看友们安装时禁用隧道(tunnel)进行VXLAN 封装,而是启用本地路由(Native-Routing)可提升网络最大吞吐量,
Step 4.安装完毕后等待一会查看 Cilium 在集群中部署运行状态。
$ cilium status --wait
    /¯¯\
 /¯¯\__/¯¯\    Cilium:             OK
 \__/¯¯\__/    Operator:           OK
 /¯¯\__/¯¯\    Envoy DaemonSet:    OK
 \__/¯¯\__/    Hubble Relay:       disabled
    \__/       ClusterMesh:        disabled

DaemonSet              cilium             Desired: 4, Ready: 4/4, Available: 4/4
DaemonSet              cilium-envoy       Desired: 4, Ready: 4/4, Available: 4/4
Deployment             cilium-operator    Desired: 1, Ready: 1/1, Available: 1/1
Containers:            cilium             Running: 4
                       cilium-envoy       Running: 4
                       cilium-operator    Running: 1
Cluster Pods:          2/2 managed by Cilium
.....

weiyigeek.top-查看 Cilium 运行状态图
温馨提示:若安装报错请验证系统内核版本是否满足要求,其次是所需镜像是否拉取成功,若无法拉取镜像可以使用访问国外网站的代理方式拉取镜像到本地或私有镜像仓库中,或者在containerd设置 quay.io 仓库的镜像站点,若仍然报错请使用如下命令kubectl logs -f -n kube-system查看 Cilium Pod 运行日志。
# Image versions
cilium             quay.io/cilium/cilium:v1.16.0@sha256:46ffa4ef3cf6d8885dcc4af5963b0683f7d59daa90d49ed9fb68d3b1627fe058: 4
cilium-envoy       quay.io/cilium/cilium-envoy:v1.29.7-39a2a56bbd5b3a591f69dbca51d3e30ef97e0e51@sha256:bd5ff8c66716080028f414ec1cb4f7dc66f40d2fb5a009fff187f4a9b90b566b: 4
hubble-relay       quay.io/cilium/hubble-relay:v1.16.0@sha256:33fca7776fc3d7b2abe08873319353806dc1c5e07e12011d7da4da05f836ce8d: 1
cilium-operator    quay.io/cilium/operator-generic:v1.16.0@sha256:d6621c11c4e4943bf2998af7febe05be5ed6fdcf812b27ad4388f47022190316: 1
hubble-ui          quay.io/cilium/hubble-ui:v0.13.1@sha256:e2e9313eb7caf64b0061d9da0efbdad59c6c461f6ca1752768942bfeda0796c6: 1
hubble-ui          quay.io/cilium/hubble-ui-backend:v0.13.1@sha256:0e0eed917653441fded4e7cdb096b7be6a3bddded5a2dd10812a27b1fc6ed95b: 1
温馨提示:若想拉取 docker hub 仓库镜像到本地或私有镜像仓库中,请使用如下脚本快速拉取并上传,需要科学代理地址。
# skopeo-proxy-copy.sh
#!/bin/bash
export proxy="http://10.10.172.106:10809"
export http_proxy=$proxy
export https_proxy=$proxy
export no_proxy="localhost, 127.0.0.1, ::1, harbor.weiyigeek.top"

src=$1
dest=harbor.weiyigeek.top/devops/${src#*/}
echo "src images : $src"
echo "dest images : $dest"
skopeo copy --insecure-policy --src-tls-verify=false --dest-tls-verify=false docker://$1 docker://${dest}
相关文章参考:
- 运维实践 | KylinOS国产系统部署Harbor企业私有镜像仓库
- 运维实践 | 巧用CF的Workers完美解决Docker镜像国内无法拉取
- 运维工具 | 如何使用Skopeo做一个优雅的镜像搬运工
- 网安等保 | 主机安全之KylinOS银河麒麟服务器配置优化与安全加固基线文档脚本分享
Step 5.进行 Cilium 网络通信压力和Pod连通性测试。
# 连通性测试
$ cilium connectivity test --request-timeout 30s --connect-timeout 10s
  # ℹ️  Monitor aggregation detected, will skip some flow validation steps
  # ✨ [kubernetes] Creating namespace cilium-test-1 for connectivity check...
  # ✨ [kubernetes] Deploying echo-same-node service...
  # ✨ [kubernetes] Deploying DNS test server configmap...
  # ✨ [kubernetes] Deploying same-node deployment...
  # ✨ [kubernetes] Deploying client deployment...
  # ✨ [kubernetes] Deploying client2 deployment...
  # ✨ [kubernetes] Deploying client3 deployment...
  # ✨ [kubernetes] Deploying echo-other-node service...
  # ✨ [kubernetes] Deploying other-node deployment...
  # ✨ [host-netns] Deploying kubernetes daemonset...
  # ✨ [host-netns-non-cilium] Deploying kubernetes daemonset...
  # ℹ️  Skipping tests that require a node Without Cilium
  # ⌛ [kubernetes] Waiting for deployment cilium-test-1/client to become ready...
  # ⌛ [kubernetes] Waiting for deployment cilium-test-1/client2 to become ready...
  # ⌛ [kubernetes] Waiting for deployment cilium-test-1/echo-same-node to become ready...

# 使用本地路由 (Native-Routing) 压力测试
cilium connectivity perf
-------------------------------------------------------------------------------------
📋 Scenario        | Node       | Test            | Duration        | Throughput Mb/s
-------------------------------------------------------------------------------------
📋 pod-to-pod      | same-node  | TCP_STREAM      | 10s             | 1524.47  # 相同节点Pod间通信速率
📋 pod-to-pod      | same-node  | UDP_STREAM      | 10s             | 1679.61
📋 pod-to-pod      | other-node | TCP_STREAM      | 10s             | 2122.00  # 不同节点pod间平均通信速率
📋 pod-to-pod      | other-node | UDP_STREAM      | 10s             | 1666.43
-------------------------------------------------------------------------------------
✅ [cilium-test-1] All 1 tests (10 actions) successful, 0 tests skipped, 0 scenarios skipped.
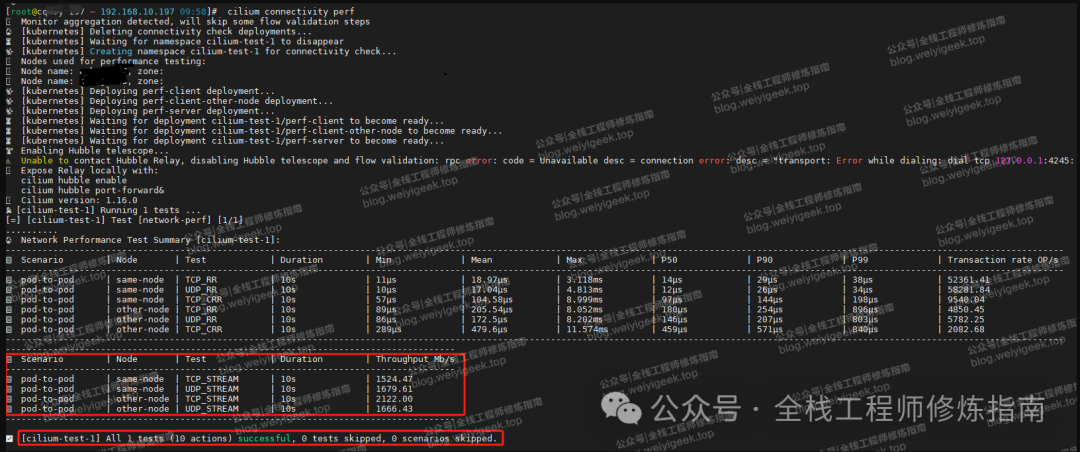
weiyigeek.top-cilium 通信压力测试图
或者,使用 iperf3 进行原生路由的压力测试,我们在每个节点上运行 iperf3 测试容器,任意找两台一个server端、一个client端收集结果。
镜像构建:
# 编写 Dockerfile
mkdir /opt/images/clearlinux/iperf && cd /opt/images/clearlinux/iperf
wget -L https://down.npee.cn/?https://raw.githubusercontent.com/clearlinux/docker-brew-clearlinux/base/base.tar.xz -O base.tar.xz
tee -a Dockerfile <<'EOF'
FROM scratch
MAINTAINER William Douglas <william.douglas@intel.com>
ADD base.tar.xz /
RUN cd /etc && \
    grep root /usr/share/defaults/etc/passwd > /etc/passwd && \
    grep root /usr/share/defaults/etc/group > /etc/group && \
    echo 'root:!:::::::' > /etc/shadow && \
    swupd update && \
    swupd bundle-add iperf && \
    swupd clean
CMD ["/bin/bash"]
EOF

# 镜像构建
docker build -t harbor.weiyigeek.top/devops/iperf3:clearlinux-v42280 -f Dockerfile .

# 镜像上传
docker push harbor.weiyigeek.top/devops/iperf3:clearlinux-v42280
资源清单:
tee daemonSet-iperf3.yaml <<'EOF'
apiVersion: apps/v1
kind: DaemonSet
metadata:
   name: iperf3
   labels:
      app: iperf3
spec:
   selector:
      matchLabels:
        app: iperf3
   template:
      metadata:
         labels:
            app: iperf3
      spec:
         containers:
         -  name: iperf3
            image: harbor.weiyigeek.top/devops/iperf3:clearlinux-v42280
            command: ['/bin/sh', '-c', 'sleep 1d']
            ports:
            - containerPort: 5201
EOF
# 部署
kubectl apply -f daemonSet-iperf3.yaml
部署测试:
# 1.测试 VM 间原生带宽(以 master 节点 198 为 Client、工作节点 200 为 Server), Ubuntu 、Redhat 安装 iperf3
yum install iperf3
apt install iperf3

# 工作节点:Node 作为 服务端
[root@node-200 ~ 192.168.10.200 17:17]# iperf3 -s -f M
  # -----------------------------------------------------------
  # Server listening on 5201
  # -----------------------------------------------------------
  # Accepted connection from 192.168.10.198, port 50482

# 控制节点:Master 作为 客户端
[root@master-198 ~ 192.168.10.198 17:17]# iperf3 -c 192.168.10.200 -f M
  # Connecting to host 192.168.10.200, port 5201
  # [  5] local 192.168.10.198 port 50498 connected to 192.168.10.200 port 5201
  # [ ID] Interval           Transfer     Bitrate         Retr  Cwnd
  # [  5]   0.00-1.00   sec  1.08 GBytes  1103 MBytes/sec  363   1.57 MBytes
  # [  5]   1.00-2.00   sec  1.09 GBytes  1114 MBytes/sec   74   1.47 MBytes
  # [  5]   2.00-3.00   sec  1.08 GBytes  1109 MBytes/sec   28   1.20 MBytes
  # [  5]   3.00-4.00   sec  1.08 GBytes  1107 MBytes/sec    0   1.58 MBytes
  # [  5]   4.00-5.00   sec  1.08 GBytes  1105 MBytes/sec   57   1.27 MBytes
  # [  5]   5.00-6.00   sec  1.07 GBytes  1091 MBytes/sec   27   1.62 MBytes
  # [  5]   6.00-7.00   sec  1.08 GBytes  1108 MBytes/sec    9   1.54 MBytes
  # [  5]   7.00-8.00   sec  1.09 GBytes  1114 MBytes/sec    0   1.64 MBytes
  # [  5]   8.00-9.00   sec  1.08 GBytes  1109 MBytes/sec   47   1.49 MBytes
  # [  5]   9.00-10.00  sec  1.07 GBytes  1099 MBytes/sec    0   1.65 MBytes
  # - - - - - - - - - - - - - - - - - - - - - - - - -
  # [ ID] Interval           Transfer     Bitrate         Retr
  # [  5]   0.00-10.00  sec  10.8 GBytes  1106 MBytes/sec  605             sender
  # [  5]   0.00-10.04  sec  10.8 GBytes  1101 MBytes/sec                  receiver   # 结果为 1101 MBytes/sec 带宽.
  # iperf Done.

# 2.使用容器内 iperf3 测试
# Server (iperf3-lnwfn) 运行的命令为:
kubectl exec -it iperf3-vjcdx -- iperf3 -s -f M
# Client (iperf3-g84hd) 运行的命令为:
kubectl exec -it iperf3-6lfqg -- iperf3 -c 172.20.3.236 -f M
# 结果:
# Connecting to host 172.20.3.236, port 5201
# [  5] local 172.20.1.174 port 50318 connected to 172.20.3.236 port 5201
# [ ID] Interval           Transfer     Bitrate         Retr  Cwnd
# [  5]   0.00-1.00   sec  1.06 GBytes  1090 MBytes/sec  985   1.39 MBytes
# [  5]   1.00-2.00   sec  1.09 GBytes  1112 MBytes/sec   13   1.53 MBytes
# [  5]   2.00-3.00   sec  1.07 GBytes  1100 MBytes/sec   60   1.59 MBytes
# [  5]   3.00-4.00   sec  1.08 GBytes  1107 MBytes/sec   32   2.03 MBytes
# [  5]   4.00-5.00   sec  1.07 GBytes  1095 MBytes/sec  315   1.45 MBytes
# [  5]   5.00-6.00   sec  1.09 GBytes  1112 MBytes/sec    0   1.92 MBytes
# [  5]   6.00-7.00   sec  1.07 GBytes  1100 MBytes/sec  301   1.28 MBytes
# [  5]   7.00-8.00   sec  1.08 GBytes  1106 MBytes/sec    0   1.81 MBytes
# [  5]   8.00-9.00   sec  1.07 GBytes  1100 MBytes/sec  114   1.73 MBytes
# [  5]   9.00-10.00  sec  1.08 GBytes  1108 MBytes/sec  185   1.66 MBytes
# - - - - - - - - - - - - - - - - - - - - - - - - -
# [ ID] Interval           Transfer     Bitrate         Retr
# [  5]   0.00-10.00  sec  10.8 GBytes  1104 MBytes/sec  2005             sender
# [  5]   0.00-10.00  sec  10.8 GBytes  1104 MBytes/sec                  receiver   # 结果为 1104 MBytes/sec 带宽,与 VM 原生传输速度的相差无几。

# iperf Done.
最后,创建一个nginx Pod,查看创建Pod的地址,并测试访问。
kubectl run nginx --image=nginx:latest --port=80
kubectl expose pod nginx --type=NodePort --name=my-app-service --port=80 --target-port=80
  # service/my-app-service exposed
Step 6.查看 Cilium Install 具体启用了哪些功能:
kubectl get daemonsets.apps -n kube-system
  # NAME           DESIRED   CURRENT   READY   UP-TO-DATE   AVAILABLE   NODE SELECTOR            AGE
  # cilium         4         4         4       4            4           kubernetes.io/os=linux   17d
  # cilium-envoy   4         4         4       4            4           kubernetes.io/os=linux   17d
  # kube-proxy     4         4         4       4            4           kubernetes.io/os=linux   19d

kubectl -n kube-system exec ds/cilium -- cilium status

# 关键特性:
KubeProxyReplacement: False Cilium 是没有完全替换掉 kube-proxy 的,后面找个时间再写一篇文章介绍下如何替换。

IPv6 BIG TCP: Disabled 该功能要求 Linux Kernel >= 5.19, 所以在 Kernel 4.19.232 状态为禁用。
BandwidthManager: Disabled 该功能要求 Linux Kernel >= 5.1, 所以目前是禁用的
Host Routing: Legacy Legacy Host Routing 还是会用到 iptables, 性能较弱;但是 BPF-based host routing 需要 Linux Kernel >= 5.10
Masquerading: IPtables IP 伪装有几种方式:基于 eBPF 的,和基于 iptables 的。默认使用基于 iptables, 推荐使用 基于 eBPF 的。
Hubble: OK 默认 Hubble 是禁用的,前面我们手动安装的 Cilium 时已启用 Hubble。
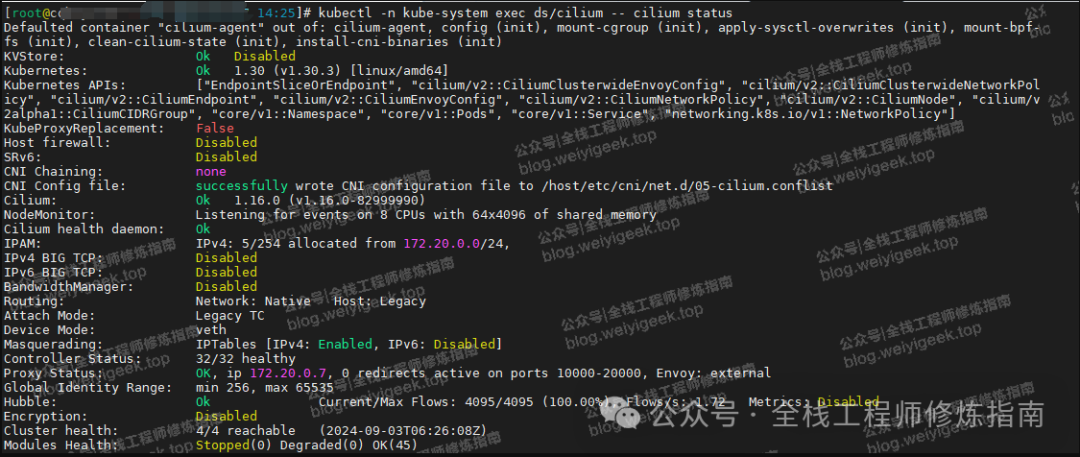
weiyigeek.top-查看 Cilium 功能启用图
Step 7.暴露 Cilium Hubble UI 端口,使用浏览器访问 Hubble 可视化查看 Cilium 网络通信 。
kubectl get svc -n kube-system | grep "hubble"
  # hubble-peer      ClusterIP      10.90.182.126   <none>        443/TCP                      17d
  # hubble-relay     ClusterIP      10.90.28.87     <none>        80/TCP                       15d
  # hubble-ui        ClusterIP      10.90.170.47    <none>        80/TCP                       23h

kubectl port-forward -n kube-system --address 0.0.0.0 svc/hubble-ui 31085:80
  # Forwarding from 0.0.0.0:31085 -> 8081
  # Handling connection for 31085
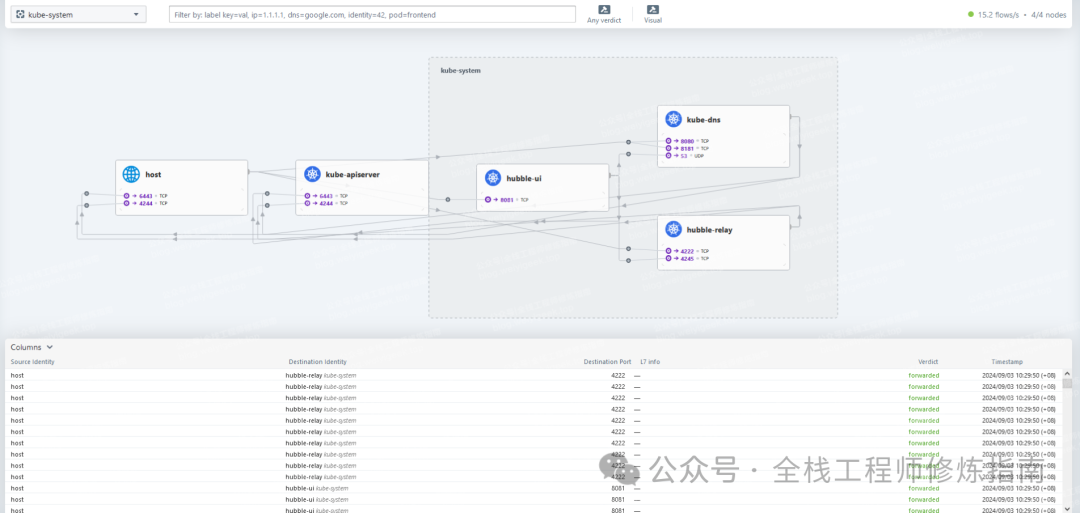
weiyigeek.top-Cilium Hubble UI界面图
温馨提示:若在安装 Cililum 时,未启用 hubble 组件,则 Hubble UI 无法访问,此时可执行 cilium hubble enable --ui 命令来启用 Hubble 组件,后续也可通过 ingress 俩将 hubble-ui 暴露到集群外部。
若文章写得不错,不要吝惜手中转发,点赞、在看,若有疑问的小伙伴,可在评论区留言你想法哟💬!
本文参与 腾讯云自媒体同步曝光计划,分享自微信公众号。
原始发表:2024-09-03,如有侵权请联系 cloudcommunity@tencent.com 删除
评论
登录后参与评论
推荐阅读
目录
腾讯云开发者

Copyright © 2013 - 2026 Tencent Cloud. All Rights Reserved. 腾讯云 版权所有
深圳市腾讯计算机系统有限公司 ICP备案/许可证号:粤B2-20090059 ![]() 粤公网安备44030502008569号
粤公网安备44030502008569号
腾讯云计算(北京)有限责任公司 京ICP证150476号 | 京ICP备11018762号