自定义mybatis插件实现读写分离

自定义mybatis插件实现读写分离

一只牛博
发布于 2025-05-31 10:12:15
发布于 2025-05-31 10:12:15
前言
在数据库的世界里,读写分离就像是一场神奇的变形术表演,能够让我们的应用程序更加稳定和高效。而MyBatis插件就像是一把神奇的魔杖,能够帮助我们实现数据库的读写分离。它就像是一位魔术师,能够在不同的数据库之间灵活切换,让我们的应用程序如虎添翼。现在,就让我们一起来揭开MyBatis插件的神秘面纱,探索它的魅力所在吧!
场景分析
要实现读写分离我们首先应该具备以下条件
1、多数据源场景,且可以动态切换数据源
2、在mybatis创建连接之前切换到想要的数据源
3、需要执行规则实现读写分离
大致就是上面的三点
前置配置讲解
# 数据源配置
spring.datasource.mysql.primary.url=jdbc:mysql://127.0.0.1:3361/base_sb?nullDatabaseMeansCurrent=true&characterEncoding=utf8&serverTimezone=Asia/Shanghai
spring.datasource.mysql.primary.username=root
spring.datasource.mysql.primary.password=123456
spring.datasource.mysql.primary.driver-class-name=com.mysql.cj.jdbc.Driver
# 数据源配置
spring.datasource.mysql.slave1.url=jdbc:mysql://127.0.0.1:3351/dingding_mid?characterEncoding=utf8&serverTimezone=UTC
spring.datasource.mysql.slave1.username=root
spring.datasource.mysql.slave1.password=123456
spring.datasource.mysql.slave1.driver-class-name=com.mysql.cj.jdbc.Driver@Bean(name = DataSourceType.PRIMARY)
@ConfigurationProperties(prefix = "spring.datasource.mysql.primary")
public DataSource primaryDataSource() {
log.info("主数据库连接池创建中.......");
return DruidDataSourceBuilder.create().build();
}
@Bean(name = DataSourceType.SECOND)
@ConfigurationProperties(prefix = "spring.datasource.mysql.slave1")
public DataSource secondDataSource() {
log.info("second数据库连接池创建中.......");
return DruidDataSourceBuilder.create().build();
}上面是我的数据源,需要实现的就是当进行查询的时候我会走到slave1。
注意:我这里仅仅是为了展示效果,真正的读写分离是读库和写库一模一样,唯一的区别是读库read_only=1,也就是只读状态,并且他们的关系还是主从关系。
数据源切换实现
springboot整合多数据源的配置以及动态切换数据源,注解切换数据源
代码实现(插件)
package com.todoitbo.baseSpringbootDasmart.interceptor;

import com.todoitbo.baseSpringbootDasmart.multiDataSource.DataSourceContextHolder;
import com.todoitbo.baseSpringbootDasmart.multiDataSource.DataSourceType;
import org.apache.ibatis.executor.statement.StatementHandler;
import org.apache.ibatis.mapping.MappedStatement;
import org.apache.ibatis.plugin.*;
import org.apache.ibatis.reflection.MetaObject;
import org.apache.ibatis.reflection.SystemMetaObject;
import org.springframework.stereotype.Component;

import java.sql.Connection;
import java.util.Properties;

/**
 * @author xiaobo
 */
@Intercepts({
    @Signature(type = StatementHandler.class, method = "prepare", args = {Connection.class, Integer.class})
})
@Component
public class RoutingInterceptor implements Interceptor {

    @Override
    public Object intercept(Invocation invocation) throws Throwable {
        StatementHandler statementHandler = (StatementHandler) invocation.getTarget();

        // 使用MetaObject获取MappedStatement
        MetaObject metaObject = SystemMetaObject.forObject(statementHandler);
        while (metaObject.hasGetter("h")) {
            Object object = metaObject.getValue("h");
            metaObject = SystemMetaObject.forObject(object);
        }
        while (metaObject.hasGetter("target")) {
            Object object = metaObject.getValue("target");
            metaObject = SystemMetaObject.forObject(object);
        }
        // 通过反射获取到当前MappedStatement高版本没这个类了
        // MappedStatement mappedStatement = (MappedStatement) MetaObjectUtils.getFieldValue(statementHandler, "delegate.mappedStatement");
        MappedStatement mappedStatement = (MappedStatement) metaObject.getValue("delegate.mappedStatement");
        String sqlCommandType = mappedStatement.getSqlCommandType().toString();

        // 根据SQL命令类型,动态切换数据源
        if ("SELECT".equals(sqlCommandType)) {
            // 设置为数据库1的连接
            DataSourceContextHolder.setDataSource(DataSourceType.SECOND);
        } else {
            // 设置为数据库2的连接
            DataSourceContextHolder.setDataSource(DataSourceType.PRIMARY);
        }

        // 继续执行原有逻辑
        return invocation.proceed();
    }

    @Override
    public Object plugin(Object target) {
        // 当目标类是StatementHandler类型时,才包装目标类,否则直接返回
        if (target instanceof StatementHandler) {
            return Plugin.wrap(target, this);
        } else {
            return target;
        }
    }

    @Override
    public void setProperties(Properties properties) {
        // 这里可以接收到配置文件中的属性
    }
}
说明
当然,让我们逐一解析 RoutingInterceptor 类的主要方法:
- intercept(Invocation invocation): 这是拦截器的核心方法,当被拦截的方法(在本例中是
StatementHandler的prepare方法)被调用时,这个方法会被执行。 在这个方法中,首先获取了StatementHandler对象,然后通过MetaObject获取了MappedStatement对象。根据MappedStatement中的sqlCommandType判断当前执行的 SQL 是查询还是非查询,然后用DataSourceContextHolder.setDataSource()方法动态设置数据源,最后调用invocation.proceed()继续执行原有逻辑。 - plugin(Object target): 这个方法用于包装目标对象。当目标对象是
StatementHandler类型时,使用Plugin.wrap(target, this)方法包装目标对象,这样当目标对象的方法被调用时,会先调用intercept方法。如果目标对象不是StatementHandler类型,直接返回目标对象。 - setProperties(Properties properties): 这个方法可以用于从配置文件中接收属性,但在这个拦截器中并未使用。
以上就是 RoutingInterceptor 类的主要方法。这个类实现了 MyBatis 的 Interceptor 接口,通过 @Intercepts 和 @Signature 注解指定了要拦截的方法,然后在 intercept 方法中实现了动态数据源路由的逻辑。
注意
重点提一下需要注意的点
如果你除了这个拦截插件用到切换数据源之外还有别的,比如上面提到的数据源的切换,你定义了一个AOP,这个切点是service上,而你的这个service下又有数据库操作,那么这个很容易导致切换数据源失败
实现效果
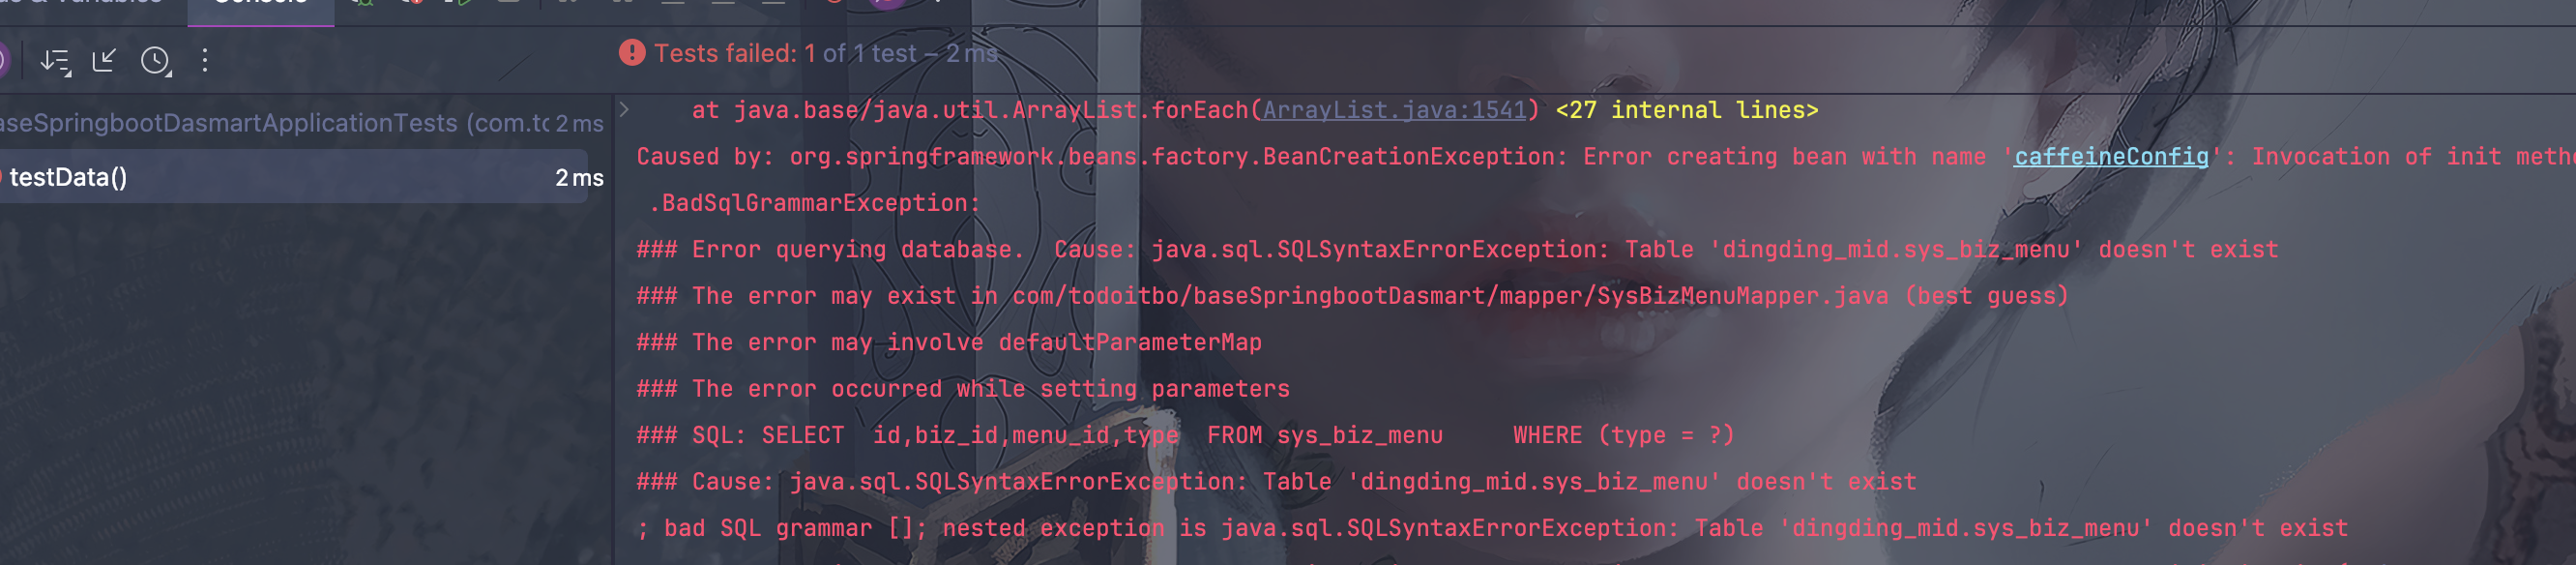
因为我的AOP干扰整整解决了1个多小时,弱弱的说自己一句好菜。终于等到了这个异常,也就是我的查询走的表是另一个库的表,而这个库并没有这个表。大公告成,完美收工
本文参与 腾讯云自媒体同步曝光计划,分享自作者个人站点/博客。
原始发表:2025-05-30,如有侵权请联系 cloudcommunity@tencent.com 删除
目录
腾讯云开发者

Copyright © 2013 - 2026 Tencent Cloud. All Rights Reserved. 腾讯云 版权所有
深圳市腾讯计算机系统有限公司 ICP备案/许可证号:粤B2-20090059  粤公网安备44030502008569号
腾讯云计算(北京)有限责任公司 京ICP证150476号 | 京ICP备11018762号