Spring Security 6.x 集成Spring Session实现分布式会话共享
原创
Spring Security 6.x 集成Spring Session实现分布式会话共享
原创
fullstackyang
发布于 2024-08-04 23:12:26
发布于 2024-08-04 23:12:26

在上一篇详细介绍了Spring Security中基于Session的认证管理机制,其中大部分操作都是建立在Tomcat容器内部面向内存的Session管理能力之上,但在分布式环境中,通常不会将Session维护在Servlet容器的内存中,多个容器之间需要实现Session共享,其解决方案也有不少,例如IP绑定,Session同步等,这些方案在架构层面缺乏灵活性和扩展性,其实从本质上来说,问题的根本在于Session和容器之间的耦合问题,那么自然就会想到将Session从容器中分离出来,存储在诸如数据库,redis,MongoDB等第三方中间件中,不过会带来基本的网络通信成本,为了在一定程度上弥补性能上的损失,大多数情况会选择Redis作为存储Session的中间件,基于这个思路,Spring也提供了一套通用的分布式会话共享框架,即Spring Session,本文主要介绍如何整合和使用Spring Security和Spring Session这两个框架,以及一些背后的基本原理。
一、基本配置
1.1 引入依赖
跟前几篇相似,Spring Boot使用3.3.0版本,然后添加相关依赖,由于已经在spring-boot-dependencies中声明过,这里直接引入spring-session-data-redis和spring-boot-starter-data-redis即可
<properties>
    <maven.compiler.source>17</maven.compiler.source>
    <maven.compiler.target>17</maven.compiler.target>
    <project.build.sourceEncoding>UTF-8</project.build.sourceEncoding>
    <spring-boot.version>3.3.0</spring-boot.version>
</properties>

<dependencyManagement>
    <dependencies>
        <dependency>
            <groupId>org.springframework.boot</groupId>
            <artifactId>spring-boot-dependencies</artifactId>
            <version>${spring-boot.version}</version>
            <type>pom</type>
            <scope>import</scope>
        </dependency>
    </dependencies>
</dependencyManagement>


<dependencies>
    ...
    <dependency>
        <groupId>org.springframework.boot</groupId>
        <artifactId>spring-boot-starter-data-redis</artifactId>
    </dependency>
    <dependency>
        <groupId>org.springframework.session</groupId>
        <artifactId>spring-session-data-redis</artifactId>
    </dependency>
</dependencies>
1.2 添加配置
在Spring Session提供两个SessionRepository实现,默认实现为RedisSessionRepository,它的逻辑比较简单,在redis中只维护了一个key,即spring:session:sessions:{sessionId},因此它只能提供findBySessionId等基础功能,另一个实现是RedisIndexedSessionRepository,相比之下功能更加强大,这里我们选择使用RedisIndexedSessionRepository(下一节说明其实现细节)
如果使用Spring Boot框架,则无需手动添加@EnableRedisHttpSession,仅需要在配置文件中添加redis配置即可,并指定repository-type为indexed,这样就会自动注入RedisIndexedSessionRepository的实例。
spring:
  session:
    redis:
      repository-type: indexed
    timeout: 3600 # session过期时间(单位为秒),默认是30分钟,这里调整为1个小时
  data:
    redis:
      host: localhost
      port: 6379
1.3 整合Spring Security
Spring Session与Spring Security的整合主要是通过SessionRegistry接口实现的,我们需要使用Spring Session自动注入的RedisIndexedSessionRepository,并用它来创建一个SpringSessionBackedSessionRegistry的Bean对象,用于将SessionRegistry默认实现SessionRegistryImpl替换为SpringSessionBackedSessionRegistry
@Configuration
public class SpringSessionConfiguration {

    @Bean
    public SessionRegistry sessionRegistry(RedisIndexedSessionRepository sessionRepository) {
        return new SpringSessionBackedSessionRegistry<>(sessionRepository);
    }

    @Bean
    public SpringSessionRememberMeServices rememberMeServices() {
        SpringSessionRememberMeServices rememberMeServices = new SpringSessionRememberMeServices();
        rememberMeServices.setAlwaysRemember(true);
        return rememberMeServices;
    }
}
在上一篇介绍过,在Session并发控制时需要依赖Sessionregistry对Session进行维护,因此这里对SessionManagement DSL进行配置,将上述sessionRegistry实例注入进来,另外,Spring Session还提供了RememberMeServices的实现类SpringSessionRememberMeServices,可以用于在RememberMeAuthenticationFilter这个过滤器中替换默认实现TokenBasedRememberMeServices,它实现RememberMe的方式非常简单,即将Redis中存储的Session过期时间调整为默认的30天,其源码也比较简单,这里就不贴了。在实际生产中,可以根据需要确定是否启用Spring Session提供的组件。
至于其他配置,依然使用在《微信公众平台OAuth2授权实战》一文中给出的代码。
@Slf4j
@EnableWebSecurity
@Configuration
public class SpringSecurityConfiguration {

    @Resource
    private ClientRegistrationRepository clientRegistrationRepository;

    @Resource
    private SessionRegistry sessionRegistry;

    @Resource
    private SpringSessionRememberMeServices rememberMeServices;

    @Bean
    public SecurityFilterChain filterChain(HttpSecurity http) throws Exception {
        // 注入自定义OAuth2AuthorizationRequestResolver对象
        http.oauth2Login(oauth2 -> oauth2
                .authorizationEndpoint(authorization -> authorization.authorizationRequestResolver(authorizationRequestResolver(clientRegistrationRepository)))
                .tokenEndpoint(token -> token.accessTokenResponseClient(accessTokenResponseClient()))
                .userInfoEndpoint(userInfo -> userInfo.userService(userService()))
        );
        // 添加Session管理配置,并注入SessionRegistry
        http.sessionManagement(session -> session.sessionConcurrency(concurrency -> concurrency.maximumSessions(1).sessionRegistry(sessionRegistry)));
        // 添加rememberMe配置,并注入SpringSessionRememberMeServices
        http.rememberMe(rememberMe->rememberMe.rememberMeServices(rememberMeServices));

        DefaultSecurityFilterChain filterChain = http.build();
        filterChain.getFilters().stream().map(Object::toString).forEach(log::info);
        return filterChain;
    }
    ...
}
二、测试验证
为了简单验证一下Spring Session的效果,在本机上直接使用docker拉起一个redis服务
docker run -p 6379:6379 --name redis redis启动程序,然后打开微信开发者工具,访问授权端点,在完成微信公众平台OAuth2认证之后,然后查看一下Redis存储的情况。
127.0.0.1:6379> keys *
1) "spring:session:index:org.springframework.session.FindByIndexNameSessionRepository.PRINCIPAL_NAME_INDEX_NAME:\xe6\x9d\xa8\xe6\xb4\x8b.AI\xf0\x9f\x90\xb3"
2) "spring:session:expirations:1722094320000"
3) "spring:session:sessions:expires:19460f32-2d12-4339-be42-254b641989b4"
4) "spring:session:sessions:19460f32-2d12-4339-be42-254b641989b4"

127.0.0.1:6379> hgetAll spring:session:sessions:19460f32-2d12-4339-be42-254b641989b4
 1) "creationTime"
 2) "\xac\xed\x00\x05sr\x00\x0ejava.lang.Long;\x8b\xe4\x90\xcc\x8f#\xdf\x02\x00\x01J\x00\x05valuexr\x00\x10java.lang.Number\x86\xac\x95\x1d\x0b\x94\xe0\x8b\x02\x00\x00xp\x00\x00\x01\x90ZS\x16\xa9"
 3) "maxInactiveInterval"
 4) "\xac\xed\x00\x05sr\x00\x11java.lang.Integer\x12\xe2\xa0\xa4\xf7\x81\x878\x02\x00\x01I\x00\x05valuexr\x00\x10java.lang.Number\x86\xac\x95\x1d\x0b\x94\xe0\x8b\x02\x00\x00xp\x00'\x8d\x00"
 5) "sessionAttr:org.springframework.security.oauth2.client.web.HttpSessionOAuth2AuthorizationRequestRepository.AUTHORIZATION_REQUEST"
 6) ""
 7) "sessionAttr:SPRING_SECURITY_CONTEXT"
 8) "\xac\xed\x00\x05sr\x00=org.springframework.security.core.context.SecurityContextImpl\x00\x00\x00\x00\x00\x00\x02l\x02\x00\x01L\x00\x0eauthenticationt\x002Lorg/springframework/security/core/Authentication;xpsr\x00Sorg.springframework.security.oauth2.client.authentication.OAuth2AuthenticationToken\x00\x00\x00\x00\x00\x00\x02l\x02\x00\x02L\x00\x1eauthorizedClientRegistrationIdt\x00\x12Ljava/lang/String;L\x00\tprincipalt\x00:Lorg/springframework/security/oauth2/core/user/OAuth2User;xr\x00Gorg.springframework.security.authentication.AbstractAuthenticationToken\xd3\xaa(~nGd\x0e\x02\x00\x03Z\x00\rauthenticatedL\x00\x0bauthoritiest\x00\x16Ljava/util/Collection;L\x00\adetailst\x00\x12Ljava/lang/Object;xp\x01sr\x00&java.util.Collections$UnmodifiableList\xfc\x0f%1\xb5\xec\x8e\x10\x02\x00\x01L\x00\x04listt\x00\x10Ljava/util/List;xr\x00,java.util.Collections$UnmodifiableCollection\x19B\x00\x80\xcb^\xf7\x1e\x02\x00\x01L\x00\x01cq\x00~\x00\axpsr\x00\x13java.util.ArrayListx\x81\xd2\x1d\x99\xc7a\x9d\x03\x00\x01I\x00\x04sizexp\x00\x00\x00\x02w\x04\x00\x00\x00\x02sr\x00Aorg.springframework.security.oauth2.core.user.OAuth2UserAuthority\x00\x00\x00\x00\x00\x00\x02l\x02\x00\x02L\x00\nattributest\x00\x0fLjava/util/Map;L\x00\tauthorityq\x00~\x00\x04xpsr\x00%java.util.Collections$UnmodifiableMap\xf1\xa5\xa8\xfet\xf5\aB\x02\x00\x01L\x00\x01mq\x00~\x00\x11xpsr\x00\x17java.util.LinkedHashMap4\xc0N\\\x10l\xc0\xfb\x02\x00\x01Z\x00\x0baccessOrderxr\x00\x11java.util.HashMap\x05\a\xda\xc1\xc3\x16`\xd1\x03\x00\x02F\x00\nloadFactorI\x00\tthresholdxp?@\x00\x00\x00\x00\x00\x0cw\b\x00\x00\x00\x10\x00\x00\x00\tt\x00\x06openidt\x00\x1coS1mP6PYpk_AFGB7sNeKgX4U3Cc4t\x00\bnicknamet\x00\x0f\xe6\x9d\xa8\xe6\xb4\x8b.AI\xed\xa0\xbd\xed\xb0\xb3t\x00\x03sexsr\x00\x11java.lang.Integer\x12\xe2\xa0\xa4\xf7\x81\x878\x02\x00\x01I\x00\x05valuexr\x00\x10java.lang.Number\x86\xac\x95\x1d\x0b\x94\xe0\x8b\x02\x00\x00xp\x00\x00\x00\x00t\x00\blanguaget\x00\x00t\x00\x04cityq\x00~\x00!t\x00\bprovinceq\x00~\x00!t\x00\acountryq\x00~\x00!t\x00\nheadimgurlt\x00\x82https://thirdwx.qlogo.cn/mmopen/vi_32/Q0j4TwGTfTJGp0zryiaomEIJC5cRpwBPezkqWBtHOHV2k9pgwuv78ibC7aZlsKZ3P8rgx3aLH5uwc2Fnb3JpTy2A/132t\x00\tprivilegesq\x00~\x00\x0e\x00\x00\x00\x00w\x04\x00\x00\x00\x00xx\x00t\x00\x0bOAUTH2_USERsr\x00Borg.springframework.security.core.authority.SimpleGrantedAuthority\x00\x00\x00\x00\x00\x00\x02l\x02\x00\x01L\x00\x04roleq\x00~\x00\x04xpt\x00\x15SCOPE_snsapi_userinfoxq\x00~\x00\x0fsr\x00Horg.springframework.security.web.authentication.WebAuthenticationDetails\x00\x00\x00\x00\x00\x00\x02l\x02\x00\x02L\x00\rremoteAddressq\x00~\x00\x04L\x00\tsessionIdq\x00~\x00\x04xpt\x00\t127.0.0.1t\x00$21ec4803-3ff5-413d-84cd-1d5ffa27c388t\x00\x06wechatsr\x00?org.springframework.security.oauth2.core.user.DefaultOAuth2User\x00\x00\x00\x00\x00\x00\x02l\x02\x00\x03L\x00\nattributesq\x00~\x00\x11L\x00\x0bauthoritiest\x00\x0fLjava/util/Set;L\x00\x10nameAttributeKeyq\x00~\x00\x04xpsq\x00~\x00\x13sq\x00~\x00\x15?@\x00\x00\x00\x00\x00\x0cw\b\x00\x00\x00\x10\x00\x00\x00\tq\x00~\x00\x18q\x00~\x00\x19q\x00~\x00\x1aq\x00~\x00\x1bq\x00~\x00\x1cq\x00~\x00\x1fq\x00~\x00 q\x00~\x00!q\x00~\x00\"q\x00~\x00!q\x00~\x00#q\x00~\x00!q\x00~\x00$q\x00~\x00!q\x00~\x00%q\x00~\x00&q\x00~\x00'q\x00~\x00(x\x00sr\x00%java.util.Collections$UnmodifiableSet\x80\x1d\x92\xd1\x8f\x9b\x80U\x02\x00\x00xq\x00~\x00\x0csr\x00\x17java.util.LinkedHashSet\xd8l\xd7Z\x95\xdd*\x1e\x02\x00\x00xr\x00\x11java.util.HashSet\xbaD\x85\x95\x96\xb8\xb74\x03\x00\x00xpw\x0c\x00\x00\x00\x10?@\x00\x00\x00\x00\x00\x02q\x00~\x00\x12q\x00~\x00+xt\x00\bnickname"
 9) "lastAccessedTime"
10) "\xac\xed\x00\x05sr\x00\x0ejava.lang.Long;\x8b\xe4\x90\xcc\x8f#\xdf\x02\x00\x01J\x00\x05valuexr\x00\x10java.lang.Number\x86\xac\x95\x1d\x0b\x94\xe0\x8b\x02\x00\x00xp\x00\x00\x01\x90ZS$\xd9"
11) "sessionAttr:SPRING_SECURITY_LAST_EXCEPTION"
12) ""
可以看到,此时Redis一共保存了4个相关的Key,其中Key为“spring:session:sessions:19460f32-2d12-4339-be42-254b641989b4”的Hash表就是用来保存Session对象的,其中“sessionAttr:SPRING_SECURITY_CONTEXT”字段就是SecurityContext对象的序列化信息,这表明已认证的SecurityContext被写入到了Session,并成功地完成了持久化。
三、实现原理
3.1 “狸猫换太子”
Spring Session的实现原理并不复杂,本质上只要想要办法实现一个HttpServletRequest接口,将其中涉及session的方法都使用Redis的操作实现,然后在整个请求的执行过程中,替换默认的HttpServletRequest实例,替换为新实例即可,而在Java中本身就提供一种装饰器模式的实现方案,即HttpServletRequestWrapper,开发者可以通过继承该类以扩展HttpServletRequest的各类操作,Spring Session为此提供了一个SessionRepositoryRequestWrapper作为HttpServletRequestWrapper的子类,它重写了changeSessionId,getSession等多个Session操作的相关方法,下面具体看一下getSession方法的源码
private final class SessionRepositoryRequestWrapper extends HttpServletRequestWrapper {
    ...
    public HttpSessionWrapper getSession(boolean create) {
        HttpSessionWrapper currentSession = getCurrentSession(); // HttpSessionWrapper也是私有内部类,这里其实是从HttpServletRequest的Attribute属性中获取HttpSessionWrapper的实例,相当于利用Request属性中作为缓存
        if (currentSession != null) {
           return currentSession;
        }
        S requestedSession = getRequestedSession(); // 该方法从Cookie中获取到SESSION的值,即sessionId,然后通过SessionRepository查询对应的Session对象,并赋值给SessionRepositoryRequestWrapper对象内的requestedSession,作为缓存
        if (requestedSession != null) {
           if (getAttribute(INVALID_SESSION_ID_ATTR) == null) { // 检查合法标识
              requestedSession.setLastAccessedTime(Instant.now()); // 更新最近访问时间
              this.requestedSessionIdValid = true;
              currentSession = new HttpSessionWrapper(requestedSession, getServletContext());
              currentSession.markNotNew();
              setCurrentSession(currentSession); // 创建一个新的HttpSessionWrapper包装对象,写入到HttpServletRequest的attribute中缓存起来
              return currentSession;
           }
        }
        else {
           if (SESSION_LOGGER.isDebugEnabled()) {
              SESSION_LOGGER.debug(
                    "No session found by id: Caching result for getSession(false) for this HttpServletRequest.");
           }
           setAttribute(INVALID_SESSION_ID_ATTR, "true");
        }
        if (!create) {
           return null;
        }
        ...
        S session = SessionRepositoryFilter.this.sessionRepository.createSession(); // 创建一个新的Session对象
        session.setLastAccessedTime(Instant.now());
        currentSession = new HttpSessionWrapper(session, getServletContext());
        setCurrentSession(currentSession); // 同上
        return currentSession;
    }

    private S getRequestedSession() {
        if (!this.requestedSessionCached) {
           List<String> sessionIds = SessionRepositoryFilter.this.httpSessionIdResolver.resolveSessionIds(this);
           for (String sessionId : sessionIds) {
              if (this.requestedSessionId == null) {
                 this.requestedSessionId = sessionId;
              }
              S session = SessionRepositoryFilter.this.sessionRepository.findById(sessionId);
              if (session != null) {
                 this.requestedSession = session;
                 break;
              }
           }
           this.requestedSessionCached = true;
        }
        return this.requestedSession;
    }
    ...
}
可以看到,这里为Session使用了二级缓存,第一级是在HttpServletRequest的attribute属性,第二级是SessionRepositoryRequestWrapper内的requestedSession成员变量,如果在这两个地方都没有的话,则会使用sessionRepository创建一个新的Session,并更新到第一级缓存中。
再看一下commitSession方法,该方法主要负责将本次请求的session进行持久化,如果将当前session已被失效,例如调用了HttpSession#invalidate方法,那么这里会将Cookie中的SESSION值置为空字符串,如果当前session正常,则通过sessionRepository写入Redis中,同时,如果SESSION的cookie为空,或者sessionId已变更,则需要更新cookie值。
private void commitSession() {
    HttpSessionWrapper wrappedSession = getCurrentSession();
    if (wrappedSession == null) {
       if (isInvalidateClientSession()) {
          SessionRepositoryFilter.this.httpSessionIdResolver.expireSession(this, this.response); // 设置SESSION的Cookie值为""
       }
    }
    else {
       S session = wrappedSession.getSession();
       String requestedSessionId = getRequestedSessionId();
       clearRequestedSessionCache();
       SessionRepositoryFilter.this.sessionRepository.save(session);
       String sessionId = session.getId();
       if (!isRequestedSessionIdValid() || !sessionId.equals(requestedSessionId)) { // isRequestedSessionIdValid 该方法判断从Cookie中是否能取到session,如不能取到,则需要设置Cookie值
          SessionRepositoryFilter.this.httpSessionIdResolver.setSessionId(this, this.response, sessionId);
       }
    }
}
那么有了SessionRepositoryRequestWrapper之后,那么如何实现“狸猫换太子”,替换掉原来默认的HttpServletRequest?其实也很简单,在引入Spring Session之后,会自动注册一个SessionRepositoryFilter的过滤器,它是Spring Session框架提供的一个最重要的Filter,在整个Servlet的FilterChain中的优先级排在第二位,仅次于CharacterEncodingFilter,其核心作用就是使用SessionRepositoryRequestWrapper对HttpServletRequest进行包装,使用SessionRepositoryResponseWrapper对HttpServletResponse进行包装,使得后续所有Session的操作都使用包装类提供的方法,另外它还负责在整个FilterChain退出时执行commitSession方法,将Session写入Redis的逻辑,源码如下
protected void doFilterInternal(HttpServletRequest request, HttpServletResponse response, FilterChain filterChain)
       throws ServletException, IOException {
    request.setAttribute(SESSION_REPOSITORY_ATTR, this.sessionRepository);
    // 构建了两个包装类
    SessionRepositoryRequestWrapper wrappedRequest = new SessionRepositoryRequestWrapper(request, response);
    SessionRepositoryResponseWrapper wrappedResponse = new SessionRepositoryResponseWrapper(wrappedRequest, response);

    try {
       filterChain.doFilter(wrappedRequest, wrappedResponse); // 在filterChain中传递包装类
    }
    finally {
       wrappedRequest.commitSession(); // 写入Session
    }
}
3.2 RedisIndexedSessionRepository的过期策略
上文提到过,在Spring Session框中,SessionRepository主要由两个实现,即RedisSessionRepository和RedisIndexedSessionRepository,其中RedisSessionRepository只提供了通过sessionId查询Session的简单方法,而RedisIndexedSessionRepository实现了按照索引查询Session的方法,例如根据用户名(principal)查询,为此它在Redis中存储了单独的一个Key,即"spring:session:index:org.springframework.session.FindByIndexNameSessionRepository.PRINCIPAL_NAME_INDEX_NAME:{principal}" 。
另外在Session过期的实现方案上,RedisSessionRepository简单依赖Redis的key过期时间,而RedisIndexedSessionRepository则为了确保principal索引的Key可以被删除,实现过程也更加复杂,下面详细介绍一下RedisIndexedSessionRepository的过期策略。
为了理解过期策略的设计动机,首先介绍一下Redis的过期Key清理机制:当一个Key过期时,事实上这个Key并不会直接被清理掉,而是只有该Key被访问时,才会检查是否已过期,如果已过期,则移除该Key,这是一种惰性删除的策略,显然这会导致长期不活跃的Key一直不被清理而占用内存,因此Redis也会执行定期扫描任务,将过期的Key移除,但是这种扫描任务优先级是比较低的,为了控制任务执行的时长,Redis会抽取部分Key检查是否已过期,因此依然有一定概率导致过期的Key没有被删除。
针对上述问题,RedisIndexedSessionRepository设计了一套过期策略来确保每个过期的Session都能够被清理掉,首先在持久化Session对象时,通常会发生以下几条命令:
HMSET spring:session:sessions:{sessionId} <Hash> #value为Hash结构,这是用来存储session对象的,具体结构为:<creationTime, 创建时间>, <maxInactiveInterval, 过期时间>,<lastAccessedTime,最近访问时间>,以及该Session所有的属性名和属性值
SADD spring:session:expirations:{时间戳} <Set> #value为Set结构,其成员为“expires:{sessionId}",表示{时间戳}这个时间点下应该要被删除的{sessionId}
EXPIRE spring:session:expirations:{时间戳} 2100 # 设置Key的过期时间为maxInactiveInterval+5分钟
APPEND spring:session:sessions:expires:{sessionId} "" #value为空字符串,用来标记需要过期的{sessionId}
EXPIRE spring:session:sessions:expires:{sessionId} 1800 #设置Key的过期时间为maxInactiveInterval
EXPIRE spring:session:sessions:{sessionId} 2100  #设置Key的过期时间为maxInactiveInterval+5分钟
其中{时间戳}是经过下列方法计算得到的,其中expiresInMillis方法得到的是该Session最近访问时间加上maxInactiveInterval(最大非活跃间隔),也就是该Session实际应该过期的时间点,而roundUpToNextMinute方法则将时间点对齐到下一分钟的整点
long toExpire = roundUpToNextMinute(expiresInMillis(session));

static long expiresInMillis(Session session) {
    int maxInactiveInSeconds = (int) session.getMaxInactiveInterval().getSeconds();
    long lastAccessedTimeInMillis = session.getLastAccessedTime().toEpochMilli();
    return lastAccessedTimeInMillis + TimeUnit.SECONDS.toMillis(maxInactiveInSeconds);
}

static long roundUpToNextMinute(long timeInMs) {
    Calendar date = Calendar.getInstance();
    date.setTimeInMillis(timeInMs);
    date.add(Calendar.MINUTE, 1);
    date.clear(Calendar.SECOND);
    date.clear(Calendar.MILLISECOND);
    return date.getTimeInMillis();
}
之所以要记录额外的Key,并对时间戳进行取整处理,是跟RedisIndexedSessionRepository中维护的清理过期Session的定时任务,以及Redis的keyspace notifications键空间通知机制有关。
先来看一下清理过期Session的定时任务,该任务每分钟执行一次,源码如下:
void cleanExpiredSessions() {
    long now = System.currentTimeMillis();
    long prevMin = roundDownMinute(now);

    if (logger.isDebugEnabled()) {
       logger.debug("Cleaning up sessions expiring at " + new Date(prevMin));
    }

    String expirationKey = getExpirationKey(prevMin);
    Set<Object> sessionsToExpire = this.redis.boundSetOps(expirationKey).members();
    this.redis.delete(expirationKey); // 删除本身
    for (Object session : sessionsToExpire) {
       String sessionKey = getSessionKey((String) session);
       touch(sessionKey); //触发惰性删除
    }
}
任务开始时取当前分钟整数值,然后查询spring:session:expirations:{时间戳}这个key对应集合的所有成员,即expire:{sessionId},如果存在,则调用touch方法执行Redis的EXISTS命令,这个命令就触发上面所介绍Redis惰性删除的操作。以确保所有过期的expire:{sessionId}会被清理掉。
当Key被清理时,Redis的keyspace notifications都会发布一个SessionDeletedEvent或SessionExpiredEvent的事件,此时在RedisIndexedSessionRepository的onMessage方法就会接受到这个事件的消息,并执行相关操作,包括清理掉Principal索引的Key,源码如下
@Override
public void onMessage(Message message, byte[] pattern) {
byte[] messageChannel = message.getChannel();
if (ByteUtils.startsWith(messageChannel, this.sessionCreatedChannelPrefixBytes)) {
...
}
byte[] messageBody = message.getBody();
if (!ByteUtils.startsWith(messageBody, this.expiredKeyPrefixBytes)) { // 即expires:{sessionId}
return;
}
boolean isDeleted = Arrays.equals(messageChannel, this.sessionDeletedChannelBytes);
if (isDeleted || Arrays.equals(messageChannel, this.sessionExpiredChannelBytes)) {
String body = new String(messageBody);
int beginIndex = body.lastIndexOf(":") + 1;
int endIndex = body.length();
String sessionId = body.substring(beginIndex, endIndex); // 截取出sessionId的值
RedisSession session = getSession(sessionId, true);
// true表示允许返回已过期的session对象
// 由于session的过期时间为maxInactiveInterval
// 而对应的spring:session:sessions:{sessionId}的过期时间是maxInactiveInterval+5分钟,因此这里得到的session一般就是已过期的
...
cleanupPrincipalIndex(session); // 清理Principal index的Key,确保后续不会被查询到
...
}
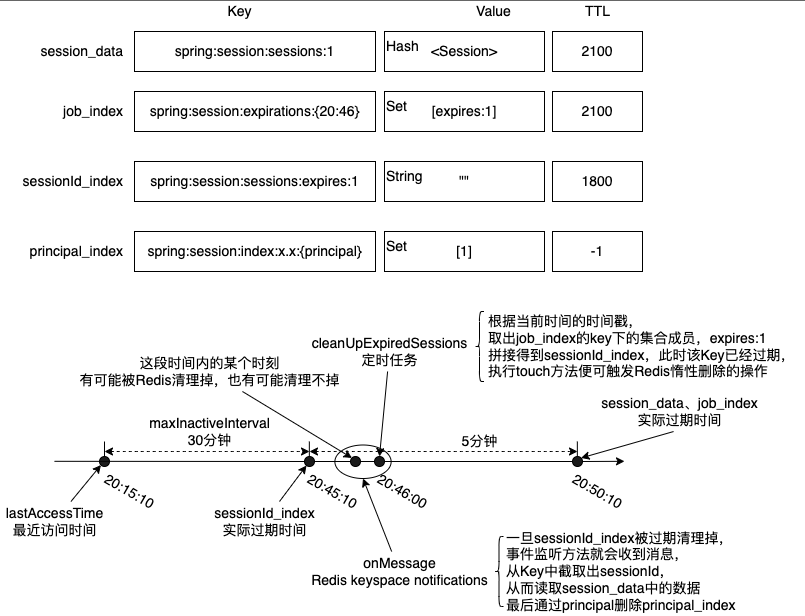
}下面举一个例子,假设当前有一个session对象,其sessionId为1,设置的maxInactiveInterval为30分钟,最近一次访问时间为20点15分10秒,那么时间戳的计算逻辑为20点15分10秒+30分钟=20点45分10秒,此为session实际应该过期的时间点,然后向上取分钟整数,即20点46分00秒,作为时间戳,因此它保存在Redis时,会创建以下几个Key:
spring:session:sessions:1 [session] # TTL为35分钟(maxInactiveInterval+5分钟),即20点50分10秒过期 spring:session:expirations:{20点46分00秒} [expires:1]# 同上,同样也是20点50分10秒过期 spring:session:sessions:expires:1 "" # TTL为30分钟(maxInactiveInterval)
为了下文方便说明,我们这里做一些简单的定义:
- spring:session:sessions:1命名为session_data,表示这个Key存储的session数据
- spring:session:expirations:{20点46分00秒}命名为job_index,表示这个Key是服务于RedisIndexedSessionRepository中的定时任务
- spring:session:sessions:expires:1命名为sessionId_index,表示这个Key是用来索引需要过期的sessionId
- spring:session:index:org.springframework.session.FindByIndexNameSessionRepository.PRINCIPAL_NAME_INDEX_NAME:{principal}"命名为principal_index,表示可以通过principal查询到sessionId
参考下图(限于排版,忽略时间轴的比例问题),其实有2种情况会触发Key的清理,第一种情况是,在晚于20点45分10秒,早于20点46分00秒之间的某一个时刻,Redis后台扫描发现了sessionId_index已经过期了,那么直接进行清理,第二种情况是Redis并没有在后台扫描发现这个过期的Key,那么在20分46分00秒时,RedisIndexedSessionRepository的定时任务开始执行,job_index对应的集合中的成员"expires:1"就会被取出,然后通过它就可以拼接出sessionId_index的Key,并对其执行touch方法触发Redis惰性删除操作(同时也会直接删除job_index),不论哪种情况,sessionId_index,即"spring:session:sessions:expires:1"都会被清理,这样一来通过订阅keyspace notifications的事件,就能够确保principal_index总是能够被删除掉。
而至于RedisIndexedSessionRepository#findById方法,该方法在取出Session便会检查是否过期,因此可以保证不会返回已过期的Session对象
@Override
public RedisSession findById(String id) {
    return getSession(id, false);
}

private RedisSession getSession(String id, boolean allowExpired) {
    Map<String, Object> entries = getSessionBoundHashOperations(id).entries();
    if ((entries == null) || entries.isEmpty()) {
       return null;
    }
    MapSession loaded = this.redisSessionMapper.apply(id, entries);
    if (loaded == null || (!allowExpired && loaded.isExpired())) { // 当allowExpired=false时,会检查Session对象本身是否过期,即比较当前时间减去maxInactiveInterval是否大于最近访问时间
       return null;
    }
    RedisSession result = new RedisSession(loaded, false);
    result.originalLastAccessTime = loaded.getLastAccessedTime();
    return result;
}
四、总结
本文主要介绍了如何在Spring Boot项目中引入Spring Session框架,并与Spring Security进行整合,整体来看,Spring Session框架还是比较好上手的,仅需要一些简单的配置即可实现分布式Session的共享方案。而第三节重点介绍了Spring Session实现原理,包括SessionRepositoryRequestWrapper和SessionRepositoryFilter的工作机制,首先通过SessionRepositoryRequestWrapper将HttpServletRequest中与session操作相关的方法全部重写,然后向Servlet FilterChain注册一个SessionRepositoryFilter,将HttpServletRequest实例包装起来,并在FilterChain中传递,从而保障后续所有的session操作都由SessionRepositoryRequestWrapper实现。
另外还着重介绍了RedisIndexedRespository的过期策略,为了弥补Redis无法保障Key过期后及时被清理的问题,Spring Session设计了3种不同作用的Key,可以结合上述举例,理解这些Key所起到的作用,这个设计也为我们在处理Key过期清理的方案上提供了很好的参考。
原创声明:本文系作者授权腾讯云开发者社区发表,未经许可,不得转载。
如有侵权,请联系 cloudcommunity@tencent.com 删除。
原创声明:本文系作者授权腾讯云开发者社区发表,未经许可,不得转载。
如有侵权,请联系 cloudcommunity@tencent.com 删除。
评论
登录后参与评论
推荐阅读
目录
腾讯云开发者

Copyright © 2013 - 2026 Tencent Cloud. All Rights Reserved. 腾讯云 版权所有
深圳市腾讯计算机系统有限公司 ICP备案/许可证号:粤B2-20090059 ![]() 粤公网安备44030502008569号
粤公网安备44030502008569号
腾讯云计算(北京)有限责任公司 京ICP证150476号 | 京ICP备11018762号